Feb 28

284 comments

{Video} Royal Icing Consistency Made Easy – The 10 Second Rule

Share it!   

I’ve been decorating cookies for approximately 8 years now, and I still remember how frustrating some of my first cookie decorating experiences were.

I couldn’t get my cookies to look as nice as I wanted them to; the icing was either too thick and dry, or too runny and hard to control.  The designs didn’t look as neat and pretty as I had hoped.

Well, after poring over every cookie decorating book I could find, taking a cookie decorating class at the Bonnie Gordon College of Confectionary Arts, and after much experimentation and practice, I (eventually) found tried and true tricks and tips to make the cookie decorating experience easier.

Today, besides showing you how I made this charming wintry fella, I’m going to be showing you one of my absolute favorite keys to cookie decorating success – a necessary basic: How to figure out the right royal icing consistency.

For those of you who like video, here’s a demonstration of how to find the consistency – The 10 Second Rule:

Click HERE if you can’t see the video.

*

For those of you who like written break-downs:

*

Royal Icing Consistency

To test consistency, you’ll need a butter knife and your royal icing.

I’ll be showing you how to make the icing in another video; for now you can find the recipe here in my cookie decorating tutorial.

*

The 10 Second Rule

To check the consistency, all you need to do is drag the tip of a butter knife through the surface of your icing, letting the knife go approximately an inch deep, and slowly count to 10.

If the surface of the icing smoothes over in approximately 10 seconds then your icing is ready to use.  If it takes longer, the icing is too thick.  Slowly add more water.

If your icing surface smoothes over in less than 5-10 seconds, it is too runny.  Mix your icing longer or slowly add more sifted icing sugar to thicken it.

You don’t want the icing to be too thick so that it doesn’t flood, or too thin so that it’s too runny and hard to control.

I should mention that this is what works for me; my preference is that the surface of the icing smoothes over at about the 10 second mark.  I like it at this consistency (a bit thick), because the icing holds its shape and doesn’t run too quickly out of the piping bag.

With this thicker icing I can outline and fill in right away; you just have to shake the cookie a bit to help the icing settle.  You can see how I do it in this video on marbling royal icing HERE.

If the icing is runnier, you don’t have to shake the cookie because the icing flows easier.  I used to do it this way, (prepare two consistencies of icing; one for outlining, and one for filling in).  Again, flooding is definitely easier, but I prefer not to have to set up two icings.

{In the video, I normally don’t use a runnier icing like the green example; I was demonstrating the difference between an icing that smoothes over in 5 seconds, and an icing that smoothes over in 10 seconds}.

For an example of icing which is a bit too runny for piping details, take a look at the swags of this birthday cake cookie I made when I first began decorating.  The lines were harder to control when I piped the icing.

What I’ve shown you today may seem like such a simple thing, but it made a huge difference in my own cookie decorating.  It can really help alleviate frustration and improve the overall look of the cookie.


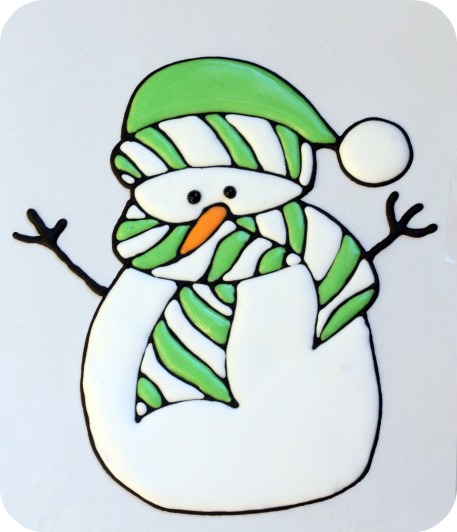
Now a little bit about Frosty the Snowman:

This little guy isn’t a cookie; he’s made just of royal icing.

Royal icing decorations, also known as runouts, flood work, transfers, color flow (by Wilton), or run sugar, are basically the piping of a runny royal icing onto parchment paper or acetate paper (sometimes into an outlined shape).

When the shape dries, you have an icing design which you can use for a multitude of decorating purposes; on cakes, cookies, gingerbread houses, cupcakes etc.

In this case I needed him for an 8″ round cake.  As soon as I saw him on these adorable mugs (bought at the end of last winter at Canadian Tire), I knew I wanted to make an edible version of him.

I actually made the first runout of him before Christmas and have been meaning to get to this post since!  Just managed to squeeze him in before spring.  ;-)

*

How to Make Royal Icing Runouts/Floodwork

If you’d like to try making royal icing runouts, you’ll need:

  • Royal Icing Recipe
  • Icing Gel Colors
  • Acetate Paper or Parchment Paper
  • Shortening
  • Piping Tip (I generally use tip #2)
  • Piping Bag
  • Coupler

Basic Steps:

  1. Shortening on acetate paper or parchment paper
  2. Pipe design by tracing or using KopyKake projector (Can do outline first and let dry)
  3. Fill or flood design
  4. Let dry for a minimum of 24 hours
  5. Gently peel off backing
  6. Attach with more royal icing

For detailed steps on making runouts click HEREHERE or HERE.

*

Getting icing consistency right is really one of the major keys to making your cookie decorating experience a fun one.  Once you’ve got a good icing basis everything else becomes easier.

If you enjoyed today’s tips please leave me a comment below and let me know what you thought or if you have any questions.

xo,

Marian


p.s. In the last video on Marbling Royal Icing I asked what you’d like to see in the next video.  Thank you for your comments!

*

p.s.s. Please let me know in the comment section below on facebook or twitter, what you’d like to see in the next video.  Happy decorating!

p.s.s.s. I linked up to LilaLola’s fun Snowman Celebration!

Related Content

284 Comments

  1. March 14, 2012 at 10:23 pm | Permalink
    201

    This tutorial has been really helpfull, thanks so much Marian!, i’ve tried the last christmas, doing some cookies with the “transfers” it i guess i have a great result.

  2. March 15, 2012 at 5:45 pm | Permalink
    202

    Please please remove the suggestion about using parchment paper. I have had horrible results 2x with parchment paper – it wrinkles on me. Maybe the brand i’m using is thin. It’s the wax paper I love to use.
    :)

  3. March 15, 2012 at 6:33 pm | Permalink
    203

    Thank you @ Suzanne: Thank you for your comment; I’m sorry it didn’t work for you. Elsewhere on the blog someone left a comment saying wax paper didn’t work for them. I don’t suggest wax paper as I’ve never tried it and have had success with parchment paper. Maybe as you said, it was the brand – would you share what kind it was please?

  4. March 20, 2012 at 3:09 pm | Permalink
    204

    Can I just say thank you, thank you, thank you! I have (and am) learning so much from your tutorials. I am a self-taught baker, decorator with a lot to learn but I am so appreciative of people like you that take their time to really teach the art of your craft.

  5. March 22, 2012 at 1:56 pm | Permalink
    205

    Thank you for the helpful tips

  6. March 27, 2012 at 2:15 pm | Permalink
    206

    @ Marian (Sweetopia):
    It did not work with reynolds parchment or with my pre-cut parchment sheets I get at the baking supply store.

    I had GREAT results with Reynolds wax paper.

  7. Andrea
    April 13, 2012 at 12:47 pm | Permalink
    207

    Great video tutorial. Really helpful.

  8. Kylie
    April 16, 2012 at 5:02 am | Permalink
    208

    Hi just wondering could you use baking paper instead of the transparent paper for the icing transfer

  9. marian
    April 16, 2012 at 8:15 pm | Permalink
    209

    Hi @ Kylie: I’ve used parchment paper with success, however, read the last 20 comments – you’ll see some other opinions about baking paper brands etc.

    Thanks everyone for your lovely comments!

  10. April 19, 2012 at 10:57 pm | Permalink
    210

    Just happen across your page and just finished viewing your tutorial, wanted to add my thank you too for sharing.

  11. marian
    April 19, 2012 at 11:25 pm | Permalink
    211

    Thank you, @ Debra Johnson! I appreciate it!

  12. Molly
    April 22, 2012 at 11:44 am | Permalink
    212

    Hi, I’ve been wondering this for a while, but what is the texture of royal icing supposed to be like when it’s dry? I love how it looks, but i want my icing to be somewhat soft when people eat them.

  13. marian
    April 22, 2012 at 11:52 am | Permalink
    213

    Hi @ Molly: I write about royal icing (all you need to know) in this post here: http://sweetopia.net/2011/01/how-do-you-store-royal-icing-and-how-long-can-you-keep-it/
    There’s a blurb on taste near the bottom if you’d like to check it out.
    xo

  14. Reine
    May 16, 2012 at 1:29 pm | Permalink
    214

    Hi Marian,
    Thanks for this great tutorial about the consistency. I just want to know do you get this consistency after mixing all the ingredients for 10 minutes? or do you add water and you mix till you get this consistency? I’ve been having hard time with this. Every time i fill the piping bags after just piping, the pipe clogs and it’s driving me crazy.

    I would really appreciate your help with this.

  15. marian
    May 22, 2012 at 8:06 pm | Permalink
    215

    Hi @ Reine: Absolutely! I mix for 10 minutes, and it makes the icing quite thick. Seems silly, but then I water it down. Somehow the texture for decorating seems better that way.
    Hope that helps!
    xo
    p.s. There’s a tutorial on preventing tips from clogging if you’d like to check it out.

  16. July 19, 2012 at 11:52 am | Permalink
    216

    Hello Marian!!! thanks for share all this things….. How can I transfer any draw to my cookie if I don´y have a projector??? Could you help me??? Thanks and have a good day!!

  17. July 19, 2012 at 1:00 pm | Permalink
    217

    HI @ Mariné: Yes, there are options. You can read them near the bottom of this tutorial: http://sweetopia.net/2010/06/decorating-cookies-with-a-kopykake-projector/
    xo

  18. Valérie
    September 19, 2012 at 4:23 am | Permalink
    218

    Thanks for this great tutorial, Marian ! I haven’t decorated cookies yet but am planning to and your tutorial will guide me !

  19. Astra
    September 28, 2012 at 6:32 pm | Permalink
    219

    Hi Marian, could you give an estimate as to how much water I need to add to reach flooding consistency/10 sec per batch of royal icing (i.e. using 1kg of icing sugar). Also, how much water do I add at a time to avoid thinning it too much? Thank you.

  20. marian
    October 2, 2012 at 7:03 pm | Permalink
    220

    Super, @ Valérie, have fun!

    @ Astra: This is going to sound crazy (possibly), but it does depend on the environment you’re working on. I find during the humid summers I need to add less water than in the dry winters. *On average*, though, I need to add at least 3/4 of a cup of water more. Hope that helps!

  21. Donna
    October 10, 2012 at 6:23 am | Permalink
    221

    Thanks so much, I am off to pipe a web on a spiderman cake as we speak!

  22. Heather
    October 30, 2012 at 1:14 pm | Permalink
    222

    This is something that I’ve always struggled with – is my icing the right consistency! Thank you so much for giving me a way to check it before I actually put it into the bag and start using it, only to discover it’s too thin/thick.

  23. Christi
    November 18, 2012 at 5:54 pm | Permalink
    223

    I love your videos! I love, love, love to bake (especially around the holidays) and give goodies away as gifts to friends and coworkers. However, I have always steered clear of sugar cookies for two reasons…(1) I am no good at rolling out the cookie dough and working with cookie cutters and (2) I have been so easily defeated by the lack of skill I have to decorate sugar cookies.
    After watching your videos on decorating and poking around your site, I am going to give this another try!
    Thanks for sharing your expertise!

  24. November 18, 2012 at 5:59 pm | Permalink
    224

    Hope you had fun, @ Donna!

    My pleasure, @ Heather. :)

    That’s great to hear, @ Christi! If you have any troubles while you’re doing it, send me a message here or on any social media avenues you’re on, and I’ll help as soon as I can. Have fun!

  25. Pam
    November 19, 2012 at 12:18 am | Permalink
    225

    Thanks for the tips!! I cant wait to start decorating cookies. :0)

  26. Cathy
    December 3, 2012 at 10:17 am | Permalink
    226

    I’m getting ready to decorate Christmas cookies, and I’m using your guidelines. I’ve been decorating cookies for years, but they never come out quite as good as I’d like. Thanks for your help!

  27. December 4, 2012 at 7:05 pm | Permalink
    227

    Marian,
    you are truly amazing! Your cookies, cakes etc are GLORIOUS and made meticulously with such love. I am going to try your icing this Christmas and the shortbread recipe too! I will share pictures on my blog hopefully after the weekend. I am sure they will not be as wonderous as your, but they should be better than past years! :)
    Thanks for the tips, and examples and video! Awesome!!!!!!
    Cookie hugs,
    Patti

  28. marian
    December 7, 2012 at 11:03 pm | Permalink
    228

    @ Pam, @ Cathy, @ Patti Gramza: Thank you all for your kind comments! I hope you have fun decorating! xo

  29. Alicia
    December 8, 2012 at 6:55 am | Permalink
    229

    Thank-you for your help, very helpful. If only my cake decorating tutor make it this clear!

  30. liz morgan
    December 17, 2012 at 12:56 pm | Permalink
    230

    How long will this icing last in covered containers in the fridge.

  31. Theresa Moss
    December 17, 2012 at 7:42 pm | Permalink
    231

    Great video. It was very helpful. I always had a hard time with consistency of
    my cookie icing! Thanks

  32. marian
    December 17, 2012 at 11:06 pm | Permalink
    232

    My pleasure, @ Alicia and @ Theresa Moss

    @ liz morgan: Here is a post for you:
    http://sweetopia.net/2011/01/how-do-you-store-royal-icing-and-how-long-can-you-keep-it/

  33. Gina
    December 18, 2012 at 12:33 am | Permalink
    233

    Hi! I’ve read your royal icing recipe and was wondering if you mix your icing to form stiff peaks or not? I have been experimenting with different techniques. What I’ve found is that if the icing forms stiff peaks and you work to the correct consistencies you need from there, the icing is easier to work with, but dries rock hard. If you don’t let it get to the point of stiff peaks, it’s harder to control but you won’t crack a tooth on it. I should add that I’ve never added the cream of tartar before.

  34. December 29, 2012 at 2:00 pm | Permalink
    234

    Hi! Thank you for you wonderful tutorial! All your information has helped us tremendously in our cookie adventure! I do have a question. What type of Projection machine do you have? I googled and found small ones that are for children. Thank you again!

  35. marian
    December 29, 2012 at 2:35 pm | Permalink
    235

    Hi @ Gina: Thanks! Here is a video on how i make my royal icing (for gingerbread houses, but i mention cookie decorating icing in the video); http://sweetopia.net/2011/12/gingerbread-house-royal-icing-video-kitchenaid-7-quart-mixer-giveaway/

    @ Cristi: Absolutely, here is a post for you; http://sweetopia.net/2010/06/decorating-cookies-with-a-kopykake-projector/

  36. tabassom
    February 3, 2013 at 7:10 am | Permalink
    236

    That was great! I learned a lot of things through your post. Thank you so much!

  37. Linda DuCote
    February 11, 2013 at 3:36 pm | Permalink
    237

    I really enjoy your tutorials and as a newbie, I’m really learning a lot. However, I still have RI consistency issues; going by “seconds”, what’s a good consistency for piping? Outlining is working pretty well for me using 10sec icing, but if I want to pipe designs like lace or filigree on top of icing, I’m not getting that so well. Any suggestions will be most helpful, and thanks!

  38. marian
    February 12, 2013 at 1:51 pm | Permalink
    238

    My pleasure, @ tabassom, thanks for your kind comment.

    HI @ Linda DuCote: Besides using my favorite piping tips (PME. *You can see all my favorite tools in one of my videos if you like), and using small sizes, like 00, 1 or 1.5, you can do a 15 second icing if you want finer detail. Hope that helps!

  39. Maria in NJ
    February 12, 2013 at 7:06 pm | Permalink
    239

    Marion do you ever use any corn syrup in your icing? How will that effect the consistency and why do I feel like I need to add it??? I am doing a crown shaped cookie and need to do the Union Jack flag on it…any help will be gladly be accepted, I am thinking that the easiest way for a newbie like me is to just do them white and use the edible markers to do the stripes???

  40. marian
    February 20, 2013 at 7:50 am | Permalink
    240

    Hi @ Maria in NJ: I have tried it, and wrote about it at the bottom of this post here;
    http://sweetopia.net/2011/11/gluten-free-coconut-cupcakes-with-coconut-frosting-shiny-royal-icing/
    Your idea for the Union Jack flag sounds good. Another option is an edible ink image.
    Happy decorating!

  41. Joy
    March 16, 2013 at 8:48 pm | Permalink
    241

    I haven’t used the royal icing method on cookies or used the “color flow” method to transfer an image to a cake in years. I thought I’d check out your method to see if things have changed. Your video was clear and concise. Thank you so much for sharing. Tomorrow, I will make an attempt to try the transfer method. I will be making some Easter cookies over next weekend. Hope they come out 1/2 as nice as yours!

  42. Diana
    April 12, 2013 at 1:47 pm | Permalink
    242

    Hi this was very helpful I’m just wondering how do you transfer the decoration? Thank you!!!

  43. preciosa miranda
    April 12, 2013 at 3:42 pm | Permalink
    243

    @ Ariana:

    thank you for share the recipes and tricks !!

  44. marian
    April 13, 2013 at 11:22 am | Permalink
    244

    Hope they went well @ Joy!

    Hi @ Diana: I try and peel the transfer away from the transparency paper… Use the edge of the table to help peel them away. Here is a photo… #9. http://sweetopia.net/2011/01/valentines-love-cupcakes/

    They are very fragile so I usually make extra ones. Hope that helps!

    @ preciosa miranda: Thank you!

  45. Jenny
    April 29, 2013 at 3:37 am | Permalink
    245

    Thank you so much for the tip. I’m all new at this and trying to have the perfect consistency of the icing was a nightmare. Now with the 10 sec rules…it’s much easier. Thank you!

Show Pingbacks & Trackbacks

  1. By Summer preview « grey*salt on March 24, 2011 at 9:19 pm

    [...] the outline has set, thin out the icing using the ten second rule and begin your floodwork.  Use the toothpick to pull the icing where you want it to go.  I also [...]

  2. [...] Outline and flood the cookie right away. Shake gently if you need to help the icing settle. Icing consistency is imporant; if you’d like more detail please see here. [...]

  3. [...] Outline and flood the cookie right away. Shake gently if you need to help the icing settle. Icing consistency is imporant; if you’d like more detail please see here. [...]

  4. By {Video} How to Make Cookie Pops | Sweetopia on May 16, 2011 at 5:33 am

    [...] {Video} Royal Icing Consistency Made… [...]

  5. [...] Y me explico: si usamos una boquilla del 2 para perfilar la galleta con glasa de consistencia “regla de los 10 segundos”, vemos que cae tan despacio que podemos  manejarla como si fuera la cuerda de una cometa ¿verdad? [...]

  6. [...] Baby Blue) mit mittlerer bis flüssiger Konsistenz (d.h. der Guss zerläuft nicht sofort, hier gibt es ein tolles Tutorial zu genau dieser Konsistenz, allerdings auf Englisch, dafür aber mit [...]

  7. [...] A quick note about royal icing – if you’d like more information on how to store it, how long it lasts etc., please click here and for a video on find royal icing consistency for decorating cookies, please click here. [...]

  8. [...] One of the most important tips has to do with the consistency of your royal icing. Too thick and your lines might curl, crumble and break. Too thin, and they’ll look like a soupy mess. I use the 10 Second Rule to help me find the right consistency for piping. You can find a post and video on the 10 second rule by clicking here. [...]

  9. [...] or “flooding” the inside of your piping.  What finally helped me with that is this video from Sweetopia.  In the video, she teaches you about the “10-second rule and the 5-second [...]

  10. [...] And then you thin it with water, and it dribbles like this. Sweetopia has a whole 10-second rule. She’ll tell you. [...]

  11. [...] need some guidance, a good place to start is with my Cookie Decorating Tutorial, and two videos on Icing Consistency and How to Pipe Icing [...]

  12. By Royal Icing Recipe | Sweetopia on January 8, 2012 at 11:27 am

    [...] For instructions on finding icing consistency for cookie decorating, click here. [...]

  13. [...] some more guidance, a good place to start is with my Cookie Decorating Tutorial, and two videos on Icing Consistency and How to Pipe Icing [...]

  14. By Cookie Lingo on February 9, 2012 at 8:40 pm

    [...] and the more appropriate it is as a piping icing rather than a flood icing. Sweetopia has a great video on [...]

  15. [...] more guidance, a good place to start is with this Cookie Decorating Tutorial, and two videos on Icing Consistency and How to Pipe Icing Lines. For a tutorial on how to make gumpaste or fondant leaves, click [...]

  16. [...] more guidance, a good place to start is with this Cookie Decorating Tutorial, and two videos on Icing Consistency and How to Pipe Icing Lines. For a tutorial on how to make gumpaste or fondant leaves, click [...]

  17. By Happy Valentine’s Day! « oh my omiyage on February 14, 2012 at 5:37 am

    [...] to cookie decorating, then she has tutorials for the basics too like how to fill a piping bag, how to get the right icing consistency, and how to store your icing.  Happy Valentine’s Day, all! Share this:Like this:LikeBe the [...]

  18. [...] How do you figure out the best icing consistency for decorating? Here is a video which demonstrates an easy way of finding a good royal icing consistency for cookie [...]

  19. By Centennial Cookies on March 3, 2012 at 11:01 pm

    [...] Arizona shaped Cookie cutter: ABC Cake Decorating SupplyStar Candy: Sweeties in ChandlerRoyal Icing Recipe: The Decorated CookieHere is a video tutorial I used to help me get the right icing consistency: Sweetopia [...]

  20. By The Lorax Decorated Cookies | Sweetopia on March 4, 2012 at 10:36 am

    [...] more guidance, a good place to start is with this Cookie Decorating Tutorial, and two videos on Icing Consistency and How to Pipe Icing [...]

  21. By Secrets of a Cookie Decorator | Sweetopia on March 5, 2012 at 5:53 am

    [...] Figuring out icing consistency made the biggest difference in improving my cookie [...]

  22. By Centennial Cookies - East Valley Mom Guide on March 5, 2012 at 3:41 pm

    [...] Arizona shaped Cookie cutter: ABC Cake Decorating SupplyStar Candy: Sweeties in ChandlerRoyal Icing Recipe: The Decorated CookieHere is a video tutorial I used to help me get the right icing consistency: Sweetopia [...]

  23. By Royal Icing Consistency on March 11, 2012 at 7:39 pm

    [...] the way my friend LulaLoa likes her icing.Here is the way my friend SweetSugarBelle likes her icing.Here  is the way my friend Sweetopia likes her icing.Happy Creating, { 14 comments… read them [...]

  24. By Sweet Little Lamb Cookies on March 14, 2012 at 2:03 am

    [...] to outline and flood right away when I’m looking for a smooth layer, (you can see a video on how I do it here, if you like), but today I’m also looking for a thicker texture to simulate the lambs [...]

  25. [...] 10 second icing (great tutorial here from Sweetopia) and a #3 tip, I piped dots along all 4 edges [...]

  26. By Learning about Icing Consistency on March 17, 2012 at 12:29 am

    [...] many names.  It really boils down to personal preference and how fast you count.  Marian calls it 10-second icing,  Georgeanne prefers 12-second icing, Lisa does the 15-second version.  If you want to get [...]

  27. [...] more guidance, a good place to start is with this Cookie Decorating Tutorial and two videos on Icing Consistency and Flooding [...]

  28. By Decorated Hunger Games Cookies on April 18, 2012 at 9:59 am

    [...] easily and creates a perfectly smooth surface.  Again, I turned to Sweetopia for a tutorial on getting correct icing consistency.  Marian actually uses a technique that allows her to use the same consistency icing for both the [...]

  29. [...] decorating cookies, icing consistency is key. For a video on how I find the right consistency, click here. For a more detailed tutorial on how to decorate cookies, click [...]

  30. [...] need white icing in 2 different consistencies for this cookie. For the face and legs, the usual flood icing, and for the lamb's wool, a thicker icing. When you dip a spoon into the icing and pull [...]

  31. By St. Patrick's Day Decorated Cookies | Sweetopia on July 27, 2012 at 12:18 pm

    [...] a good place to start is with this Cookie Decorating Tutorial, and two videos on Icing Consistency and How to Pipe Icing [...]

  32. By Baby Shower Cookie Favors | Sweetopia on August 21, 2012 at 5:59 pm

    [...] can find my favorite royal icing recipe here. The consistency of icing is key for easy decorating. Click here to see a YouTube video on finding the right icing thickness for cookie [...]

  33. By Sweet Bakes Of Mine on September 5, 2012 at 10:24 pm

    [...] Once the cookies have cooled off, it’s time to outline the sugar cookie with Royal Icing.  For the Royal Icing recipe I used Marian’s recipe from Sweetopia!  She has a easy fun free picture illustrating how to make her recipe! Since it was my 1st time making such a huge batch it took quite a few drops of water to make it right.  I was trying to do the 10 second rule.  If you don’t know what the 10 second rule in Royal Icing is, I suggest you see Marian’s YouTube Video explaining it! You can also read on her post here. [...]

  34. [...] icing a little runnier so you don't have to shake the cookie as much (5 second rule – See here for the video), and so the icing runs into tight areas easier.  Be aware that runnier icing [...]

  35. By Make your homely cookies sexy « Kitchen Submission on October 2, 2012 at 10:40 pm

    [...] having trouble determining your royal icing thickness, don’t throw a hissy fit, check out Sweetopia’s video and written explanation. She also has some other great tutorials since she is super talented. Check them [...]

  36. By Galetes de mantega temàtiques | La vie en dolç on November 14, 2012 at 4:37 am

    [...] la clara d’ou amb el sucre durant una estona. Ha de quedar una mescla blanca i brillant. Un truc del fantàstic bloc Sweetopia (que recomano molt per aprendre a decorar galetes) per saber si heu [...]

  37. By How to Make a Cardinal Cookie | Sweetopia on December 13, 2012 at 9:21 pm

    [...] favorite royal icing recipe here. Click here to see a YouTube video on finding the right icing thickness for cookie [...]

  38. By {How-To Feature} Simple Valentine’s Day Cookies on February 4, 2013 at 9:06 am

    [...] royal icing, 15-20 second consistency (here is a great starter icing recipe and here is a video on icing [...]

  39. [...] If you’ve never used Royal Icing before, the best tutorial I have ever seen is posted by  Sweetopia and I generally follow her guidelines.  (Her blog is a wonderland and worth a trip!) I used the [...]

Leave a Reply

XHTML: The following tags may be used: <a href="" title=""> <abbr title=""> <acronym title=""> <b> <blockquote cite=""> <cite> <code> <del datetime=""> <em> <i> <q cite=""> <strike> <strong>

Something
     Sweet

50+ Secrets of a Cookie Decorator

50+ Secrets of a Cookie Deco…

144 Comments | Posted March 5th 2012

Privacy | Hosting by Media Temple | © Copyright 2009-2013, Sweetopia. All Rights Reserved.