Merry cookie decorating, sweet friends! It’s almost Christmas time and I couldn’t resist getting one more big batch in. These guys were so fun to decorate, with fairly straightforward designs and fun, bright colors.
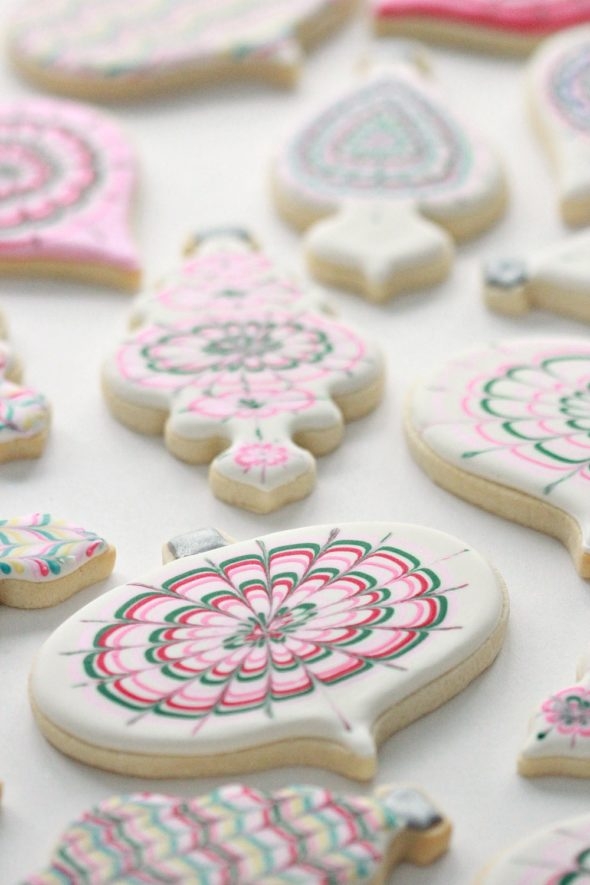
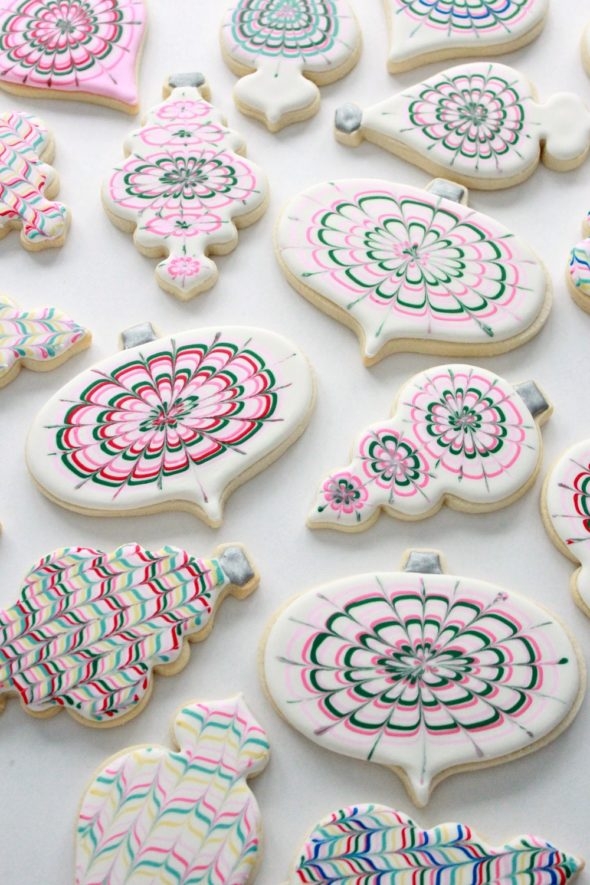
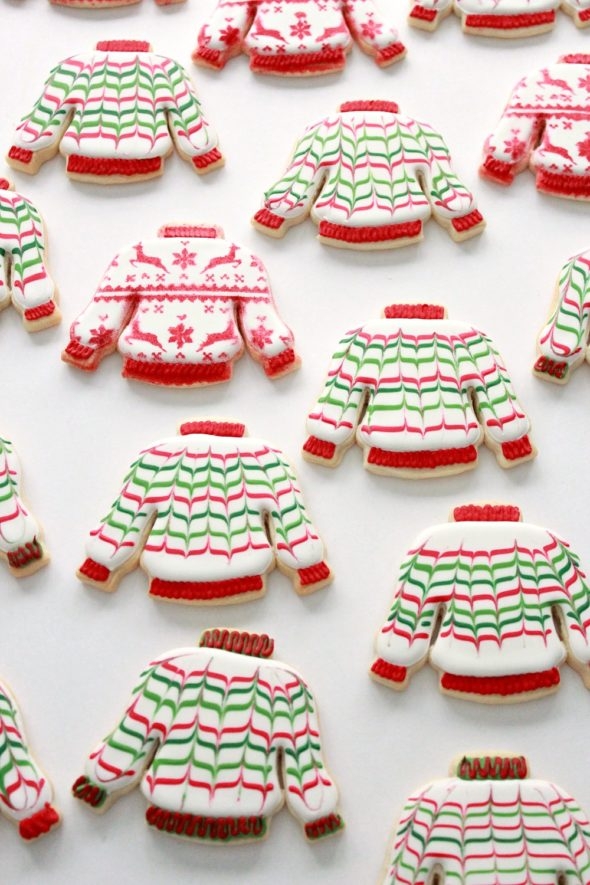
The most enjoyable part, for me, was the marbling… you’ll see below that I went a little cookie crazy with it! I’ll share basic cookie decorating how-to’s and similar videos related to the designs here, but if you’d like more info. on any of the cookies you see, please check out my Digital Download Tutorial HERE.
Because even the simplest designs can be frustrating if you’re not familiar with some royal icing tips and tricks, I thought I’d spend some time on things I’ve learned which have helped me over the years. I still have much to learn (especially with craters, more on that later), but can share what I know with you.
First off, the cookie decorating basics and then onto the tips below.
Decorating Cookies
Find the cookie cutters I used here by clicking on each individual cutter below (Any links to Amazon in this post are affiliate links):
Cookie Cutters:
Gingerbread Girl Cookie Cutter
Gingerbread House Cookie Cutter
Scalloped Rectangle Cookie Cutter
Sugar Cookie and Royal Icing Recipe
The sugar cookie recipe can be found here. The royal icing recipe can be found here.
Decorating Items
What you’ll need:
- Piping Tips – PME #1.5, PME #2 and PME #3
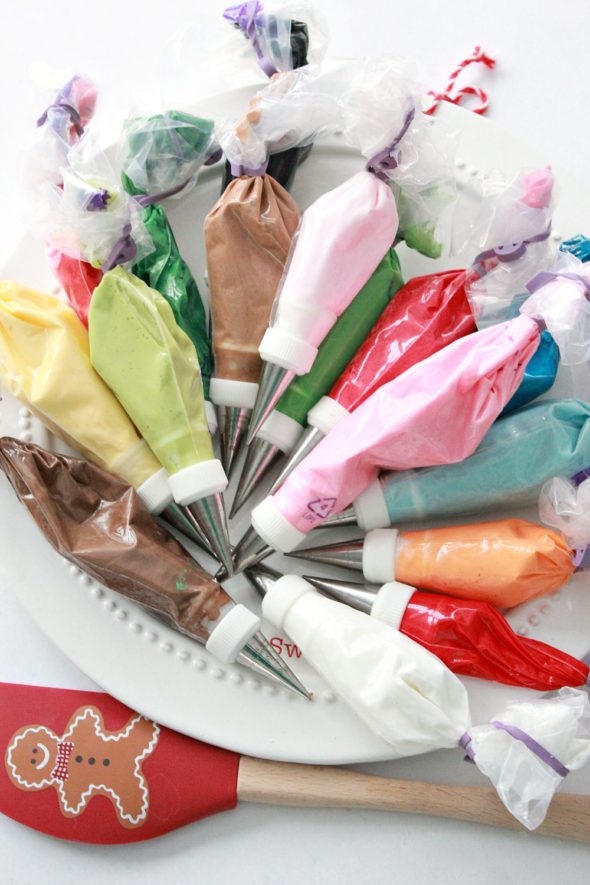
- Piping Bags
- Couplers
- Gel paste colors
- Scribe Tool or Toothpicks
- Transparency Paper
- Gold Luster Dust
- Gold Edible Stars Confetti
- Black Edible Ink Marker
- White Sanding Sugar
- Pico Projector for drawing help, if you’d like it
- Mini HDMI to HDMI cable (doesn’t come with the Pico projector)
- Arkon Mount to hold projector
- or on Arkon’s site – Arkon Remarkable Creators Phone and Tablet Stand (20% off with coupon code sweetopia)
- iPad (If you’d like to project image from iPad)
- Lightning to HDMI Adapter (Adapter for HDMI cable to attach to iPad)
Royal Icing Consistency
The consistency of icing is key for easy decorating. Click here to see a YouTube video on finding the right icing thickness for basic flooding and decorating.
Cookie Decorating Basics
This video on outlining and flooding is a good place to start if you’re new to decorating cookies with royal icing. These cookie decorating basics YouTube videos may also be helpful to get you started.
Thank you to The Gift Wrap Company for the gingerbread man with hat, and snowman character design! I found these adorable gift tags and made royal icing replicas!
I made the characters as royal icing transfers, and used my pico projector to help me draw the designs. More on that here. More on how to make a royal icing transfer at the links below:
How to Do Royal Icing Flood Work or Run Outs
Royal Icing Tips for Cookie Decorating
Recipe
It was mentioned earlier, but in case you missed it, here is the royal icing recipe I use for all my cookies. Finding a good recipe helped my decorating immensely in the beginning. The meringue powder I use has cream of tartar in it, so I no longer add cream of tartar, unless I’m making a gingerbread house with the icing. (Cream of tartar helps the icing set/stiffen).
Royal Icing Consistency
By far, one of the biggest tips is to figure out what kind of consistency you’ll need for each aspect of your design. There are 3 main consistencies I use:
10 second rule icing or medium consistency icing
For basic outlining and flooding (my most commonly used consistency), it is loose enough to flow nicely on the cookie for flooding, but not so loose that it is hard to control without a dry, outlined border. Here is a video on how I achieve that consistency, which explains the 10 second rule. Here is another video showing how I decorate some simple designs using the same consistency icing to outline and flood. It does take some time to get familiar with the consistency you end up liking. Sometimes I do use a slightly thicker icing (about 15 second icing), which means I’d have to shake the cookie more to help the icing settle. I’ll use that for a cookie which is smaller and has less room for the icing to spread. Another way to test the icing comes with experience… getting the feel for it while you’re stirring it with a spoon… how loose it is or how thick it is… you will get the feel for it with practice. Visually, another way to test is to lift your spoon out of the icing after stirring, and let the icing fall into your container… depending on how the icing falls (Does it fall in ribbons? Does it flow easily?) and how it settles, will help you determine your consistency. Another thing you can do is let your icing drip into the container, then gently shake the container like you would if the icing was on a cookie, then see how the icing settles. It will “act” like it would act on a cookie, so you can test if you’re happy with how the icing settles, before you put it into a piping bag. I realize the last few tips are not likely helpful for beginners, so the video mentioned earlier regarding the 10 second rule is a great place to start.
5 second icing or runny consistency icing
Using the same video as seen in the 10 second rule (Here is the video), drag the knife through the surface of your icing, and if the line runs back together in about 5 seconds, you have your runny icing. Runny icing is good for filling in or flooding larger cookies. It flows easier and you have more time to work with it before it sets. Note that I usually do a thicker outline (10 second icing) for a large cookie, and fill it in with a 5 second icing. You will see the outline a bit, but the thicker, somewhat dry outline will do a much better job of holding the icing in, and as a result your cookie will look more full, or the icing looks puffier, rather than flatter. I do this with smaller areas of flooding too, if I’d like an especially puffy look, like the icing dripping off the top of the gingerbread house in the cookie below. If you like a flatter look, omit the outline and flood your cookie further away from the cookie edges, then push the icing with your piping tip or scribe tool as close to the edge as you’d like.
Thick Icing – For fine details
For leaves, piping lines and for any details which are finer, more “crisp” or where I need the icing to keep its shape, I’ll use thick icing. To see if you have made thick icing, dip your spoon into the icing and lift away. You should see a stiff little peak where you’ve lifted our spoon away. If the peak disappears rapidly back into the icing, your icing is too runny. It should mainly keep its shape. You can also tell when you’re mixing it; it’s harder to mix and has a much tighter feel. If you’ve made your icing too runny, you can just add spoonfuls of powdered sugar (icing sugar or confectioners sugar) until you’re happy with the consistency. For thick consistency I also usually small piping tips, sizes 1, 1.5.
It takes some patience to figure out the consistency you’ll need, especially as a beginner decorator, so as much as possible, make sure you have some time set aside to make your icing. I like to break up my cookie decorating a bit; here are the two schedules I use along with some free printables if you’d like to try them out.
Storing royal icing, how long it can be kept and what about icing that separates?
There were some questions on Instagram and Facebook about storing royal icing, how long it can be kept for, and what to do about separated icing. – Here is a post for you on all those questions.
How do you dry your cookies? Do you use a fan?
Here is a video for you on how I dry my cookies.
Mixing Royal Icing
One mistake I still do sometimes, is to not mix the food gel coloring into my royal icing well enough, especially near the bottom of the container. I often use recycled yogurt containers (see this post here on staying organized while cookie decorating), and I’m finding that I prefer rounder-bottomed, shallower containers, as it’s easier to mix the the icing. You can see by looking at the gingerbread houses below, that the ones with icing which wasn’t mixed well enough, have streaks.
Avoid stirring your icing vigorously, it creates air bubbles.
Marbling Royal Icing Tips
Marbling is an easy and fun way to play around with different designs!
Here is a how-to video for you on how to marble with royal icing on cookies.
Preparing your Icing for Marbling
I usually prepare the consistency of my marbling icing (10 second icing) first, then separate the icing into individual containers and color them. That way all the icings have the same consistency. Do note that if you have a color which requires a lot of gel coloring, it may thin your icing a bit. If you notice that it becomes a bit too runny, you can add powdered sugar until the consistencies match again. One more tip… if you’re using white icing, ensure that the white icing is a tad thicker than the colors, it helps prevent bleeding.
.
Craters in Icing
While dots (generally dots or a similar type shape) of royal icing are drying (varying sizes, but generally small), small craters can form. You can see them in many of the Christmas balls on the tree cookies, especially in the tree on the left, below.
I obviously still have issues with them 🙂 and would love your feedback on things that have helped you. I’ve been experiencing it here and there about as long as I’ve been cookie decorating. The issue is discussed in depth here. As far as I can tell, a thicker icing helps. Other than that, if I feel like it, once the icing with the crater has set, I try to fill it in with a little royal icing, or in this case I put lots of luster dust mixed with raspberry vodka into some of them. I made the latter mixture somewhat thick so as to be a little like a paste to fill them in. Some people say that drying cookies with a dehydrator or fan works in minimizing craters, but I have yet to experiment with that. Please feel free to me know what works for you!
Top 10 Mistakes to Avoid
Here is a post I wrote with some common mistakes to avoid for cookie decorating, please let me know if you have any to add, I’d love to learn more!
How do I avoid butter spots on my icing?
Here is a post for you, How to Avoid Spots on Icing.
How do I prevent my icing from bleeding?
Here is a post for you. 🙂 Make sure you color your white icing, white! And the consistency of the white icing should be slightly thicker.
How do you color your icing red?
Here is a post for you? 🙂
How long does it take to make decorated cookies?
I like spacing it out a bit, rather than doing everything in a day or so. Here are my tips and cookie decorating schedules, with options for a shorter schedule and a longer schedule.
How do you get your corners so neat?
Not all of them are, but a few things which I do are:
When I’m outlining a cookie, I don’t always continuously pipe the whole perimeter of the cookie or shape in one shot. I sometimes pipe until I get to a corner and then stop and start a new line for the next side of the cookie/shape. It creates more of an edge than a rounded corner. Another thing I do is use a scribe tool to push the icing to the corners if it’s not as sharp as I’d like.
Issues with Lettering
Using a stiff, thick icing is a good place to start, although stiffer icings can clog in tiny tips like 00, 0 or 1. Try using a disposable bag where you can snip a tiny hole off the end. I have these ones. You might want to check out this post on preventing tips from clogging as well. One trick I do though, I try to make the cookies I’m lettering on larger, that way the lettering doesn’t have to be so small. I can then use a medium-thick consistency icing and a #1 tip. I’ve put ‘lettering video tutorial’ on my list of things to work on as a video, so I’ll be playing around with it in the next while and will be back with a tutorial. I’m sorry that’s not immediately helpful, but hopefully the other tips are somewhat useful for you.
What color is on the scalloped cookie cutter? (A question asked on Facebook)
It’s Wilton sky blue mixed with a tiny bit of black. As much as possible, I color my royal icing in daylight, and check it near a window before finishing, to see the truest shade of what I’m trying to achieve.
How can you do fine lines on some of the smiles of the gingerbread men?
This edible ink pen has two sides, use the fine tip.
There are likely many questions I’ve missed, please feel free to comment below. I also have a FAQ section here and a glossary of terms here.
Merry, merry Christmas to you and happy decorating!
xo,
Marian

































Do you use a convection oven to bake your cookies. I’m ususing a conventional oven and the cookies seem to spread more than I’d like (using your cookie recipe, and omitted the baking powder). Thanks for all your help! Your blog is my go to for all things cookies!
Thanks Mary! I use the convection setting, yes. Try setting the temperature a tad higher as well. Here is a post on preventing cookies from spreading:
https://sweetopia.net/2011/04/top-8-tips-on-preventing-cookies-from-spreading/
and and example video post on cookie dough I make, if that helps at all:
https://sweetopia.net/2016/11/video-recipe-how-to-make-gingerbread-cut-out-cookies-decorate-gingerbread-men-with-royal-icing/
Happy decorating! xo
Hi Marian,
Wow….Beautiful work again. You explained and answered many questions I have! Love all your caracters and shapes you used. Very interesting detailed post. I am learning a lot from you!
Thank you for sharing all your talents.
Have a wonderful Christmas and have a good rest!
ML
Thank you so much Maria! Have a wonderful Christmas as well! xo
Hi,
I was wondering how you correct or avoid your sprinkles absorbing the color of the icing and essentially ruining the cookie! I think I may have packaged them too early but want to make sure it isn’t something else before I redo them!
Hi Margaret,
There are a few things I can think of:
Yes, that’s the biggest thing; wait to package them until they are completely dry. The moisture contributes to white or lighter colored sprinkles absorbing the color they are sitting on. Even then, a dark color like a dark green icing base, has a higher chance of bleeding into the white sprinkles because there’s a lot more food coloring in it. I would try a little bit lighter of a base color. If you didn’t already know, the color of the icing deepens over about 12 hours… so color your icing a tad lighter than you’d like it. Hope that helps!
Wow, these cookies are wonderful. Thank you for all the info. One day I hope to have the time to try and tackle making them. They are really spectacular.
Thank you Susan for the lovely compliments and Merry Christmas to you!
Hi Marian:
I love your site your cookies are just so pretty. Thanks for all your hard work. Looking forward to practicing your techniques this winter when things slow down a little for me.
Where did you get those cute little boxes from?
Thanks Dolores
Merry Christmas!
Hi Dolores,
Thanks so much! I got the boxes from https://www.creativebag.com/ There is a U.S. and a Canadian site. It was a few years ago so I’m not sure they still have those exact ones, but they have a ton of selection.
Merry Christmas to you!
Hi. When I try to fix my royal icing into the corners or fix an imperfection I get lumps and bumps instead of smoothness. Do you know what I might be doing wrong. I am doing it right after flooding. I love all your cookies they are so beautiful. You are extremely talented!!! Thank you❤️
Thanks Tamara! Try making your icing a tad bit runnier. The lumps and bumps should smooth out if you gently shake or tap the cookie. If they don’t, it generally means the icing is too thick. Hope that helps!
Love your designs. Have you tried a Kopykake projector and how does it compare to the Pico projector?
Hi Gerri,
Yes, I have a kopykake projector, the tutorial is here:
https://sweetopia.net/2010/06/decorating-cookies-with-a-kopykake-projector/
I do prefer the Pico projector and plan on doing an explanation post, for now, I’ll just say that I prefer the clarity of the Pico more as well as some other things. Will expand in the future!
I gave up on making royal icing for some cookies I made this summer for my daughter’s birthday shower. The addition of Wilton meringue powder made it taste horrid, and the cookies inedible. Is all royal icing just pretty, or is it possible to make it taste even halfway decent?
Marian may have some better tips, but in case she’s busy decorating, we add extracts and flavor. A bit of lemon juice and lemon extract goes a long way. We usually combine a bit of “juice” and a bit of extract, but I’ve used coffee, maple, almond, and cream cheese, just to name a few. Lemon or cream cheese with gingerbread is yummy.
Agreed, Julie, thanks for helping out!!
I had a question about your tag cookies…it almost looks as if you have another cookie on top, but I noticed a shadow under the ends of the gingerbread guy’s hat. How do you get the tips of his little hat to curve up like that?
They all look fabulous btw. I’m combing for some new designs and techniques and I loved your sweater pattern on another post.
Hi Julie,
Yes, the gingerbread man with the hat and the snowmen are royal icing transfers. You can see a shadow because I (inadvertently) dragged my scribe tool through the ends/ tips, in an upward motion to make the tip more pointy. It dried that way, was an accident! In case you’d like to know more about transfers (if you don’t know about them), I explain more in this post here; https://sweetopia.net/2018/11/pico-projector-arkon-mount-and-nutcracker-decorated-cookies/
Merry Christmas and happy decorating!
Hi there! I absolutely adore your cookies and art to it. I will be making royal icing, my first time, and I’m hoping it turns out… Good. I was wondering, what brand do you use to color the icing?
Hi Britney,
I use a variety of brands; Americolor, Wilton and Rainbow Sugar Art. As long as they are paste colorings or gels, they’ll be good to use with royal icing.
Hi,
Hope you can help me.
One of my adult daughter’s Xmas requests is…….a kit of basic piping bags and attachments for learning to decorate with royal icing. I thought this would be easy to buy. But I went on line and am soooo confused.
Should I buy throw away bags for ease in using? How do I know the tips will fit on the bags I buy, regardless whether I buy regular or throw away bags? How do the tips stay on? Is there a difference between regular icing and royal icing tips? Any help would be greatly appreciated.
Hi Kathy,
I would buy these disposable bags (they can also be washed and re-used):
https://amzn.to/2sAw2ur
These couplers:
https://amzn.to/2EpoWeY
These piping tips:
https://amzn.to/35wmLlN
The tip set is pricey, but has lots of tips and is excellent quality. Only ones I use.
Hope that helps!
Hello!! I love your royal icing recipe and love it. My issue when using lustre dust on dried royal icing is I feel like the icing melts even when using a thicker solution and even with one brush stroke. Please help 🙁
Hi Rena,
Yes, it’s a tricky balance. Try vodka or everclear if you haven’t yet. I have best results with those.
Hi Marian,
I have to say, that is the nicest colour icing I’ve ever seen on a gingerbread man or girl.
Would you be willing to share what colour you used. Love it all !!
Thanks
Anna