
I’ve had a lot of questions about these since I posted the corresponding cupcake recipe here, and quite a few comments on line and in person, about how difficult they look to make.
By no means am I an expert – in fact, I felt a little intimidated when asked to make these teapot toppers for a recent baking convention, as I’d never made them before, and they looked challenging to me too.
To my happy surprise, by using a few tutorials I’ll be sharing with you and changing a few things along the way (I’ll be sharing those tips with you as well), I actually found they were quite simple to create! I hope you find the links and ideas helpful.
A few notes on materials
Tylose Powder:
- The first important thing I learned with a little experimentation, is that I liked my results better when I used a mixture of fondant with tylose powder
. (Click here for a definition of tylose powder). Using straight fondant made it challenging to create neater spouts and handles for the teapots etc.
- I generally mixed one part tylose powder to 5 parts fondant.
- Gum paste would be an option as well, as it’s edible, but I found that mixing tylose with the fondant provided the benefit of a nice taste and made the fondant easier to work with.
- Note that the gel colors in fondant mixed with tylose powder will fade over time. A few days is fine, but if you’re keeping the items as a show piece for a cake etc., make the colors deeper than you’d like to compensate for the fading.

- I used lustre dusts mixed with raspberry vodka to paint the flowers on the teapots etc. Make sure your lustre dust label says non-toxic and safe for consumption. There are different products available.
- You could use water to adhere the fondant pieces together, however, to make sure everything really stayed together I used edible glue.
*
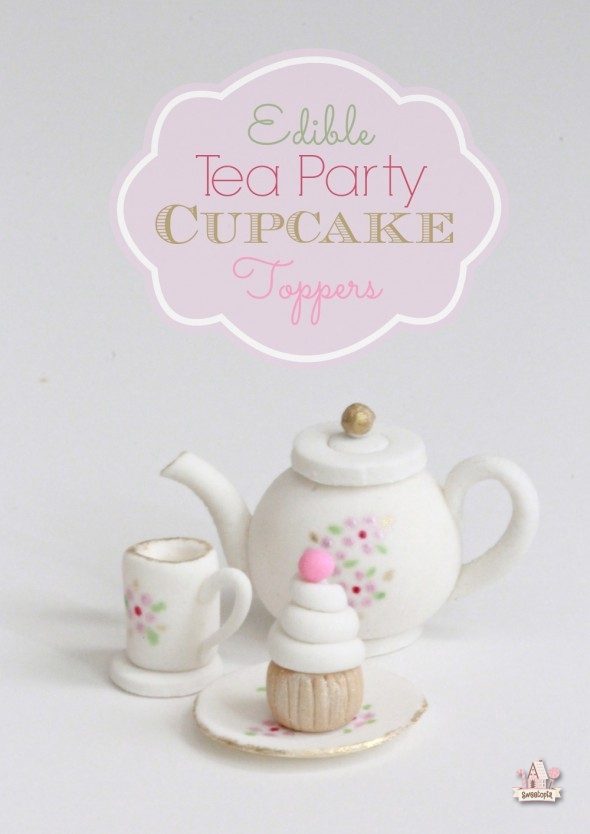
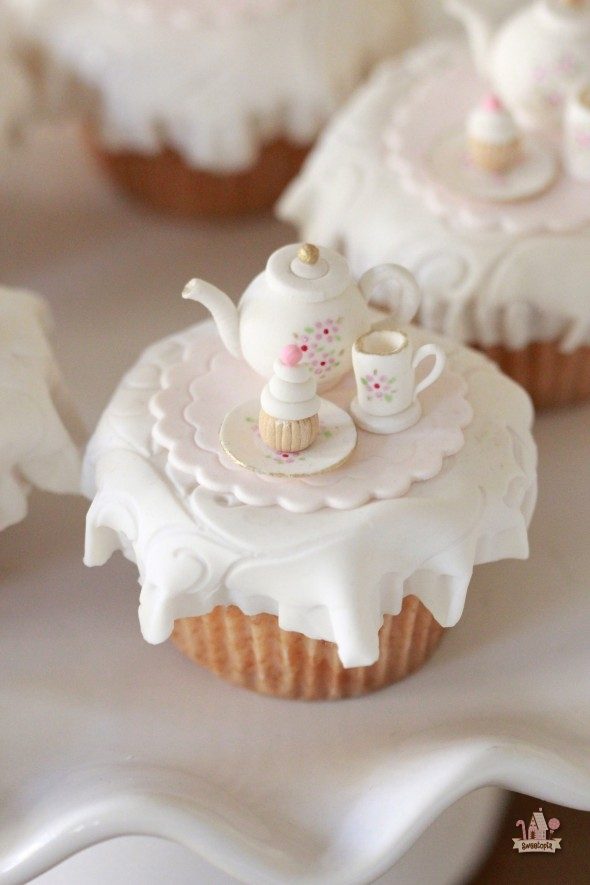
How to Make a Tea Pot Cupcake Topper
To make my tea pots I used the following sources to learn from:
- The Redpath Sugar gals and their cute teapot topper tutorial.
- mackandnorm’s YouTube video on How to Make a Mini Fondant Teapot Cupcake Topper was really helpful for a visual learner like me!
I basically combined the two tutorials. Mackandnorm’s uses a bubble straw to make the indentation for the teapot lid (I actually found bubble straws at a local convenience store which sells slushies!), whereas Redpath Sugar makes a separate lid. Preferring a little more of a 3-D look, I rolled out fondant and cut out a circle shape with round cutter, and used that as my teapot lid. I used a #10 circle piping tip for the indentation of the lid, and a little ball of fondant painted with gold luster dust for the very top. Easy peasy!

Each one ends up looking a little different than the next, but if you’d like yours to be exactly the same, you could weigh out each rolled ball of fondant and measure the length of each spout and handle.


As I’m not the most skilled painter I decided to go simple with the design – dots!

*
Making Mini Teacup, Plate and Cupcake Toppers

Again, I used mackandnorm’s awesome video for a how-to on making the teacup. You can find the video here.

The only difference I played around with, was using the skinny end of the chopstick to start the inside of the cup, and then, once the hole was a 3/4 of the way down the cup, I switched to the thicker end of the chopstick, to force the hole open a bit more. Hope that makes sense. Once you see the video, you’ll see what I mean.

For the plates, I used this tutorial by iheartpastelpink on YouTube. The tutorial is for polymer clay but the procedure is the same.

The cupcake how to I followed can be found here (Call Me Crafty on YouTube). I scored a few more lines, made the cupcake base a bit shorter and added a “cherry” on top.
The gel colors I used for the cupcake liners were ivory and a touch of golden yellow, and once the fondant had dried a bit, I dusted each with a bit of pearl luster dust.

The cupcakes were actually a bit challenging (for me). Rolling out the snake-like roll of fondant was easy enough; it was placing the spiral neatly on the cupcake. Some turned out better than others, but they were fun to see when they were done.

*
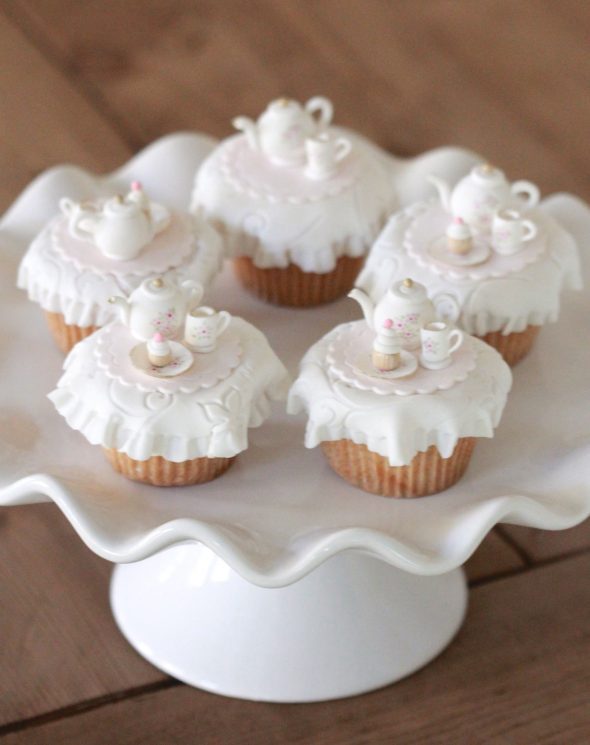
Fondant Tablecloths
To make the fondant tablecloths, I rolled the fondant (no tylose this time), over this impression mat, cut out a circle with circle cookie cutter, and frilled the edges. I followed this tutorial by Alan Tetreault of Global Sugar Art for tips on curling the fondant edges.

After cutting the cupcake dome off with a serrated knife, I smoothed about a tablespoon’s worth of buttercream on the top of the cupcake, placed the “tablecloth” on top, and gently patted the edges down over the sides of the cupcake.

In case a little of the buttercream’s grease seeped through, I added an extra layer of fondant with the second, pink “tablecloth”. (Easy to make with a frill, circle cookie cutter). All the pieces were adhered with edible glue, but royal icing would work well too.

Hope you have fun making these toppers too!
xo,
Marian
*
Homemade Fondant Recipe
Adapted from Redpath Sugar’s Marshmallow Fondant recipe, I love the taste and texture of this homemade fondant!
Marshmallow Fondant Recipe
Ingredients
- 4 cups (225 g) miniature marshmallows
- 4 cups (455 g) icing sugar, plus extra for dusting
- 3 tbsp (45 ml) water
Instructions
- Heat marshmallows and water in a saucepan over medium heat. Cook, stirring often, until the marshmallows are fully melted and smooth. Add flavouring if desired.
- Slowly stir the icing sugar into the marshmallows, 1 cup at a time. Stir until the mixture becomes thick and too stiff to stir.
- Scrape the mixture out onto a countertop dusted with icing sugar. The mixture will be sticky and lumpy, with lots of sugar yet to be incorporated. Dust your hands with icing sugar, and knead the fondant until all icing sugar is incorporated, and until smooth. If it is too sticky to handle, dust the fondant with more icing sugar.
- Once smooth, the fondant is ready to be used. You can roll it out, shape it, colour it, or wrap it tightly in plastic for later use. If storing for later, be sure to knead the fondant again before using.
- If you'd like your fondant to dry a bit harder, and/or are working with some delicate pieces, you may want to knead tylose powder into your fondant. I generally add one part tylose powder to five parts fondant. Keep in mind that your fondant will dry harder. See the tylose notes in the corresponding post as well.
Notes
- food coloring or flavored extracts (optional)
- tylose powder (optional)


Absolutely fascinating! I loved reading this and am inspired to throw a little tea party. =)
De un gusto exquisito… te felicito, DIOS Bendiga tu arte eres gran artista.
amazing work! I love it! Beautiful teaparty!
You must have a lot of patience.
thank you for teaching us your talents.
ML
I can’t believe that you were able to make these on a first go- totally beautiful artistry!!
Just look at all of that detail! Simply amazing!
I love it! I have made the teapot and cup before but never the little cupcake.. so cute.. yours came out perfectly!!!
I´ve always wanted to make marshmallow fondant but never had the guts to try it, but I think I will give it a try 😉 Xx
Not an expert? You sure fooled me! Your tea party cupcakes are exquisite! I’m in awe! Simply beautiful.
Super cute!
These toppers are so beautiful!!!
These are precious!! I want to throw a tea party right now!!
I love this!!! I make mmf a lot, but never used tylose. Def gonna try, as it will work well in the Fla humidity!! Thx so much for sharing!!
Thanks for the comments! xo
Thank you so much for the tutorial…you ARE an expert…I love making marshmallow fondant and basically use the same amount of ingredients noted here…I have a question though…I see lots of cakes that the fondant is very shiny. My husband read that a hair dyer is used to make it shine, some have said they brush with vodka…do you know if it’s possible and/or how to make the marshmallow fondant shine? So love your blog and all your creations…you are one of my cake heroines…I learn something from you all the time and appreciate your sharing your knowledge and skills with me.
Hi Tami,
Thanks. 🙂
I’m actually not 100% sure on how to make it shine, although I do remember taking a class at the Bonnie Gordon College, and the flowers were steamed to make them look a bit glossy. Jacqueline Butler also did that in a Craftsy class I took by her. So the hair dryer seems like it would make sense and work too. Let me know if you try the vodka for shine, how it goes. Happy decorating!
Ohhhh when I saw these cute cups I had to smile, Marian.
I have been making these as well this year, and I just pictured us making these together 🙂
I also think that it was not as hard at all to make – the handles were a little tricky I thought 🙂
Thanks for such a lovely post, I enjoyed it!
Much love as usual, sweetheart.
niner 🙂
Thank so much Niner, and everyone, for your comments! xo
You are seriously so talented! These have got to be the cutest cupcakes I’ve ever seen!’
so adorable!!!
They turned out PERFECTLY adorable! Thanks for all the info., tips, and links so that I can try it myself. 🙂
I absolutely LOVE these and I am inspired to try these for my daughter’s birthday party in August! She will be 4 and we are having a Dollies and Me tea party!! I have never baked in my life but I just have to have these for her party! I need a little help though, have a few questions – can I make these ahead of time? How do I store them? Also, I am not making the cupcakes at home and I plan to have my local bakery make them for me and I will assemble as per your directions on your blog, will that work? Oh and last one- I am willing to try and make the fondant but if I find it too hard can I use ready made and if so which brand do u remember suggest? Thank you!:) Please help!this is such a challenge for me since I can barely make cookies out of a box!
Hi Mkmala,
I mix my marshmallow fondant with tylose powder (I talk about it in the post above), so the tea party toppers dry somewhat hard. If you want to make them even weeks ahead, you can, but keep in mind they will dry somewhat hard, and I wouldn’t recommend eating them then. You can still put them on the cupcakes, they are technically edible, but I would recommend the recipients take them off and just eat the cupcake.
Store them in an air-tight box on bubble wrap lined with parchment, or on something soft lined with parchment paper. Also put a package of dessicant inside (see this post here; https://sweetopia.net/2014/09/how-to-store-or-preserve-decorated-cookies-as-keepsakes-top-7-tips/ ), to help preserve them from getting damaged due to humidity.
You asked if getting your local bakery to make them and then you assemble – I would talk to the bakery first and show them the post – only the person there will know if they are willing to decorate the cupcake as pictured.(I’m not sure what part you want to assemble – just adding the toppers? Or the little fondant “table cloths” as well).
If you want to buy the fondant, my favorite right now is Satin Ice.
Good luck! With a little bit of planning you’ll be able to pull these off. xo
I am so excited! I am planning a tea party theme birthday party for my 7 year old granddaughter and this is the exactly what I wanrted. Than you, thank you
Thanks so much Elizabeth!
hi this is amazing !! I want this !! Where I can buyer this
Hi Maria Isabel,
I’m sorry, I don’t sell these, I’ve shared the tutorial here though.