
Gas Station Cookies
I think I’ve got a tad bit of OCD. (C’mon tell me you haven’t already wondered? Maybe even if it’s more than a tad?) I mean, once I get an idea in my head that I want to try, it’s like I can’t let it go. Like these Esso/Imperial Oil cookies I made for a friend. Once the idea of making the 3D vintage gas pump popped in my head, it wouldn’t leave. I knew it would take more time to make than your average cookie, but it didn’t matter. More on how-to details later, but just warning you in case someone asks you to make 200 of these.
![]()
The logo cookies were simple enough to make with my Kopykake projector, as was this vintage Esso tiger:

The image below projected onto the cookie using the projector, meant all I needed to do was trace the lines with icing, section by section.

Here’s an almost finished pic I shared on Instagram, where you can kind of pick out the different areas I piped.

After the base of the tiger was dry, I added final icing details like his eyes and whiskers, and orange luster dust for a little more texture.

The idea behind these cookies was to surprise my friend’s Dad with Imperial Oil/Esso cookies as he works for the company and she was flying out to visit him. A little digging on the internet came up with some fun vintage images, like these two characters:


And these gas pumps and logos:

Again, the Kopykake was an invaluable tool for a drawing challenged decorator like me.

I used it for the logo cookies (Instagram pic above)…
![]()
and then added a little sanding sugar to adorn and clean up the edges.

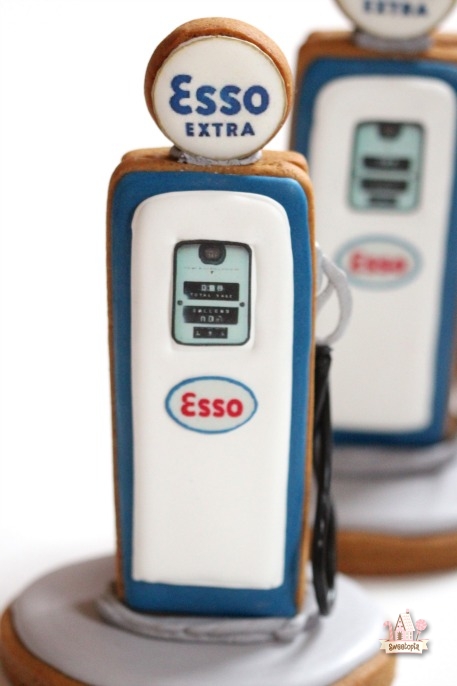
And the gas pumps… In case you’d like to make them, here are the how-to steps, summarized:
*
Basic Step by Step for the Vintage 3-D Gas Pump Cookies
- After you’ve made the dough, find the image you’d like to copy and cut out the corresponding-sized cookie shapes in your dough. You’ll need two rectangles per gas pump. (And two circles if you’d like to do the vintage ones I made. Technically, if you don’t want the round “light” on the top, one cookie will be thick enough… You could pipe the back and front of the gas pump on one cookie, and stand that on your base). Also cut out a large oval cookie for each base. Bake shapes and let cool.
- Make and color your icing. (White, navy, grey). All flooding consistency until the grey is thickened at the end.
- Pipe some grey gas pump handles on parchment paper or a transparency lightly coated with shortening. Let dry. These will need to be ready for the last steps of making these cookies.
- Pipe the grey base on the oval cookies.
- Pipe the navy base on the rectangles and one side of the circles. Let dry.
- Pipe a smaller, white rectangle on top of the navy. Let dry.
- Print edible image logos and gas pump face and cut them out.
- Adhere edible image circle logos, and the gas pump face logos, but do not adhere the logo on the front of the pump, yet.
- Pipe another white rectangle on top of the one you already made, this time piping around the edible ink image/gas pump face. This will create a little more depth. Let that dry.
- Now adhere the logo to the front of the pump (In my case, Esso logo).
- Adhere the edible ink logos to the other side of the circle cookies.
- Adhere the two sides of the gas pump together, with white royal icing. Use less than the amount in the photo, below. That was my “experimentation” cookie. Let dry.
- Thicken your grey royal icing, so that when you dip a spoon into it and pull upwards, a stiff peak will form. Pipe a generous amount of grey icing on the center of the oval cookie and stand your gas pump cookie in it. The icing should be thick enough that the gas pump cookie doesn’t need support, but be ready with things to help prop it up while it’s drying. Let dry.
- Pipe thick, grey icing on the top of the gas pump and add the circle cookie. Pipe a small amount of grey on the side of the pump and add the pump handle. Let dry.
- Cut some thin, black liquorice to size, and adhere it to the side of the pump, just underneath the pump handle. let dry.
- Package and tie with ribbon.

Excuse the bad lighting of the finished cookies… I forgot to take daylight photos of them before I gave them away.

A little idea in case you make the gas pump cookies and need to transport them – They survived the trip intact inside wine bottle containers. Yay! Speaking of which, how do you like to package your cookies if you’re shipping or travelling with them? I’ve got a post on how I ship them here, but I’m always game to learn more.

Happy decorating!
xo,
Marian
*
Related posts:
{Video} Making Daisy Cookies with a Kopykake Projector


Hi @ brantcookies: Yes, I do, especially during the humid summers! Here are a few posts for you:
https://sweetopia.net/2009/10/how-to-prevent-your-icing-from-bleeding-7-tips/
https://sweetopia.net/2011/07/how-to-avoid-spots-on-icing/
https://sweetopia.net/2012/01/video-how-to-dry-cookies-decorated-with-royal-icing/
Thanks for all the sweet comments, everyone!
Genius!
These are the most fantastic cookies I have ever seen. My dad would love these but I’d have to use the Texaco/Mohawk logos. Thanks for a stunning example of beautiful cookies.
How do you print your edible images? Do you have your own printer? A local grocery store used to print sheets for a fee, but now they don’t. 🙁
@ marian:
Thank you so much Marian, My pretty Toronto Maple leaf cookies bled this past weekend 🙁
They looked great going to bed, woke up to a mess…grrrrrr LOL!
Thanks, @ Carla: I’d love to see Texaco/Mohawk cookies!
@ Terri: My local grocery store does them and I do have an edible ink printer… There’s a link to the kind I use in this post;
https://sweetopia.net/2010/03/edible-ink-images-decorated-love-cookies/
Hi @ brantcookies: That IS frustrating! Humidity is evil for cookies, isn’t it! In my last newsletter, in the little ‘tip section’ at the bottom, I talked about how even the winter months can have humidity, and can wreak havoc on cookies. The weather network usually shows how high the humidity is, so you can check it and see if you should pull the de-humidifier out. Hopefully no more bleeding!! xo
AMAZING!!!!!! Would he even eat them?
They are an art piece!
These are so creative!! Love it!!
Who knew a gas pump could be SO CUTE!?! Love it!
Hello!
Your cookies are incredible–the best I’ve seen! I’m going to try my hand at making some bunny cookies and was wondering…can I leave my undecorated cookies out to cool overnight if I bake them in the evening? Or should I wait for them to cool and store them airtight until I can decorate them?
Thanks!
Hi @ Andrea: I leave them out to cool overnight, and usually decorate in the monring (on weekends). Maybe put them in containers in the morning, until you’re ready to decorate. For the decorating process, here’s a post for you on drying cookies;
https://sweetopia.net/2012/01/video-how-to-dry-cookies-decorated-with-royal-icing/
Thanks for the comments everyone!
Wow! I can’t believe the detail in that gas pump! : )
Hi Marian,
I’ve been admiring your 3-d gas pump cookies for quite some time now. By chance, do you take custom orders for these? My Dad is an avid gas pump collector and I know he would absolutely love these as a gift. A small order, whatever your minimum requirement is…I was thinking one dozen Thoughts? Thanks in advance! Jenny
Hi Jenny,
Thank you so much! I’m sorry, I don’t do orders, but these talented cookiers do:
https://sweetopia.net/cookie-decorator-directory/ You can search the map for someone near you as well. Best wishes! xo