
Embellishing Cookies – 5 Easy Decorating Techniques to Add Interest or Detail to Your Cookies
Flood icing is perfect for getting that pretty, smooth look for decorated cookies, but sometimes a little texture or special details add an extra bit of charm. I’ve listed a few ways to add some visual interest to your cookies below, which I hope you find helpful.
1. Use different marbling options:
Marbling has always been one of my favorite cookie decorating techniques. It’s fun, easy to do, and the possibilities are endless.

Incorporate the marbling into a small part of the design, like the feathers on the turkey cookies (Thanks to Bridget of Bake at 350 for the adorable idea)…

… or marble the whole design, like these leaf cookies. (Thanks to Lizzy B Bakes for this fantastic idea!).

Even small details like wiping or not wiping the toothpick between each ‘line dragging’, will make a difference in the outcome.
For a video on marbling, click here. For a tutorial, click here.
*
2. Add texture by letting the icing dry in stages:
Piping icing and letting it dry before you add more icing beside it, is another way to add dimension and texture.
Take this pumpkin cookie I made for The TomKat Studio last Halloween:

Piping the light orange, letting it dry for about 15 minutes to 1/2 an hour, and then piping the deep, tangerine orange, creates slight dips and rounded ridges. It’s a little easier to see the example in this photo below:

Here’s a visual step by step on making the pumpkin cookie:

You can find more information on making the leaf here.

3. Embellish with sanding sugar:
Sprinkling sanding sugar on your cookie is an inexpensive (and sparkly), way to embellish any cookie, and is also a great way to hide imperfections or mistakes!


Cover the whole cookie, or small sections, such as this leaf veining…

or the tops of these acorns.

Change it up by using clear sanding sugar with the varying colours of icing beneath it…

or match the sugar to the icing color.

By the way, I love this great (practical), tip from Bridget; use a coffee filter to catch excess sugar when sprinkling it on your wet cookie.

*
4. Add texture and dimension by varying piping tips:

Use a thicker icing and change up your piping tip to create height and new textures, like this tip PME #44 for these mini pine cones.

Or this #67 leaf tip for the leaf on an apple cookie.

Something to note – Textured icing needs to have a thicker consistency to hold its shape. To test and make sure the icing is thick enough, dip a butter knife into the it (sitting in bowl), and pull straight up. If the icing forms a stiff peak or stands straight up, it will be thick enough.
Have fun and experiment with tips you’ve never tried before!
*
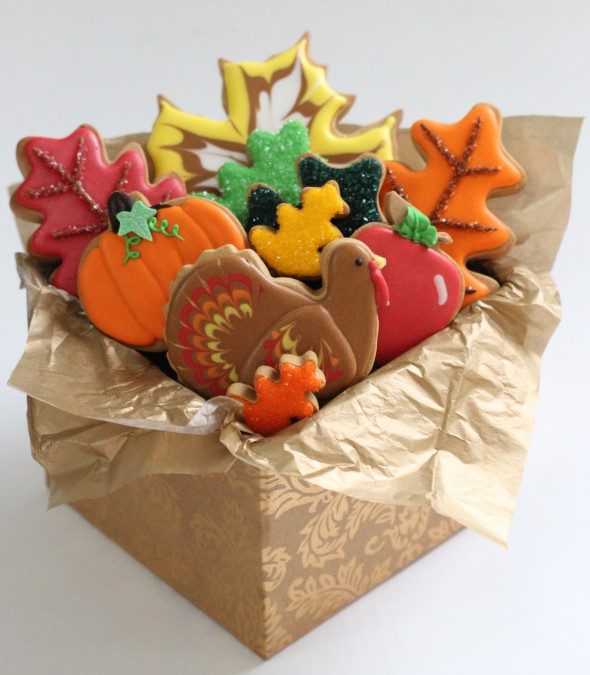
5. Packaging:
Play around with different ways to present your cookies once they’re finished.

Besides a cellophane bag or clear boxes, stack them in a mason jar or layer them in pretty gift boxes lined with matching tissue paper.

Even a cute take-out container (found this gold one at Michael’s), is a fun way to hand out a Thanksgiving gift.

If you’re not giving them out right away, wrap in cellophane to keep them fresh.
*
My Decorating Space Mess

As a little aside, I wanted to share with you what it looks like at home when I’m decorating…

At first, all my piping bags all lined up and ready to go. (Lately, btw, I haven’t bothered putting them in cups while I’m decorating – I just leave them on the table covered with a plastic tablecloth, and resting in a damp cloth).

A large sheet of parchment paper and my decorating tools and sugars around me.

Mid-way.

Annnd, at the end. 🙂
Always a bit of a mess, but so much fun.

And so worth it when I give them away.
Hope you have fun decorating! If you have any tips of your own to share, or would like to ask a question, please feel free to leave me a comment below, or find me on Facebook, twitter or YouTube.
xo,
Marian


Your work is absolutely flawless. I have a quick question. I am having a really hard time getting my border to dissappear. I always have that tacky like around the cookie. It drives me nuts and I don’t know how to make it go away! Do you have any tips on what I can do? After 2 cookie decorating classes, I still can’t get this technique right!!!!thank you. You should be called the cookie queen because you are amazing.
Hi Alice,
The icing consistency is key and if it helps, I have a few videos which show how I outline and flood if you like. (a video on consistency is there too). Hope that helps! xo
Your tutorial is absolutely beautiful and informative! The photos of your cookie art are stunning as well as the cookies are beautiful! Thank you for sharing.
New to your site. Obsessed with it and now it’s bookmarked! I totally love how you photographed your work station with before, during, and after photos – I was laughing when I saw the “aaand the end” photo. Thanks for your honesty and openness (and of course all the amazing wonderful tips!).
Aloha!
Marion,
LOVE your work! Can you freeze the decorated cookies?
Thanks, Suzanne! Yes, you can – I don’t do it often, but have written a post on it here:
https://sweetopia.net/2011/03/freezing-decorated-cookies/
Worth checking all the comments out!
Could you please tell me how you made these colours? I use Americolour gels. Thanks so much! Btw, you rock 🙂
Oops! I was asking about the colours on your marbled leaves 🙂
Hi Gabby, I used Americolor chocolate brown, Americolor yellow, white, orange, and Wilton no taste red. 🙂
Thank you so much Marian! Such a quick response 🙂
I’m going to decorate my maple leave today, marbling is so easy, fun and very effective indeed.
Have a fabulous week 🙂
I just love your tips and hints. I especially loved seeing your space. Honestly, mine looks exactly like that. I love, love, love, decorating cookies. Keep it coming, I am learning all kinds of tricks from you. Thanks so much!
these look great! Recipes??
Hi Jess,
All my recipes are in the recipe section at the top of the site. These are gingerbread cookies with royal icing.
Thanks for your comments everyone!
You’re cookies are beautiful. Thanks for sharing your skills and ideas. I’ve used the marbleing with candy coat chips to make leaves, butterfly wings, lady bugs, etc. To garnish cupcakes. It really adds depth and contrast in the colors that make your cookies look beautifully delicious. I make palm tree cookies at Christmas time that I’m definitely going to try your tips on to add that depth and color contrast.
Thanks, Be blessed, you are a blessing to us!
Thanks Val! xo
Okay so looking at those leaves and the turkeys, it is astonishing how you did them! Those lines are so perfect. Do you have a special trick or something? My lines never turn out that well haha. They just look absolutely flawless, I am jealous!
Hi Rochelle,
Not that I can think of. Maybe a video would help? I have one on marbling Christmas cookies… It’s one of the first videos I made on my YouTube channel. (You can find the YouTube link at the top right of my blog… it’s the yellow (youtube) social media button).
Hi, your cookies look fabulous. I have been following your site for a while now and really enjoy seeing what you are up to. I have one question that I have been wondering about for a while, how thick do you cut your cookies?
Hi Brenda! Thanks for following my site. 🙂
Here is a post for you on cookie thichttps://sweetopia.net/2013/11/how-thick-or-thin-do-you-roll-your-cookie-dough-how-do-you-make-the-dough-even/kness.
Hi!
Very pretty site, and cookies. I am inept about decorating cookies and stupidly made dough for roll out Christmas cookies to take to my high school students tomorrow. I say stupid, because I don’t have time to do the icing/ heavy decorating bit–also don’t have the hand eye coordination. What would be a very simple way to add visual interest to my cookies? I have a large star and snowman cookie cutters.
I appreciate your thoughts and time. Thank you!
Hi Joan,
Do a thin coat of icing on them and sprinkle sanding sugar on top. Easy, pretty and fun. If you’re into piping at all, a simple snowman’s face would work – https://sweetopia.net/2014/11/the-perfect-peanut-butter-cut-out-cookie/
Have fun!
Do you have a favorite recipe for the frosting? And as a comment, I love adding a drop of Orange oil or other oils to my frosting or chocolate.
How did you pipe the wings on the turkey? Did you pipe another layer of icing over dried icing?
Yes, that’s exactly what I did. 🙂
Bonjour, combien de temps se conserve les biscuits décorés, dans un simple papier ou une boite de métal?
J’adore votre travail!!!!
Merci de Belgique
Bonjour Martine,
Merci! xo
I have translated for other readers:
Hello, how long will keep the cookies decorated in simple paper or
metal box?
I love your work !!!!
Thank you Belgium
Here is a post for your about the shelf life of decorated cookies:
Voici un message pour votre sujet de la durée de vie des cookies décorés:
https://sweetopia.net/2012/02/how-long-do-decorated-cookies-stay-fresh-what-is-the-shelf-life-of-decorated-cookies/
Merci beaucoup!!
Dans votre recette de glaçage, “cream or tartare” c’est quoi? Mon traducteur ne sait pas…
Merci beaucoup
C’est cream of tartar. Vous pouvez faire le glaçage royal sans la crème de tartre. (Il aide le glaçage sec un peu).
It’s cream of tartar. You can make the royal icing without the cream of tartar. (It helps the icing dry a little).
Have fun!
sanding sugar. Is that special sugar you buy or can you take regular sugar and add it to royal icing
Hi and I love your site! When piping royal icing and making dots, and flooding small areas…. in the middle it leaves a dent and sometimes a hole. What causes that and how do you keep that from happening?
These are beautiful! How thick are your cookies?
Hi Vicky, they vary but here is a post about thickness of cookies to give you some guidelines:
https://sweetopia.net/2013/11/how-thick-or-thin-do-you-roll-your-cookie-dough-how-do-you-make-the-dough-even/
Hi there! I’m in love with your beautiful turkey cookies’ marbling! Also, the pictures of your set up is so helpful. One question, how long can you leave the icing in the piping bags? Can they be refrigerated for any length of time? I have to do my icing in multiple blocks of time due to my kids. 😉
Hi Kelly!
Thank you! The icing begins to separate over time – the runnier it is, the faster it separates. Even if you refrigerate it, it will separate, so it won’t really keep longer than a day.
In case you’d like a general post on royal icing, here it is… it includes a picture of separated icing:
https://sweetopia.net/2011/01/how-do-you-store-royal-icing-and-how-long-can-you-keep-it/
This may be helpful as well… I generally have to break up my decorating because of my job:
https://sweetopia.net/2011/11/cookie-making-schedule-free-printables-ballet-tutu-cookies/cookie-baking-and-decorating-long-schedule/
Hope that helps!