

I’m definitely a sucker for it.

I’d use it on almost every cookie if I could (but I try to restrain myself), but when I found these sparkly LOVE stickers at Michael’s Craft Store I knew I had to make a sugar version of them.
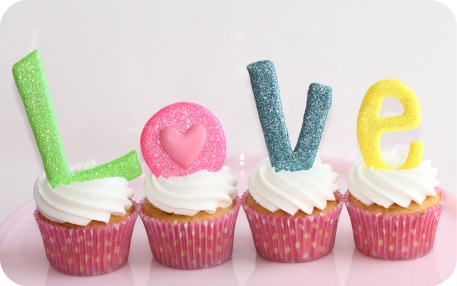
I ended up making simple royal icing decorations (also known as transfers, runouts or floodwork), instead of cookies, for these Valentine cupcakes.

If you’d like to try making these cupcakes and icing decorations, check out the how-tos below.

*
For the Valentine {Love} Cupcakes, you’ll need:


- You can find a video on how to make the cupcake swirl here.
*
*
For the Royal Icing {Love} Toppers, you’ll need:
- Royal Icing Recipe and Food Gel Colorings
- Piping Tip #2
- Piping Bag
- Coupler
- Parchment Paper or Transparency Sheet
- Shortening
![]()
*
How to Make {Love} Sugar Decorations:
I used my KopyKake projector to project the Love stickers so I could trace the image, but if you’ve got drawing talent you won’t need the projector. 😉 If you’d like to see a KopyKake projector tutorial, click here. These shapes are so simple that you really don’t need the KopyKake though; you could just trace them! I projected them because I was able to change the size and make them bigger that way.
So, let’s begin!
- Cut the transparency (or parchment paper) out just larger than the size of the image you’re piping. Lightly coat transparency, with a small amount of shortening using some paper towel. This helps make the royal icing shape easier to remove when it’s dry.
![]()
2. Pipe royal icing outline

3. Flood or fill in your outline
![]()
4. Gently shake the transparency left to right to help the icing smooth over.

5. Shake disco dust onto your wet icing

6. Pick transparency up and pour excess disco dust back into container. Some disco dust sticks to the shortening but you can probably do a better job than me if you’re not rushing.

7. Make extras of your shapes as royal icing transfers can break easily, especially if they’re a delicate design. These ones weren’t too breakable as they were a bit larger. (I think I’d make them smaller next time though; they’re a bit too big for the cupcakes now that I see them on top).
![]()

8. Let icing dry for at least 24 hours.
![]()
9. Gently remove icing decoration by peeling the backing away
![]()
![]()
10. Place on cupcakes, cakes, cookies etc.

![]()
It may look like it took a long time to make the “LOVE letters’ with all the pics, but they’re actually quite quick and easy to make. Once I made and colored the royal icing, creating (doubles of) these took about 10 minutes. Then it was just a matter of letting them dry for 24 hours and making the icing and cupcakes.
Here’s a slideshow of the whole icing decoration process if you’d prefer to see it that way:
*
(Click here if you can’t see the slideshow).
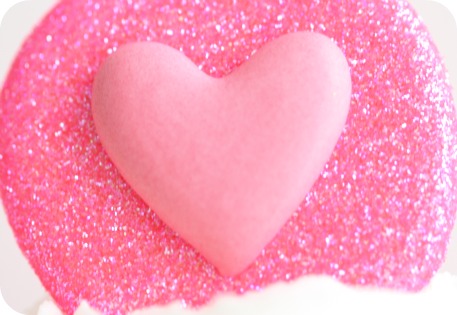
I made the pink ‘letter O’ reverse the original sticker as it was easier to make that way. For a visual how-to view the slideshow below.
*
(Click here if you can’t see the slideshow).
To see another post on how to put disco dust on cookies, click here or to see another post on making royal icing transfers, click here.
If you prefer video, HERE’S one in which I show how to make a royal icing transfer.

If you have any questions or comments, please drop me a line below and come join me on facebook here.
Enjoy making your ‘love letters‘! 😉
xo,
Marian


What a superb tutorial. Great idea and gorgeous cupcakes!
@ Jen @ My Kitchen Addiction, @ Lora:
Thanks for your comments! =)
hi love your posts, always and this particular is wonderful!! I am a “disco dust” dependent too, so I perfectly understand your need to use it!!! ciao and thansk for sharing with us your experience 🙂
These are so cute! LOVE the love cupcakes! 🙂
Love your site and tutorials!
Question: How far in advance can you make your RIT’s? Just wondering if I make them ahead of time while I have some “spare” time…
Laurie, you can make them months in advance as long as you carefully store them in a cool, dry place in an airtight containter.
*There’s a comment above on it as well.
Thank you SO much for this! I’ve been experimenting with Royal Icing and this was so helpful. I loved it so much, I posted it on my blog (crediting you of course)!!
love-the-day.com
Thanks so much Lindi!
I absolutely love these. I love everything about your site. My cousin Shelley from HowDoesShe has totally got me interested in everything you do! Quick question. What colors did you use of the disco dust? I’m mainly wondering what the pink color was. Love these. Thanks for sharing your talents!
Thanks and nice to ‘meet’ you @ Lara! You’ve got an awesome cousin in Shelley!
I checked out your sites as well; you and your family are gorgeous and you’ve done such a fabulous job with your blogs!
The disco dust is called Hot Pink. Here’s a link to my Amazon store where you can see it and other disco dust colors. You should be able to find these at your local cake decorating store by the way!
http://astore.amazon.com/sugarart-20?_encoding=UTF8&node=8
Happy decorating!
These are so cute. Iwant to try it and make one for hubby this valentines day. One question though, do I need to thin out th frosting to fill in the letters just like the cookie method? Thanks for all your helpful tips.
@ Rachelle: After I made my icing I did thin it out a little by using the 10 second rule (in my cookie decorating tutorial).
I used the same icing to outline and fill in the letters.
If you’d like to see a video on the decorating process, click here:
http://www.youtube.com/watch?v=0VMUykR14lo
Happy decorating!
WOW!!! Those are awesome! I am going to have to get some Disco Dust. My daughter will think it’s the coolest thing ever.
Marian….you are the sparkly sweet queen!!! I LOVE these!!! Wow….gorgeous!
@ Christi, @ bridget {bake at 350}:
Thank you!!
I saw the LOVE stickers at Michaels the other day and didn’t realize how little they are – yours look so much bigger! Super cute though
I attempted the royal icing decors like yours for my Valentine’s cupcakes this year. And I credited you in my blog for the idea and for the tips. Thanks!
http://acupfullofcake.blogspot.com/2011/02/valentines-glitter-cupcakes.html
Shanna
http://cupcakestakethecake.blogspot.com/2011/02/spell-out-your-love-cupcakes.html
I just thought you might like to know these are getting around!
Thanks for letting me know Kitty!
Ok the glitter on this post just makes me smile. I thought those were cookies and I was wondering how on Earth you got them to sand up and stay up without a prop…they are RI…that’s how.
Beautiful!
Ok, “8. Let icing dry for at least 24 hours.”…
Can I let dry in the refrigerator?
Because I live in a very hot place I was thinking it could not work if I let it dry on the table or something…
Thank you. =)
Hi Rahely,
No, there is too much moisture in the fridge. You would need an air-conditioned room, preferable with a de-humidifier. (Sorry!)
Some people let them dry in an oven with the light on, but I haven’t experimented much with this. You might have to try it out and see how it goes.
this step by step guide is GREAT!!!! its makes it easy for anyone to do! thanks for sharing!(:
How did you get your frosting ont he cupcakes so white? I wasn’t sure if you can tint frosting white like you can royal icing. Thanks!
@ alexis: I sure did! (colour it white with white Americolor coloring).
I love the glittery letters. soooooooo cool!!
Hi Marian!!!
I love your cookies so much!!!!
I have 1 question to ask…
Are the disco dust edible????
If I add it onto the cookies, could children eat the cookies???
Will appreciate if I could get your reply!!
Thank you!!
@ Cherol: Absolutely! Disco dust is labelled as non-toxic, and recently, it has come to my attention, that Sunflower Sugar ARt has made the effort to get their disco dust FDA approved.
Disco dust, to put it delicately, will go through the body’s system.
Hope that helps!
Hi Marian, I live in Mexico and I love your tutorials! I just recently began baking cookies and working with royal icing (your recipe).
I read this “love” transfer method and I was frustrated at first since I’m not good at free hand drawing and I was not able to get a KopyKake down here. Later on, I came up with an idea that I wanted to share with you and the rest of your followers.
What I now do is: look up the desired picture, print it on a normal sheet of paper (this also helps control the size I want it) and then place on top a sheet of wax paper. I secure both with some scotch tape to a rotating decorating table and I’m ready to work with the icing.
The wax paper is great since its really transparent and I also don’t need to add anything to it to prevent the icing from sticking, I just let it dry and voila!!!!
Hope this helps others like me.
Thank you for your insights and I hope I can be as good as you one day ;D
@ Karla Magana: Karla, thank you! You’re so kind!
If you’d like even more options check out the Kopykake projector tutorial; I outline options besides the projector near the bottom of the tutorial.
Have fun decorating!
I tried royal icing transfers for the first time this weekend. Lots of lessons learned! Definitely let them dry overnight and use the shortening on the transparency! I also put them in the freezer for a couple of minutes before peeling them off the transparency. It made them a bit stiffer since mine were a bit thin. Thanks so much for the tutorial!
These are do cute. I’m definetly going to try this!
Are you able to attach these to cookies with Royal Icing? How would you recommend attaching to cookies?
Absolutely, @ Dedi. They are fragile, but you can attach them with royal icing. These cookies here are royal icing transfers.:
https://sweetopia.net/2011/05/how-to-color-royal-icing-black/
here:
https://sweetopia.net/2011/06/baby-shower-decorated-cookies/
here:
https://sweetopia.net/2011/02/video-royal-icing-consistency-made-easy-the-10-second-rule/
and here:
https://sweetopia.net/2011/04/top-8-tips-on-preventing-cookies-from-spreading/
What kind of Pastry Bag is good for a beginner where I don’t want to be frustrated? May I use your love cupcakes pic on my sidebar as a decoration! I will link to you!
@ Miss Paula: For decorating cookies, I use disposable. For cupcakes, because the buttercream is stiffer and can make disposables pop easier, I use a polyeurethane or canvas piping bag.
And yes, I’d be honored if you used the pic, thanks!
When I saw a picture of the finished cupcakes I said to myself that the fonts and colors look so familiar. Of course I followed the link to the tutorial and Tah-Dah (no wonder!) I work for the company who made that embellishment. I love how it turned out in royal icing, it almost looks like the real thing. 🙂
Such a lovely idea, I’ll have to try it. Althought it would end up in a mess, knowing me 😛
These are SO COOL!! I can’t wait to try it. Thanks so much for sharing. I like this method so much better than flat icing with drawn-on letters.
So neat that you work for the company @ Annie! I love the design!
@ Sylvia @ My Lovely Bites: You never know! Try it!
@ Windy: Have fun decorating!
It’s very romantic!!! 🙂
Hey! I was looking in my candy supply store for disco dust and found that theirs was “not a food product” but simply non-toxic. Is that the case with your disco dust or should I keep looking for edible disco dust? I really want to use it for Valentine’s Day items I make and was so excited that I found it, but unsure if I should use this particular kind if there is something better out there. It looks like and is packaged exactly like the product you use. I look forward to your input. Thanks!
HI @ Sweet Melissa: So far, all the disco dust is labelled as ‘non-toxic’ but apparently Sunflower Sugar Art is working on getting hers officially FDA approved. Still waiting to hear on that one! Pilar (SSA) says that that non-toxic means it’s safe to eat (non-toxic to eat), but she wants to go further to get it officially FDA approved. I’m looking forward to hearing her results!