


I’m definitely a sucker for it.

I’d use it on almost every cookie if I could (but I try to restrain myself), but when I found these sparkly LOVE stickers at Michael’s Craft Store I knew I had to make a sugar version of them.
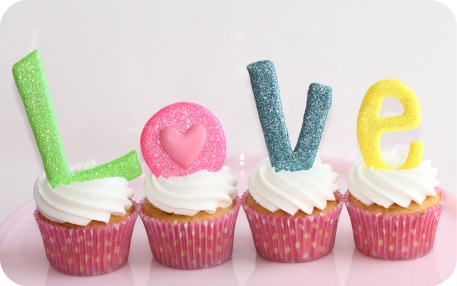
I ended up making simple royal icing decorations (also known as transfers, runouts or floodwork), instead of cookies, for these Valentine cupcakes.

If you’d like to try making these cupcakes and icing decorations, check out the how-tos below.

*
For the Valentine {Love} Cupcakes, you’ll need:


- You can find a video on how to make the cupcake swirl here.
*
*
For the Royal Icing {Love} Toppers, you’ll need:
- Royal Icing Recipe and Food Gel Colorings
- Piping Tip #2
- Piping Bag
- Coupler
- Parchment Paper or Transparency Sheet
- Shortening
![]()
*
How to Make {Love} Sugar Decorations:
I used my KopyKake projector to project the Love stickers so I could trace the image, but if you’ve got drawing talent you won’t need the projector. 😉 If you’d like to see a KopyKake projector tutorial, click here. These shapes are so simple that you really don’t need the KopyKake though; you could just trace them! I projected them because I was able to change the size and make them bigger that way.
So, let’s begin!
- Cut the transparency (or parchment paper) out just larger than the size of the image you’re piping. Lightly coat transparency, with a small amount of shortening using some paper towel. This helps make the royal icing shape easier to remove when it’s dry.
![]()
2. Pipe royal icing outline

3. Flood or fill in your outline
![]()
4. Gently shake the transparency left to right to help the icing smooth over.

5. Shake disco dust onto your wet icing

6. Pick transparency up and pour excess disco dust back into container. Some disco dust sticks to the shortening but you can probably do a better job than me if you’re not rushing.

7. Make extras of your shapes as royal icing transfers can break easily, especially if they’re a delicate design. These ones weren’t too breakable as they were a bit larger. (I think I’d make them smaller next time though; they’re a bit too big for the cupcakes now that I see them on top).
![]()

8. Let icing dry for at least 24 hours.
![]()
9. Gently remove icing decoration by peeling the backing away
![]()
![]()
10. Place on cupcakes, cakes, cookies etc.

![]()
It may look like it took a long time to make the “LOVE letters’ with all the pics, but they’re actually quite quick and easy to make. Once I made and colored the royal icing, creating (doubles of) these took about 10 minutes. Then it was just a matter of letting them dry for 24 hours and making the icing and cupcakes.
Here’s a slideshow of the whole icing decoration process if you’d prefer to see it that way:
*
(Click here if you can’t see the slideshow).
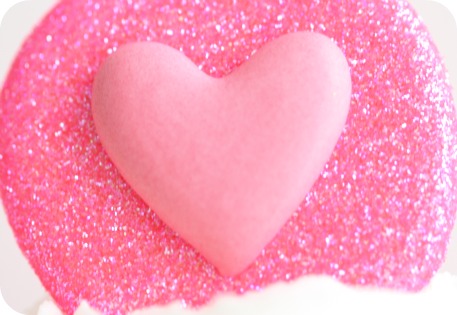
I made the pink ‘letter O’ reverse the original sticker as it was easier to make that way. For a visual how-to view the slideshow below.
*
(Click here if you can’t see the slideshow).
To see another post on how to put disco dust on cookies, click here or to see another post on making royal icing transfers, click here.
If you prefer video, HERE’S one in which I show how to make a royal icing transfer.

If you have any questions or comments, please drop me a line below and come join me on facebook here.
Enjoy making your ‘love letters‘! 😉
xo,
Marian


Love these “love” letters! Where do you get the disco dust? I haven’t seen it in any stores…do you know a site to order from? I love your website…it is always so inspiring!
too stinkin cute! can you also use wax paper?
This tutorial is so amazing!!!!!!! ♥ Thank you so much for the easy and detailed step-by-step :0) I’ll def try it!!!!!!! ♥
so lovely Valentine cupcakes ! I am one of your absolute French fan. Thank you for all these delicious posts and photos 🙂
@ Nancy:
Click on the very first word of the post, Disco Dust and it will take you to Amazon, which has a great selection.
@ Samantha:
You can!
Thanks as well Ibette and Celeste!!
OMG! These are amazing!! I’ve been wanting to bake and get creative again, so this is definitely something I want to give a try! 😀 Buying some disco dust soon~ You’re so creative, I love it ♥
Those are just darling!
So grease doesn’t affect royal icing if it isn’t mixed in it then? I have so much to learn! 🙂 These are adorable. I’m so frugal with my disco dust I’d have a hard time making these…
LOVE the disco dust ‘LOVE’! 😉
These are really cute cupcake toppers! They almost look too good to eat! 🙂
I LOVE this!!! You know I have to try them. Beautiful work 🙂
I have been wanting to try royal icing transfers as cupcake toppers, but I’ve heard that they will dissolve after you put them in the icing. I wonder how long they will hold up in the icing before the dissolving begins – does anyone know?
@ Tara, @ Jill: So far I’ve had the pink circle in a cupcake for 24 hours and there’s no damage. I’m going to be keeping these cupcakes in a display case showcasing our hospitality program at school (Students will be learning how to make these when the new semester begins in a few weeks), so I’ll be able to keep tabs on the progress. I’ll keep you updated. So far, no deterioration or dissolving!
@ Valerie, @ Kate, @ evelyn, @ Anna ♥ Sugarized, @ Mari’s Cakes: Thanks so much!
AWESOME!! Got to make these 😀
Just wondering….is there a reason you prefer to use shortening or is that just the method you were taught? I just use wax paper when I do royal icing decorations and it peels off without a problem (it’s the method I was taught).
Those are adorable! I actually have those love letters for some decorations around my house so this post totally caught me!!
@ Maysem:
That’s probably just it; it’s the way I know how! If you do use a transfer sheet it definitely needs shortening because it’s not non-stick like wax paper. I like transfers because they’re a bit stiffer than wax paper and you can trace if you need to. @ Courtney @ Cooking Up A Family:
Thanks! ♥
STUNNING, Marian! You have such an artful eye, finding inspiration everywhere:) I need to be on the lookout! Thanks for the tutorial.
@ Sue:
Thanks! =)
I simply LOVE this! It’s such a cute idea and easy too. Thank so much for all of your creative talent and for sharing it with everyone!
Thank you for your comment @ Kimmie! ♥
Really gorgeous!! Beautiful idea and love all the sparkle =) So creative Marian!
Thanks Glory!
That Candy Christmas party was delayed due to snow by the way (guests travelling from far)!! I’ll be posting it in the fall now. Haven’t forgotten!
Marian these are so awesome! I love me some disco dust! I have never made any royal icing letters, etc. so this was very inspiring for me! Thanks for the tutorial and great photos!
LOVELOVELOVE these!!! You are so dang smart girl!!!
Great tutorial Marian. The cupcakes and disco dusted decorations are adorable.
OMG I LOVE these and how easy, who’da thought!!!!
Thank you thank you thank you!!!!!!!!!!!!!!You are awesome……as always!
@ Tammy, @ Amanda, @ Paula: Thank you!!
Gorgeous little cupcakes. I haven’t even started to think about Valentine’s yet!
Those are to die for! Love the disco dust. Royal icing is so intimidating~ maybe i will give it a shot though. Thanks for the tutorial:)
Where did you get your pink cake stand? I’m in love:)
@ Adele: Thanks!
@ Sherice Sparrow: I got it on ebay. It’s a pink milk glass cake stand. Here are more on ebay:
http://shop.ebay.com/?_from=R40&_trksid=m570&_nkw=pink+milk+glass+cake+stand
Another great post from you 🙂 Such a beautiful cupcakes and such a fantastic idea.
Love these!! They are beautiful and glittery!
Dominika & Jade @ The Mess Pot, thank you!
These are AMAZING! Do you think this method would work with candy melts?
Alicia,
I was thinking about that too! That would be tasty. =)
After the candy melt had been piped, I think it would need to set for a bit before sprinkling the disco dust on. With the royal icing I can sprinkle the disco dust on right away, but I wonder if it would sink into the warm/hot candy melts.
“LOVE” the cupcakes. They are adorable. I have never bought disco dust before. It makes the letters look great!
WOW! These are FABULOUS! I just love them!
Thanks for sharing. I’m going to share this on FB (www.andersruff.com)
What an awesome tutorial! I am going to be doing a valentine cookie posting on my blog soon and i can’t wait to apply everything i have learned on your blog 🙂
Gorgeous tutorial Marian! Thank you for sharing such a brilliant idea! I must try out disco dust now! 🙂
@ Melissa, @ Maureen Anders, @ Monica, Thank you for your kind words!
@ Cakewhiz: I’d love if you shared your Valentine post on my Sweetopia facebook fan page if you’d like to!
Gorgeous beautiful Marian! wish you a wonderful weekend
xo
These are so cute! How cute would they be in mini cupcakes?! OMG! I think I will do mini cupcakes and give away 4 (all four letters) as Valentine’s Day sweets! Thanks for the idea!!!!
One question: I have read that disco dust has not been approved by the FDA…is it safe to eat, or just a decoration?
Thanks again, for sharing this awesome idea!!!
Absolutely adorable! I just love it! Thanks for such clear insructions, pics, and tutorials! I love all your work and appreciate all the time you put into your cool website!!!!!
This are beautiful! Thanks for sharing this great idea. I dropped a whole container of disco dust on my floor last night. It was sad and beautiful all at the same time. 😉
@ Rowaida Flayhan, @ Sarah Green: Thank you for your sweet comments!
@ Dani Nicole: Thanks! Great idea; they would be cute on minis! About your question; I discuss that issue right here:
https://sweetopia.net/2009/12/how-to-apply-disco-dust/
@ carolyn: Ouch! I completely see how that could be said and beautiful at the same time! lol.
I always imagine the news story my husband told me about once – he saw a story on t.v. where there was an accident with a huge ship… cargo ‘fell/spilled’ into the ocean… =( Some of it was disco dust, and the ocean in that area was filled with floating sparkles. Beautiful but so sad.
ANYways, happy decorating! Would love to see what you made if you’d like to share it on my fb page.
that is a ton of glitter…you dont actually eat the letters though…right?! i have done a lot of looking around and they say you are not supposed to ingest disco dust. it can be used for decoration purposed only!
@ Kristine Bizzelle:
I mention that in my post here:
https://sweetopia.net/2009/12/how-to-apply-disco-dust/
“I should mention again that although it’s labelled as non-toxic and is sold as a food product, disco dust hasn’t been reviewed by the FDA. Until recently I thought it would be like the gold flecks in Goldschlager, however those have actually been FDA approved.”
These are absolutely beautiful! I love the sparkle from the luster dust!