
Video Tutorial on Drying Cookies Made with Royal Icing & Making Parisian-Themed Cookies
If you can’t see the video click HERE.
If you prefer watching videos on Vimeo, click HERE.

Hi there!
Hope all of you are having a good start to 2012 and hope this year is filled with lots of sweet things for you.
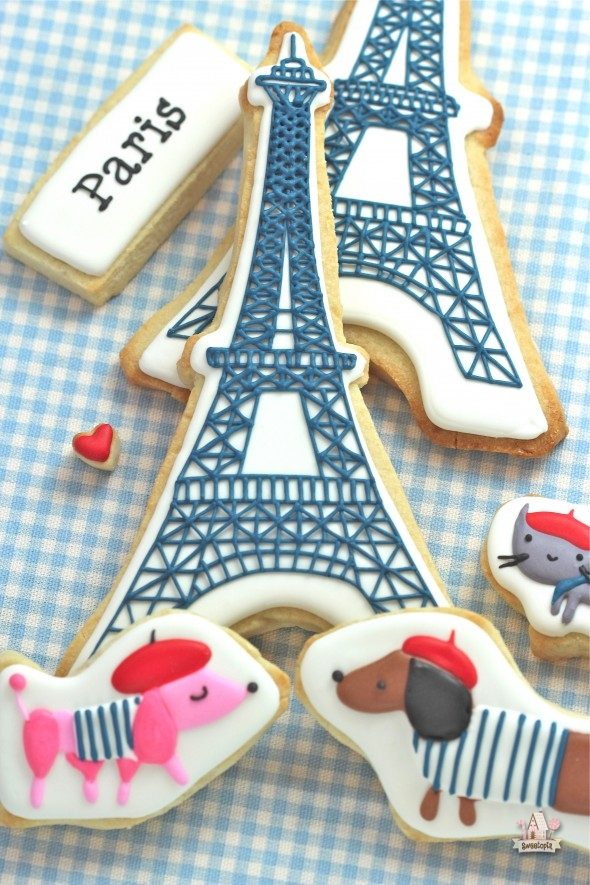
I’m excited to start my year with some fun cookie themes, like these Parisian ones here. I’ll be doing a travelling series of Around the World decorated cookies, and I just happened to begin my journey with Paris, France.

Oh la la!

I knew when I found these paris design sticky notes![]() by Jillian Phillips, I just had to make a cookie version. Thank you to Jillian and Lilla Rogers for allowing me to use her images! They were so fun to make, and really quite simple once you know a bit about piping royal icing. If you need some guidance, a good place to start is with my Cookie Decorating Tutorial, and two videos on Icing Consistency and How to Pipe Icing Lines.
by Jillian Phillips, I just had to make a cookie version. Thank you to Jillian and Lilla Rogers for allowing me to use her images! They were so fun to make, and really quite simple once you know a bit about piping royal icing. If you need some guidance, a good place to start is with my Cookie Decorating Tutorial, and two videos on Icing Consistency and How to Pipe Icing Lines.

As part of this post, I thought I’d share with you how I dry my cookies after I’ve decorated them with royal icing. It seems like such a simple thing but if you’re new to cookie decorating there can be lots of questions about how to do it so that your cookies turn out. You can find all my tips in this video here (I’ve put it here in the post again in case you missed it because sometimes the page takes a while to load):
Video on How to Dry Cookies Decorated with Royal Icing
If you can’t see the video click HERE.
If you prefer watching videos on Vimeo, click HERE.


Something I didn’t mention in the video, is that the cookie shapes were made using templates I made, not cutters. I thought I had an Eiffel Tower cookie cutter and when I went to look in my (eep, hundreds of) cutters, I didn’t actually have one.

Either way, if you’re not making too many of these, cutting the cookies out with a template and paring knife, isn’t difficult, it just takes a bit longer than using a cutter.

You can find an Eiffel Tower cookie cutter here![]() , and for the other shapes you can be creative and use other cutters you already have. Take for example the dachshund, Cindy asked on facebook if it was from a stocking cookie cutter. It wasn’t, but it easily could have been. Thanks for the idea, Cindy!
, and for the other shapes you can be creative and use other cutters you already have. Take for example the dachshund, Cindy asked on facebook if it was from a stocking cookie cutter. It wasn’t, but it easily could have been. Thanks for the idea, Cindy!


I’m thinking these would work as romantic Valentine cookies too, don’t you?

Now I’ve got some questions for you…

Where in the world do you live? Are there buildings, things or symbols from your city or country which you think would make great cookies?

Share your thoughts with me here in the comment section below, or you can share them on Facebook or twitter. I can’t wait to see where you’re from and which cookies you’d love to see!
Happy decorating!
xo,
Marian

p.s. I’ve linked these cookies to TidyMom’s I’m Lovin’ It. Check out her page for lots of amazing and fun ideas!


So love all your cookies! As a baker and a graphic designer I love the ability to create beautiful cookie designs.
This is a silly question but what is the piece of music you used for the tutorial for drying cookies with royal icing. The French music is lovely and my daughter is a figure skater.
Many thanks for all your fantastic posts! Cheers, Holly
Hi there, I am in awe if your talents and thank you for sharing so much of them with us. Since I don’t have a projector but want to make those Parisian dog and cat cookies somehow, could you tell me where I can find those images? Thank you!
Hello Marian, Beautiful Cookies — C’est magnifique !
I live in Florida — humid most of the time… Thank You for the tip and beautiful video with music — I play the accordion and I don’t know this French Tune… do you happen to know the title?!? I can sorta play this by
ear now but to catch some of the notes I’m missing, I would love to find
the song… Thank You — Enjoying all of what you create!! Thanks for Sharing!!
Which cookie cutters did you use for the dogs, cat and the coffee cup with the croissant?
Thanks
Hi dear!
Do you think you could you share your eiffel tower template?
I just learned how to transfer images to an iced cookie using the tissue paper method and I would love to give it a try on eiffel tower cookies!
Thanks!
Cy
I was wondering if you could share the Eiffel tower template you used.
Thanks so much!!
Hello,
I just watched your video on drying cookies after they are decorated. What about before they are decorated? When I put cookies on a paper towel, I notice oil spots underneath. Should I let paper towels soak that up before decorating? Is that normal? Thanks.
I just have to tell you that these cookies are gorgeous!!!!! They are way beyond anything I could ever even dream of doing, but they are so beautiful to look at!! Thanks for sharing your talent! 🙂
These cookies are amazing! Beautiful work! This is my first time decorating with royal icing and I had no idea it takes so long to dry! Thanks for the info
hi Marian,
Your cookies are beautiful! I’m originally from Philadelphia and still feel warm and fuzzy over the history of the city and the food. Perhaps you will consider the Liberty Bell, Independence Hall, Betsy Ross’ 13 star flag and of course, a soft pretzel.
I like the idea of trying the dog out with a stocking cookie cutter. Very imaginative! I made ghost cookies for Halloween one year and they were a huge hit.
Have fun with your round the world cookies! Taj Mahal for India?
Warm regards,
Susan
Your the most talented person!! Beautiful work!! Thank you for this video.
I only outlined with royal icing made with egg whites on my sugar cookie cutouts. Should they stay at room temp for that long too? Thank you for any help.
Hi Patricia,
Those don’t need to long to dry… I’d wait about 15 minutes to an hour for outlines, depending on how much of a hurry I’m in.
What size icing tip did you use to make the dark blue lines on the eiffel tower?
Hi Whitney,
It’s been awhile but likely PME #1.5
Good morning:
I noticed some sort of shadowy template for the Eiffel Tower – can you point me in the right direction to make the same *perfect* designs on the treats? THANK YOU! And you’re vid was awesome!
Hi Letty,
It was an Eiffel tower sticker… It is STILL being sold at Michael’s! I can’t remember the brand off hand but check out the stickers at Michael’s Craft Store. I will go soon again to look at the brand. Let me know if you find them too please.
Hi Letty,
So I went back to Michael’s and didn’t see it this time. I think it was the sticker brand Kate and Company though. I’m sorry this isn’t more helpful!
HI again Letty,
I found it! It is by K & Company. It’s a 12 piece sticker pack … Happy Trails Paris Grand Adhesions Dimensional Stickers.
I’m new to your website, so I’m sure you’ve probably posted this before, but what kind of project or do you use to make stencils for your cookies?
Hi Elizabethann,
I use the Pico, here is a tutorial if you like; https://sweetopia.net/2019/08/using-a-pico-projector-video-tutorial/
Have fun decorating!