
Can you tell how these cookies took half the time to dry than usual?
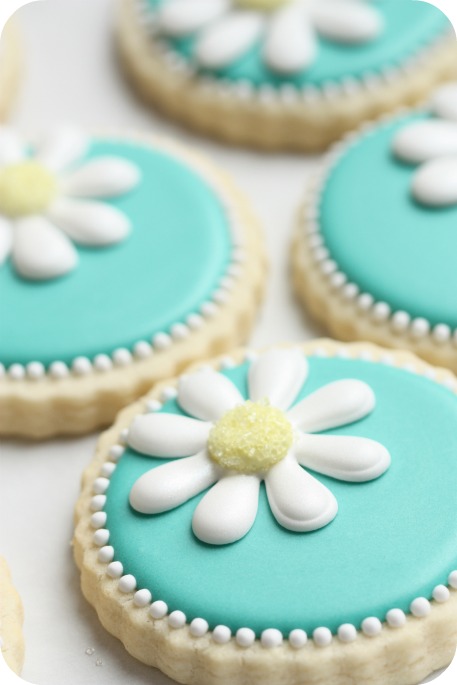
If you haven’t figured it out, maybe a hint… It has something to do with the fact that the daisy petals are able to ‘hang over’ the edges of the base.

The daisies are royal icing transfers. 🙂 (I’ll show you how I made them in the video below).
Instead of having to pipe the design on my base and then wait to let that dry, I was able to pipe both the teal base and the daisies, let them dry, and in 24 hours, adhered the daisy to the cookie. Voila! (The things that make me happy. Lol).

If you’d like to see how these were made, including a few tips about decorating with the Kopykake projector , click on the video below.
*
{Video} How to Make Decorated Daisy Cookies
If you can’t see the video, CLICK HERE.
And a quick pictorial overview:

A note in here for those of you who read my photography tips post; I orgininally made the collage below first and then decided to put all the steps in one, so made the collage above… and forgot to fix the lighting… can you see the difference?
![]()
Anyways, a few other things to mention:
- After I made the video, I decided to spray the cookies with PME pearl lustre spray
for a little sheen.
- If you’d like a more detailed pictorial how-to on making royal icing transfers, click here.
- I used Americolor food gel color
for the base of these cookies:

- These cookies might work well as ‘name-tag’ favours if you added the names to the open space.
- Thanks to Kim of The TomKat Studio and HGTV for including these cookies in their Yellow & Blue Easter Brunch!
- I’m working on a thorough Kopykake Projector
Tutorial Video. Coming… soon? For now, for those of you interested, here’s a post on it (click here).
- The KopyKake projector isn’t needed to make these cookies; you could just trace the daisy instead of projecting the image. I like the projector because 1) it’s faster for me to just pop the image in and project and 2) more importantly, if I’m making a more detailed image like the owl cookies in this post here, I’m able to see the second layer (owl’s eyes and belly), whereas if I were tracing I’d only be able to trace the first layer (brown body).

What would you like to see in the next video? Drop me a line in the comment section below, on YouTube, or my facebook page here.

And in case I’m not able to post again before then; Happy Easter to you!
I hope the Easter Bunny brings you sweets. 😉
xo,
Marian


Amazing as always, Marian you should think of making a book your cookies are amazing and so are your tutorials, love
Best of luck and success
Thank you Rowaida! You’re so kind!
thats looks amazing but could you by any chance show us how to make a royal icing rose o:)
Thanks Rola! I’m not very good at making them with icing. If I do make them I usually make them with gumpaste and I use Peggy Porschen’s way of doing them. Sorry I’m not more help with that!
Wow, these are super adorable and I love the colors! Great tutorial.
@ Marian:
Thanks Marian, but 1 cm is 1/3 inch, not 3/4 inch. I’ll use my cm ruler to be precise! 🙂
Yikes! Thanks for noticing that! They’re definitely not 3/4 of an inch if I had been using my noggin while I was typing- that’s SO thick. I think you can tell by the pictures that they’re about 1cm! Thanks!
I thank you!! You’re great!!!
Thanks Francesca!
I just used your fabulous tutorial to make these cookies! I hope they are a huge hit at our Easter get together. I’m not a decorator by any means, but I was able to get beautiful looking cookies following your simple directions. Thanks so much!
Jenn, I’m SO glad to hear that the tutorial was helpful for you! I just popped over to your site to see them; they look fabulous and I’m sure everyone will love that you made them! Now that I’ve seen your adorable stamping ideas, I’m feeling a new hobby coming on… 😉
I just discovered your site from Foodbuzz Top 9 and am in love with all these creative and beautiful ideas! I especially love these daisy cookies. How pretty! You make it look so easy. I think I’ll make these for a Mother’s Day bake sale. I am bookmarking your site and will be following for more great ideas and inspiration!
Really thank for your wonderful tutorials, your detailed instructions are absolutlely helpful! Could you please tell how can we have a shiny icing? I usually use this recipe: powdered sugar + lemon juice + egg white, is this the same I mean in result for decorating?
Have a nice day!
Hi Sunshine, Many of my shiny pics of cookies are when the icing is still wet, but you can add a little corn syrup to the royal icing to add a bit of shine, or try putting PME lustre spray (pearl) on.
Hi Marian,
Your work is beautiful and your tutorials are always so helpful and beautifully photographed. Thank you for your blog. I was wondering if you are on Etsy? There is someone using this exact picture of the Daisy cookies and if it’s you, then forget I asked. But if it’s not, just wanted to give you a head’s up. Here’s the link. http://www.etsy.com/shop/clmoore35
I decorate cookies as well and would hate for someone to use my pics as if they were their own.
Regards,
Teresa
Thanks! I’m not on etsy, and yes, they’ve used my photograph without permission. I’ll send them a quick note. Thank you Teresa!!
@ marian:
You’re welcome! 🙂
HI ! These cookies are so beautiful. I love them! I have just started making Royal Icing decorated cookies – could I ask you a few questions??
1. You mention to add corn syrup to the icing to make it shiny – I’ve been told to use glycerine to make them shiny and not set too hard so the icing doesn’t crack when bitten…have you heard that?
2. Do you use the same consistency to pipe and flood? It seems like it…
3. I add vanilla extract to my recipe because I like the taste better but I have been having some issues with the color getting blotchy after it has dried – have you ever had that problem? I wonder if it is related to the extract?
Thanks in advance for any help – you are so talented!!
Thanks dawnmski!
1. Yes, I’ve heard that about glycerine; it’s on my list of ‘posts to write’
2. Yes, you can see one example of how I do it in this video here: https://sweetopia.net/2010/12/video-how-to-marble-or-swirl-royal-icing/
3. I don’t usually add vanilla extract because my meringue powder has vanillin in it already. I’m not 100% sure if that’s the issue (extract making the icing blotchy). Hmm. Have you tried the icing I use (Antonia 74’s which can be found here – https://sweetopia.net/2009/06/cookie-decorating-tutorial-general-tips-butterfly-cookies/
Sometimes I wonder if that issue happens because grease from the cookie goes up into the icing. (Maybe need to try a dif. cookie recipe, dif. icing recipe, or both).
Let me know how it goes!
thanks so much for the generous sharing! I’m giving these techniques a try, with limited success so far (practice, practice, practice!). Could I ask? what diameter are the sugar cookies in this tutorial? likewise the daisies? maybe I’m trying to work on too small a scale (as a beginner!).
thanks.
spookercat, I checked the cookie cutter I used – they are 9cm in diameter; and yes, it is easier to work on a larger cookie! I don’t have the daisy stuff anymore but I’m guessing if the cookie was 9cm, the daisy would have been about 4-5cm.
Good luck! You will get better with practice and with tips and tricks!
so beauthuful!!!!! thanks!!
Hi there. Absolutely LOVE your blog. I am new to this (never iced a cookie!) and doing as much research before I dive in. Am well prepared with more than I need but can’t seem to find the answer for storing cookies before they are iced and during each icing stage. Once cookies are baked do you store in an airtight container? Once iced and have to wait a day to continue icing how do I store these? You are an inspiration. Thank you for sharing all you have. The daisy cookies are going to be my first attempt! Very excited 🙂
Hi Desiree,
I let them cool thoroughly first and then I usually leave mine on the baking sheet and cover the baking sheet with saran wrap or foil until I decorate them. You can actually buy covers for baking sheets, but I don’t own any.
If I don’t have enough baking sheets I do put them in an airtight container between layers of parchment.
You seem like you’re very prepared and organized! For your first time, don’t be too hard on yourself; the cookie decorating tutorial and the top 10 tips I have will help (especially like the tip about letting your icing just fall when you’re making outlines etc. – that one helped improve my piping a lot), but a little bit of practice goes a long way too, so the most important thing is to have fun!
Would love if you come back and share your cookies here or on facebook.
Have fun Desiree!
Did you ever perfect the chocolate sugar cookie receipe?
Not yet! Sorry Serwaa!
Your site is amazing. I’ve learned a lot – thanks 🙂 Just one question…How do you get perfect circles? I’ve drawn the outline like you did, but my hands shake a lot, so they still come out wonky…lol
Thanks Shannon! I do rest my arm on the table and make sure I let the icing fall onto the cookie. Besides that, maybe a little more practice will help! xo
@ Jacque:
Hi Marion,
JUst started to use my new kopykake, so I have a question, how do you keep your hand out of the light? I know it sound silly but everytime I went to outline my hand was in the light. Any tips would be helpful.
Thanks!
@ Diana Keller: No worries! I discuss that issue in my tutorial here:
https://sweetopia.net/2010/06/decorating-cookies-with-a-kopykake-projector/
Super Cute! I plan on making these for my daughters girl scout Daisy Troup.
I am new to baking cookies, and love your site! What tip do you use to make the border on this daisy cookie? Do you just squeeze a little icing out and touch up any “point” left on the ball with a brush? They balls are so perfectly round! Thank you so much!
Hi @ Kathy: Sometimes I do use a paintbrush, or even a toothpick, but if the icing is runny enough, then the icing falls back onto itself. You can see me making it in the video if you like. xo
Hello,
These cookies are absolutely adorable! I am planning my cousins baby shower & she love love loves daisy’s & her theme will be daisy’s as well. I was wondering if you sell them? Please let me know, thank you very much! I love your website and your work, simply amazing!
These cookies are amazing! You are oh so very creative! I just found you via Stumble Upon and I’m so glad I did. Thank you.
Hi Marian thank u for ur wonderful tutorial. Since I’ve seen ur video I’m eager to try this. I just want to ask u 1. We don’t have crisco in this country . Can I use butter to wipe my transparency film? 2. Is transparency film safe to use for decorating when ur talking about food & hygiene safety? Thanks I wish u all the luck …
Hi @ Lucia: No sorry, I don’t, but you can find talented decorators in the Decorator Directory in the sidebar of the blog.
Thanks @ Shirley from Funchkins!
@ Jan: I haven’t tried butter, so I’m not really sure if it would work, sorry. Another thing you can use if you’re concerned about both issues you mentioned, is simple parchment paper.
Hi Marian!
I loved watching your daisy cookie tutorial…what a great way to start my day!
Thanks for sharing so much with us! I think I may need a KopyKake projector from Santa this year…I’m not sure that I can wait that long?
hi marian, my name is laura and i´m 14 years old. i made this cookies for a bake sale they took a lot of time and hard work but evry body loved them!
thenk you so much for you help…
xoxo Laura
Hee hee @ Jules, I know the feeling!
@ laura: I think that’s so great! Such a young age and creating already – I think you are wonderful! xo
You make that look soooo easy!
These cookies are absolutely beautiful. Thanks for sharing.
My first grandbaby will be born soon….her name is going to be Daisy….I can’t wait to make these cookies for her Mommy after she is born!!
Thanks for the video and the ideas….plain, simple to understand and you did a top knot job!!!! Thank you!!
What food coloring markers do you use to line your cookies?
@ Alejandra: Americolor.
Thanks for all your comments @ Mary McCord, @ Anita Barker, @ Deedra!
What was the size of the second cookie cutter that you used? Your work is beautiful and I love the tutorials on your website.
Hi @ Gena Murray: Do you mean the circle? If yes, I’m sorry, it’s been so long since I’ve made these, I’m not sure any more. If you mean the daisy shape, it’s a Wilton cutter, here:
http://www.shopping.com/Wilton-Wilton-Comfort-Grip-Flower-Cookie-Cutter/info
Hope that helps!
I just wanted to say that I am
so impressed with the kindness
and warmness in your replies : )
You make everyone feel very
very welcomed and encouraged.
I just found your site today
and made football jersey cookies
for a super bowl cake I had to
do. They turned out just great.
Thank you! I have learned so
much from your very informative
and easy to follow instruction.
: )
Aw, @ cyndi barnett, thanks so much for making my morning with your sweet comment – really, I read every comment and yours is especially kind, thank you. I’m glad your cookies turned out great! xo
I’d like to ask if where do you keep the cookies while letting the icing completely dry for 24 hrs?
I love your works, you’re an inspiration to aspiring bakers like me. You’re very helpful, thank you and hope to meet you one day!