
This is my first tutorial on tips and tricks for decorating cookies with royal icing. I have to say first off, that I’ve learned many great tips from various sources on the internet, from books and from cookie decorating classes. If you’re interested in other sources here are the main ones I’ve learned from:
1. Internet:
http://cakecentral.com – Find forums to chat with others about cake decorating etc., photo galleries for inspiration, tutorials and more on this gold mine of a cake decorating (& more!) site.
http://www.cakejournal.com/ – A lovely site with beautiful work by the author, Louise. She’s so great you might want to just leave here and check out her tutorial on decorating cookies! Why am I even writing this?! =)
http://chiccookiekits.blogspot.com/ – Meaghan’s got a great site dedicated to all kinds of cookie decorating. In addition to publishing her own book, Cookie Sensations
http://www.youtube.com/watch?v=tZBXVveAEPE – Cat Cora from Iron Chef, shows how to decorate cookies on youtube.com. Hers is good for the beginner. There are lots of other video tutorials on youtube as well!
There are so many other great sites out there; have fun surfing!
*
2. Books:
Peggy Porschen’s books

Cookie Craft
Toba Garrett’s Creative Cookies
*
Classes:
Bonnie Gordon’s School of Cake Design (www.bonniegordoncakes.com) – Super if you live in the Toronto area! I enjoyed the cookie decorating class offered there and learned some helpful tips. There are many other great-looking decorating classes I’d like to try in the Toronto area, but haven’t taken the classes yet, so I can’t comment on them at this point in time.
*
Okay, here we go!
Decorating cookies is often called ‘flooding’ because you can essentially create a dam, wall or outline of icing on the edge of your cookie, and then ‘flood’ or ‘fill in’ that ‘dam’ with icing. There are those who like to decorate without using a dam by just applying the icing, but I find that I’m able to add more icing onto the cookie when the dam holds it in, therefore making the cookie surface look more thick and rich.
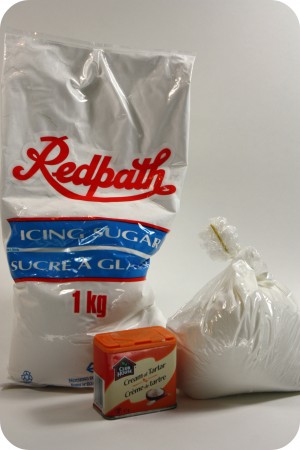
One of the most important components of decorating cookies is the royal icing itself. I have two favorite recipes; Antonia74’s (from cakecentral.com), and Peggy Porschen’s recipe from any of her books
Royal Icing Recipe
Ingredients:
6 oz (3/4 cup) of warm water
5 Tablespoons Meringue Powder
1 teaspoon cream of tartar
1 kilogram (2.25 lbs.) powdered icing sugar

*** Note; if your meringue powder has no vanilla flavour (vanillin powder) in it, add a teaspoon of clear vanilla to this recipe.
Directions:
In mixer bowl, pour in the warm water and the meringue powder. Mix it with a whisk by hand until it is frothy and thickened…about 30 seconds.
Add the cream of tartar and mix for 30 seconds more.
Pour in all the icing sugar at once and place the bowl on the mixer.
Using the paddle attachment on the LOWEST speed, mix slowly for a full 10 minutes. Icing will get thick and creamy.
Cover the bowl with a dampened tea-towel to prevent crusting and drying.
Tint with food colourings or thin the icing with small amounts of warm water to reach the desired consistency.
*
Besides your cookies and the ingredients for the royal icing recipe, you’ll need your tools:
Cookie Decorating Tools:
1) piping bags


3) piping tips
4) couplers

5) coupler covers – these aren’t necessary; you can just rest your tips in a damp cloth
4) glasses – to stand your icing bags in
5) clean cloths – a few damp and dry ones nearby
6) toothpicks

Icing Tips and Tricks:
One of the most important things I’ve learned about cookie decorating is that if your icing isn’t at the right consistency or thickness, the experience can be very frustrating.
So, once you have made the icing, it ususally needs to be thinned a bit to create the best consistency for decorating. This means that it needs to be fluid enough so that it will flow just enough that it settles into your cookie dam, but not too much so that it runs over.
You may realize that that the icing was thinner before you whipped it for 10 minutes according to the recipe, but it does make a difference in the texture that you mix it that long. Do mix it for 10 minutes and then thin it out if you need to.
Add just drops of water at a time to make the icing runnier. If you add too much water at a time it’s more difficult to thicken it with icing sugar than it is to add water to it.
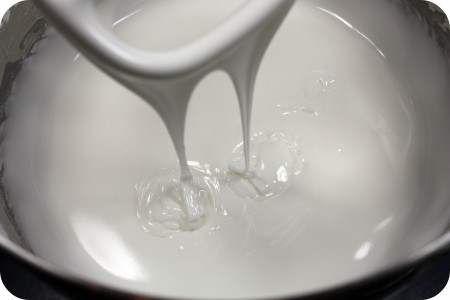
The trick I use to make sure my icing is at the right consistency, is called the “10 second rule“. Drag a butter knife through the surface of your royal icing and count to 10. If the icing surface becomes smooth in anywhere between 5-10 seconds, then your icing is ready to use. If it takes longer than approximately 10 seconds, the icing is too thick. Slowly add more water. If your icing surface smoothes over in less than 5-10 seconds, it is too runny. Mix your icing longer or slowly add more sifted icing sugar to thicken it.
I learned a slightly different ’10 second rule’, through Sarah Bell at Bonnie Gordon School of Cake Decorating… she likes to dip a spoon into the icing, lift it and let ribbons of icing drop back into the bowl, and count how many seconds it takes to make that surface flat again. (5-10 seconds).
Some people use a thicker consistency icing to outline their cookie shape and then a runnier one to fill it in. I have come to prefer using the same icing to outline and flood because it saves me time. (I don’t have to prepare two icings for each color, prepare two piping bags for each color etc.). That being said, the icing then can’t be too runny, because the outlines will not form properly.
Some decorators like to flood their cookies with a very runny icing, so if you are one of them, prepare two icing consistencies, one thicker, one runnier. The thicker icing should not be so thick that it is dry and curls when you try to pipe it. It should just hold it’s shape when you pipe it onto the cookie.
Coloring Icing:
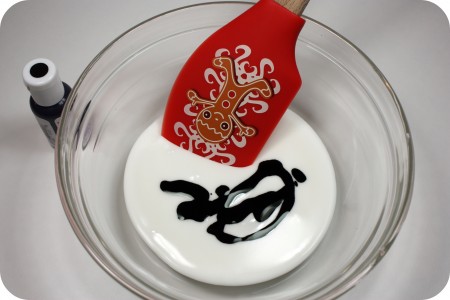
Once you’ve managed to reach the desired icing consistency, add food paste coloring of your choice. I use a toothpick to slowly add color bit by bit. Because deep, dark colors such as red or black usually require a lot more food paste coloring, I’ll use the end of a butter knife to scoop out those colors if they’re in a tiny container. I should also add that I have come to prefer the Americolor brand for black especially. Americolor uses squeeze bottles which makes adding the color much easier, and it seems to bleed less into other colors.
Another tip when it comes to adding color to your icing; the colors usually deepen with time, so I try to color my icings 24 hours in advance to see if I’m happy with them.
Also, stirring your icing to add color will incorporate air into it, so if you leave the icing sitting for a while the air bubbles rise to the surface, where you can pop them by gently stirring just a little before you add the icing to the piping bags.
One more tip to help avoid air bubbles in your piping bag; massage the royal icing a bit before you twist the top end of the piping bag closed. Press the icing in the bag upwards, starting from the tip and working your way up, pushing out the air bubbles as you go. Then push it back down towards the piping tip.
*
Filling Piping Bags:
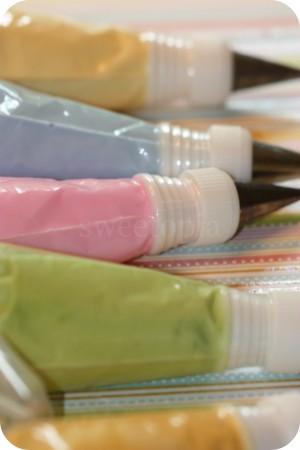
I have disposable and non-disposable piping bags for decorating. Either are fine, however, I tend to lean towards disposable because I can quickly see what color each bag has in it. Important when timing is key! That being said, you could color-code each with a matching elastic if you don’t like using disposable bags. I’ve also tried using squeeze bottles with my students at school, and they’re also great for being able to see the colors easily, they aren’t very messy, and the icing can be kept in them as they’re airtight with the wee little lids. Trying not to lose them with teenage students is a problem though! Sorry guys it’s true! 😉 For me, the bottles are really only good for filling in, or flooding, so I tend not to bother with them for the most part.
Cut off the ends of your disposable piping bags, insert the coupler, tip and close it off. I generally use a number 2 or 3 piping tip to outline my cookies and a number 2 – 5 to flood them. The larger the cookie, the larger the piping tip. There are some great tips for small details, such as 00 or even 000, however they clog very easily! I like to use tip #1-#1.5 for smaller details.
Get as many glasses as I have colors out, add a clean, damp cloth to the bottom of each, and set one empty piping bag into each as well, with the opening of the piping bag folded over the rim of the glass. Fill the piping bag with your royal icing. I find it easier to fill the bags with icing when I have two hands free.
Twist the openings of the piping bags closed, and tightly secure them with elastic bands. Work over your icing bowl so that the icing dripping out of the tips doesn’t go all over your work surface. Rest your finished decorating bags back in the glasses until you’re ready to use them.
*
Outlining Cookies/Piping Techniques:
Practice piping on your work surface so that your hand gets some practice before you begin the cookies. I usually find I need a few minutes to play around before my piping improves. I decorate my least favourite cookies, or my extra cookies first; that way if I make a mistake it won’t matter as much!
Outline the cookies first, and wait at least 15 minutes before you flood the inside of the ‘dam’. If the outline is a dark color such as brown or black, I wait 24 hours before flooding the cookie. It lessens the chance that the colors will seep into each other. If you live in a humid climate, air conditioning or a dehumidifier will help prevent color seepage as well.
I should also mention, that if you don’t like the look of the outline on the cookie, outline your cookie and fill it in right away. The icing needs to be at medium consistency for this… not too runny or it will just flow everywhere, and not too thick or it won’t settle smoothly.
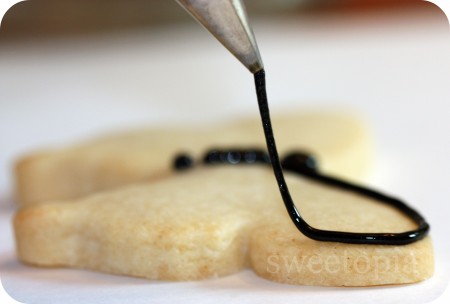
To outline the cookies, hold the bag at a 45 degree angle and position the tip at a corner of the cookie. Put enough pressure on the bag so that the icing comes out and start moving towards the direction you’d like your icing to flow at the same time. About a centimeter after you’ve begun your outline, start lifting the piping bag away from the cookie, so that the icing just falls onto the cookie. Start coming back closer to the cookie when approaching another corner. If the cookie is more intricate, or has more corners, you may not be able to just let the icing fall as there won’t really be room to. Also start to apply less pressure as you approach the corners. While decorating, every once in a while I twist and tighten the top part of the bag to create pressure so that the icing flows well.
Flooding/Filling In Cookies:
When your cookies are ready to flood use a #3 – #5 sized piping tip. The larger the cookie the larger the tip. Start at one area and quickly zig zag back and forth until you’ve covered your cookie. Don’t worry if you haven’t filled in every little spot; speed is more important at this point. If there are a few spots that haven’t quite filled in once you’ve basically covered the whole cookie, use your piping bag, a toothpick or a paintbrush (used only for food), to push the icing around and fill in the gaps.
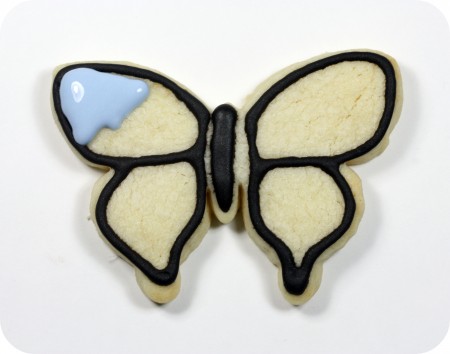
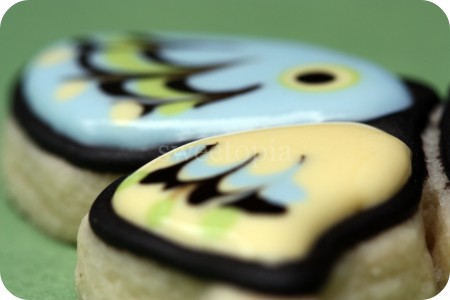
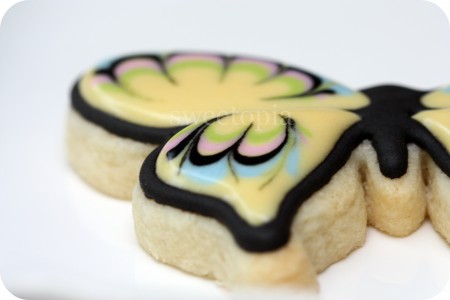
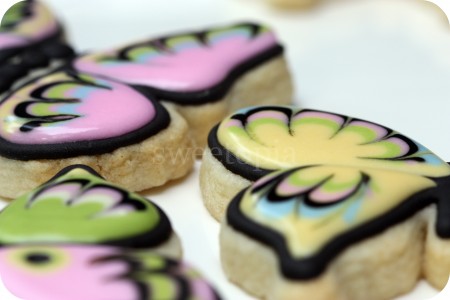
If you would like to add more icing colors to your cookie so that they ”meld’ into the base color, you need to add it right away. The base layer starts to dry quickly so you need to add your next colors as fast as possible. For example, I added these two black lines and one colorful line and then drag a toothpick through them.


The ‘eye’ of the butterfly is then made by layering a few colored dots on top of each other, with the white or light color second last and black last. Dots are easy to make; position your piping bag straight above the area you’d like to pipe and gently apply enough pressure so that just a dot comes out of the tip. Stop the pressure on the bag and lift it away. Take your next color and keep layering, making sure that your dots get smaller each time.


Fill in each wing or every two wings at a time.

Packaging and Storing Cookies:
Let the cookies dry for 24 hours before you package them.
If you’d like to store them in tupperware instead of packaging them, stack them with the largest cookies on the bottom and the smallest, most delicate ones near the top, and insert parchment paper between each layer. Store in a cool, dry area. I try to make mine no more than one week in advance, and advise people to eat them as soon as possible! They should be eaten within one month for sure. Some people claim they are fine even up to 3 months, however, I’m a firm believer in “the sooner, the better!”
I hope this tutorial has helped you! I welcome any questions or feedback… Have I forgotten to mention something? Do you need clarification on anything? Please ask or let me know!
If you like learning with video, you can also find me on YouTube, by clicking here.
Have fun creating!!
xo,
Marian
 For some other butterfly cookie examples see this older post here.



Your site is so amazing! I love the instructions, pictures, etc. I’m wondering if you could tell me approximately how many medium sized cookies Antonio’s recipe would make?
From one cookie lover to another– THANKS!
I’m in love with your blog. I followed this step by step and it is nothing like the cookies I have made in the past. They turned out great even on my first try. The dam idea is brilliant.
Thank you so much for sharing!
@ Jacinda: Oh I’m so glad to hear that! Would love to see your cookies if you’d like to share them on my Facebook page!
xo
@ Nathalie:
Personally, I don’t like using the “Pre-mix Royal Icing.” I’ve tried it in the past to save time, but it never reached the right consistency for me. Making Royal Icing is fairly simple and you will get better results. 🙂
Hi Marian
I just love your website! I’m in South Africa and desperately want to try decorating cookies. The only problem is that I can’t find Meringue Powder! Nobody knows this product here. Can I leave it out? If not why not? Thanks for your help! Yolande
@ Yolande: It can also be called egg white powder. Another alternative is to use a royal icing recipe made with egg whites instead of meringue powder. I haven’t tried decorating cookies with just icing sugar and water, but it miiiight work. The meringue powder and egg whites add stability and volume as far as I know. Whatever you end up trying, please keep in touch, and happy decorating Yolande!
How can I get thinner lines in my cookies? Have you considered making a tutorial on how to control the icing for detailing, I can’t seem to find any tips online. I do a descent job decorating the cookies, but when it comes down to detailing and doing thin lines to finish my designs, I end up with very thick lines. I have been using the 10 second rule and a tip #1. Any suggestions on what I might be doing wrong?
@ Juliette: Absolutely, I will definitely add that video to my ‘to do’ list. Would you be able to send me a photo example please? Either contact me through email – sweetopia AT inbox DOT com or share on facebook if you like. Thanks!
Thank you so much for sharing your icing recipe! Your instructions worked wonders even for a newbie like me. The first round looked a little messy since I’ve never done it before but I think I got a hang of it. I paired it with your sugar cookie recipe which also was perfect too!
I have baked shortbread cookies in the past but always used plain confectioner’s sugar and water as icing (added color to it). But never tried with meringue powder. I am going to give this a shot.
@ Diana: My pleasure, and bravo to you!
@ Asmita: Have fun and please, come back and visit if you have any questions. I’d love to see what you create!
@ Christie:
I read your comment on here and dont mean to intervene in any way but I have found that using corn syrup and no cream of tarter gives the icing a sheen. Does not dry as brick hard as regular royal but hard enough to ship if you let dry over night-24 hours. Umm I also use onlty one concistancy of icing. Still use the ten second rule. But with that said practice makes perfect and lots of trial and error. Good luck and I think what works best for you is what you shoulduse. I fgured that out myself thinking ihad to use a certain icing because most of the recipes called for the same ingredients and I just couldnt put my finger on what I did not like until experimenting. The recipe on thios site is wonderful but cornsyrup is going to give you the sheen and dry just as hard as the royal. Smiles andagain I hope no onehere feels iwas butting in.
Wow! Amazing tips!! Thank you. I just ran across a product at Michael’s called, “Color Flow” that is supposed make ‘shiny’ Royal Icing. Have you heard of it or used it? Thanks!
@ Stacey: Thanks SO much for your feedback! I welcome it!
@ Star: I haven’t used the product, no, but if you do I’d love if you came back to let us know what it was like. =)
First, let me state that your cookies are beautiful! I love your creativity. I decorate for the holidays but my cookies always seem to get craters in the small areas where I see your cookies don’t seem to get craters in those small detailed areas. How do you avoid the craters?
@ Tina: Thank you! You know, the craters are an issue for me too! Here’s a post with some helpful feedback from readers, which you may find helpful! Happy decorating!
https://sweetopia.net/2010/02/part-2-how-to-prevent-air-bubbles-in-royal-icing/
Hello Marian,
Just want to say thank you for all the tutorials, I have visited your site many times, but never really sat down and went over the details of decorating the cookies. keep up the good work, it really helps the less than talented cookie decorators like myself. I love to make cakes and cupcakes, and am used to fondant and gumpaste, and modeling chocolate, but cookies I never even thought of it. But after seeing what you can make and how you can make it. Well lets just say my mind is open to endless possibilities now.
Thanks you so much for your time and effort. It is truly appreciated.
@ amanda pritchett: Oh my goodness, what a nice comment! I appreciate your kind words, thank you.
All the best on your cookie decorating adventures!
Marion, thank you for your tutorials, your tips and your ideas! I’m going to try your icing… Greetings from Italy!
Thanks for the great recipe and tips. I tried my hand at decorating cookies for the first time this week and check out how great they turned out! http://sioneandalana.blogspot.com/2011/11/happy-thanksgiving.html
@ Valentina: That’s great! Happy decorating!
@ Alana: So cute – I love the little trees. =) Nice to ‘meet’ you as well!
I was wondering….I have always used a glaze icing….do you think that I could still use a glaze on bottom and decorate in RI? I would only do this for the cookies that I ship! My problem is that the glaze icing tends to melt some in shipping….tastes great but hates to be shipped!
Thanks for any help!
Saeweard
@ Christie: Oops, Sorry I missed your comment! In the meantime, I wrote this post which might help answer your question actually – perfect timing! https://sweetopia.net/2011/11/gluten-free-coconut-cupcakes-with-coconut-frosting-shiny-royal-icing/
@ Saeweard Smith: I’m sorry I actually haven’t tried that so don’t know. =( You know you could try and ask Pam at CookieCrazie – I think she works with glaze and might know if putting RI on top will work well.
I did try so many royal icings but I still have a problem with them after I fill the cookies the icing get crack or sometime are broken can you please help me w/this
@ Patricia Rolon: It sounds like you may be moving them too soon, but I’m not really sure without more detail. Would you describe a bit more when it happens, and what exactly happens, or, share a pic on my Facebook page – it’ll be easier to see with a photo. Thanks!
OMG I am soooo in love with these cookies, your designs are georgous!!!
Will keep this in my favorites!
Thanks for sharing.
Your cookies look AMAZING! I have always had a problem with my royal icing not adhering/sticking to my cookies (i.e. gingerbread cookies). The buttons and outlines fall off and I don’t know what I’m doing wrong. Can you help my gingerbread boys & girls from coming ‘unclothed’? Thanks
@ Anaïs Gratton: Thanks!
@ Nita Vanderah: Is it perhaps too dry, so it doesn’t stick to the cookie? Have you tried the recipe I use in this tutorial? I would say try this recipe and if the icing still doesn’t stick to your cookie, then it’s the consistency/dryness of your icing.
Hi Marian,
Followed your recipe for the royal icing; it turned it out to be a matte finish. i was hoping for a more glossy look; anything i can do to improve on that?
Thanks!
@ Sharon: Here’s a post about it. =) https://sweetopia.net/2011/11/gluten-free-coconut-cupcakes-with-coconut-frosting-shiny-royal-icing/
Dearest Marian
I stumbled upon your blog vie mylittlerecipe.blogspot.com. It came in at a very timely manner when my first foray into baking sugar cookies n decorating yesterday was a flop. Haha.I always had phobia doing them while I see how some n yourself did it effortlessly. Like how your butterfly turns up to be a genius !! You have impressed me with your humbleness in your way of writing and your “sharing recipes n tips” religion thruout the blog and how your passion has brought you far. Its the weekend for me tomorow , and I cant wait to get started with your sugar cookie recipe n the icing !! =) Wish me luck ! Like how others have said it before and I shall see it again , you are indeed AMAZING in every sense !