
As decorators, we know how frustrating bleeding icing can be… I remember it being one of my biggest pet peeves when I first began. It turns out that learning some tips and tricks on piping is only one step to having an enjoyable cookie decorating experience. If you don’t know the following 7 tips already, I hope they help you eliminate bleeding icing on your cookies.
First, what exactly is bleeding when it comes to decorating cookies?
Basically, it’s when one icing runs or spreads into another. Take a look at these flood work butterflies as an example here; you can see the brown starting to diffuse into the light yellow.
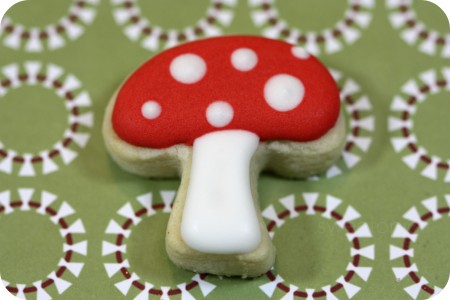
Whenever an intense color such as red or black is beside a light one, such as white or yellow, bleeding seems to happen more. The red and white mushroom cookie above has none happening though. Here’s how you can do it too:

How to stop your colors from bleeding into each other:
1. The consistency of your icing is key – If it’s too runny, your colors will tend to seep more. Especially if you’re layering a dark color onto a light one. A good rule of thumb is to follow the ‘10 second rule’. See #2 of Top 10 Decorating Tips or detailed info. at the cookie tutorial here. To be safest, your icing should gloss over closer to 10 seconds than to 5. Icing that is 15-20 seconds is even better!
2. The icing recipe is also important. I use this one. It seems to have good ‘body’. Some royal icings which are more like a glacé or glaze don’t work as well because they tend to be thinner.
3. Americolor![]() soft gel pastes seem to have better results than other brands of paste colorings, specifically with intense colors such as black, brown and red.
soft gel pastes seem to have better results than other brands of paste colorings, specifically with intense colors such as black, brown and red.
4. Tint your icing at least a few hours in advance as the colors usually deepen with time. That way you’re not necessarily adding as much food paste coloring as you can adjust your color later.
5. Let your outline or first layer of icing dry for 12-24 hours; again especially if your two colors are a stark contrast between light and dark. You can try less time depending on the humidity… Maybe 4-5 hours for a first layer, and 15 minutes to an hour for an outline, however, it is riskier.
I have to say; I usually err on the safe side. Preferably 24 hours for me!
If you have a few extra cookies, you can test if it’s dry by touching the surface (does it make a dent?), or even by biting into a test cookie.
Putting your cookies in an oven with the light on can help dry them faster, according to Colette Peter’s in her book, Colette’s Birthday Cakes![]() (p. 170). I have also heard that some people actually put the oven on extremely low and leave their cookies in for a few minutes, or some use a heat lamp and others a fan on low air.
(p. 170). I have also heard that some people actually put the oven on extremely low and leave their cookies in for a few minutes, or some use a heat lamp and others a fan on low air. I still need to experiment with that, so I can’t really comment at this point. Another future post! Update – the fan does help speed up the drying process, as does a dehydrator.

6. Never store your decorated cookies in the fridge or freezer as they can absorb moisture there. Some people say they have luck with it – If you have I’d love to hear from you in an email or a comment at the bottom of this post. Maybe the cookies are exceptionally well sealed?
7. If it’s really humid outside, use a dehumidifier in the room you’re decorating in. A climate controlled or air-conditioned room works too! Too much humidity can make the colors bleed, no matter how hard you’ve tried to do everything else right. Here’s a post with a little more information on it.
These have worked for me so far but I’m always happy to learn more; if you have any tips which you’d like to share you’re welcome to leave a comment below.
Happy cookie decorating!
xo,
Marian
p.s. Here are the rest of the fall cookies I made along with ones above. They’re sugar cookies decorated with royal icing and edged with copper-colored disco dust.


p.s.s. Since I’ve posted this I’ve had a few emails about the leaf and acorn cookie cutters. They’re from a Wilton Leaves and Acorn Cookie Cutter set.![]()


Hi I would like to know what kind of glitter you used for these leaf cookies and where o can purchase it? Is it edible?
Hi Christian,
It’s disco dust, and here is a link:
http://astore.amazon.com/sugarart-20?_encoding=UTF8&node=8
It’s non-toxic so not harmful, and as far as I know the FDA has not approved it as a food item (at the time of this post I didn’t know). Best used for decorative purposes only. Again, not harmful if ingested, but not a food product. You could use it on sweet decorations if it was able to be removed. Hope that helps!
Hi Marian, You were one of the first people I found when I started decorating with RI about 4 years ago. You helped me with consistencies. Anyway, I came cross this post about color bleed and wondered if you may have changed your mind on a couple things since this was written 10 years ago. Over the past few years, it seems to be the consensus (my experience included) that drying the first layer comoletely actually causes bleed because the dry icing sucks the moisture (ie color) from the wet layer. Also, many have been very successful with freezing. I would never refrigerate, but freezing works quite well. I seal individually in a cello bag and then store in a ziplock or Tupperware. The key, as learned by others, is not to remove the cookies from either packaging until completely defrosted on the counter. The icing and details remain perfect and the cookie tastes as fresh as just made. Just thought Id share since this older post is still a great source of info available to beginners.
Hi Mary-Jean,
Thanks for your feedback! I haven’t changed my mind about the bleeding issues, but have actually found that I’ve had great success with freezing decorated cookies, without and spots or bleeding happening. Thanks for sharing!
Hi Marian,
I love your site and have learned quite a lot from it, however, I am still having bleeding issues, as well. I live in VA and tried the fan ect still does not work. I got he transfers down, when I did the transfer the last time the black did not bleed into any other colors, but the next day after icing the base of the cookie and trying hte wet method to apply after about 4 hours the black outline started to bleed into the the dried transfered inside color. I had done the Mtv logo and the black outline bled intothe yellow of the M. Can you explain why? The transfer had dried for 24 hours? PLase if you have any tips thank you.
Hi Cristy!
Frustrating!
Are you working in a room with a/c and a dehumidifer?
You have inspired me to bake cookies again after a long time. Thank you. Quick question: How did you achieve the marbled effect on the maple leaf cookies? Is there a video?
That’s wonderful Marsha! Yes, here is the video on generally how to swirl the icing:
https://sweetopia.net/2010/12/video-how-to-marble-or-swirl-royal-icing/
Okay say you’re making cupcakes and you want to make a multi colored icing, how do you keep the colors from blending together in the piping bag?
Thanks….great tips as always. I find myself using your suggestions so often I think because you have such a reader and direction following-friendly style. Thanks so much.
:O)
Hi Marian,
I have had real good luck placing my decorated cookies in individual sandwich
size zip loc type bags and freezing them.
I love your site and all the helpful information.
Stephanie
I want to try and make a cookie that looks like the logo for the high school my daughter works at (Laguna Beach High School). It is a maroon base with a blue and white wave over half of the oval. I’m starting to think there is no way I can put the lighter frosting to make the wave over the dark maroon base. Do you have any ideas?
Hi Catherine,
Is this the logo you mean? http://www.lagunabeachschools.org/site/default.aspx?PageID=1
I would pipe the maroon base, let that dry for at least 24 hours, then do the white oval, let that dry (make sure you tint your icing white as well), then pipe the blue wave (two colors of blue, marble the lighter blue into the darker blue), and once that had dried for at least 6-12 hours, pipe (with a thicker white icing), circles of white to look like the foam. Since you’re in a warmer climate, I would definitely check out these posts too:
https://sweetopia.net/2011/07/how-to-avoid-spots-on-icing/
https://sweetopia.net/2009/10/how-to-prevent-your-icing-from-bleeding-7-tips/
Happy decorating!
I know this is a super old post but I live in Texas and am always having bleeding issues, I sumbled across your page. I just read the part you said about not freezing cookies. Well I run a business out of my home and I don’t have a very large home. When I get orders of 100 plus cookies I have no choice but to do them ahead of time. I have sucessfully frozen fully decorated sugar cookies and it literally does not alter them at all. I of course tested this method first many times and I now do this quite often for my big orders. I have not gotten one complaint about them yet! After the cookie fully dries I either bag them individually in cello (if thats what the customer wants) if they dont want them bagged I just store in an airtight container. I set the cookies out the day before the customer needs them and I do not open the bag or container at all. Once it is brought to room temperature I can then open and they look and taste just as fresh as ever! I have tested cookies anywhere from 1 week to 1 month in the freezer and can not tell the difference in them whatsoever. I always prefer to serve my cookies as fresh as possible, but sometimes this nice trick is super helpful for those gigantic orders. By the way, I have frozen cookies with edible markers used on them and even the pearl spray stuff and that holds up perfect as well! Hope this helps some people!
Hi Marcia- Your website, helpful tips and artistry are spectacular! I’ve been admiring your work for years!
A few questions for you
1) We are using white RI on sugar cookies almost exclusively, then printing onto the icing. We get a lot of bleeding of the printed colors. Could that be from the icing being too thin? Other ideas to keep colors in their place??
2) We are having a major issue with butter bleed. It has been unseasonably hot here in LA, so likely that is the culprit – though our bakery is air conditioned, and we have a fan and dehumidifier running 24/7. Have you heard of/ever tried using edible varnish to seal the cookies before icing them? We are looking into it and hoping it creates a barrier that will prevent the butter seepage. Thoughts?
3) Any tips on getting RI to be really white? Ours is a bit yellowy and tends to get more yellow over time (even when not splotched with butter stains).
MANY THANKS FOR ANY ASSIST!!
Than you so much for this info!happy baking!
Hi. I’m rather new to royal icing decorating and I’m having an issue. Thought I’d ask an expert. I’m having trouble with piped on details falling off and not adhering to my flooded cookies. Could you shed light on what I’m doing wrong?
I’m just figuring out. Probably your detail icing is too dry or over mixed, leaving not enough surface to adehere to the previous one
Hi Malinda,
It sounds like your icing is too dry, or thick. Hope that helps!
Hii. My I finished my ninja turtles sugar cookies very good. The colors perfect. But I put them on their bags one night before the part and in the morning I noticed the bleeding. :/
The black color war over the green. Why ? They were fine before putting them inside the bags.
PLEASE HELP!
We are starting a bakery in small town Northwest Ohio customizing in hand decorated sugar cookies. We are having the WORST trouble with our black detailing bleeding :(. We’ve tried everything. We’ve kept them in air tight containers, kept the temperature constant and even ordered the AmeriColor food coloring that was recommended. We’re getting very discouraged because the beautiful cookies we create are ruined by bleeding the not day. Any advice you could give us we’d reslly, really appreciate.
Hi Emily,
The tips in this post here are also useful for bleeding:
https://sweetopia.net/2011/07/how-to-avoid-spots-on-icing/
If you’re having trouble with putting them in containers, try leaving food safe dessicant in the container with them overnight and see what happens. Here’s a link to the dessicant as an example:
http://www.amazon.com/s/?_encoding=UTF8&camp=1789&creative=390957&field-keywords=food%20safe%20dessicant&linkCode=ur2&tag=sweetopia-20&url=search-alias%3Daps&linkId=KY6RW7LYRNKB2IY5
If you’re having that much trouble with bleeding, perhaps use less food coloring in the icing to just barely make the color black.
Is the icing on the cookie completely dry when you package it? If it’s totally dry and you pack an individual cookie in a cellophane bag, it shouldn’t bleed.
Try one out and see. Good luck!
Admiring the time and effort you put into your blog and detailed information you provide.
It’s nice to come across a blog every once in a while that isn’t the same outdated rehashed material.
Wonderful read! I’ve bookmarked your site and I’m including your RSS feeds to my Google account.
Hello, while waiting on the icing to dry (to prevent bleeding) how to you store the cookies to ensure that they remain as fresh as possible? Thank you!
Hi Jocelyn,
Here’s a video for you on how I dry my cookies. 🙂
https://sweetopia.net/2012/01/video-how-to-dry-cookies-decorated-with-royal-icing/
To freeze my cookies I let them dry after decorating for 24 hours then I individually bag them and stack them in an air tight container. They can be frozen for months. When you need the cookies just remove from freezer and lay them out (not stacked on each other) until they get to room temperature. Ready to eat and taste just like fresh.
Thank you so much for sharing Vanessa! xo
Hello
I have a question regarding a water temperature.
Does the water temp make a difference in how thick or thin the icing will become?
Thank you
Maggie
Putting those little silica gel parcels from food packets help too
Dear Marian, I recently made Troll cookies. Black gel color in Royal icing at most only turned gray. I ended up painting Branch’s iced “hair” with black gel color(diluted of course) but the color was still black. The cookies turned out great but the black color rubbed off on the fingers. What can I put on the finished decorated cookie to prevent this next time? Thank you. By the way, love your tips and tricks for cookie decorating. I read your blog frequently and have learned a lot.
Hi there. How do you avoid bleeding if you are decorating the flood icing such as the marble look. There is no waiting to dry with this technique?
Hi Janine,
Here is a post for you; https://sweetopia.net/2009/10/how-to-prevent-your-icing-from-bleeding-7-tips/comment-page-2/
and this one might be helpful for you as well; https://sweetopia.net/2011/07/how-to-avoid-spots-on-icing/
How do I get the “natural” color like the bottom of ice cream cone cookie??
Hi Debbie,
I usually use a beige or ivory (Wilton and Americolor have them), and add a touch of yellow.
How did you get your drawings so precise?
Hi Kimberly,
The consistency of the icing helps. If the icing isn’t precise, try making the icing a bit thicker by adding powdered sugar. I also love PME piping tips, especially tip #1.5… I think they help make the designs more exact.
When doing candy canes, for example, is there an advantage to doing the white first, and letting it dry, or the red, and letting it dry, to prevent bleeding?
Hi Carol,
That’s a great question! I have been playing around with that, and think it’s best to do the white first, let it dry completely, and then add the red.
Hi! I’m wondering how you store the cookies to dry for 12-24 hours? Do you just leave them on a paper towel out on a table? I’m worried about the cookies drying out. Thanks in advance!
Hi Laura, I leave mine on the baking sheets lined with parchment paper. The icing acts as somewhat of a sealant so they don’t dry out in that time.