

Hello sweet friends!
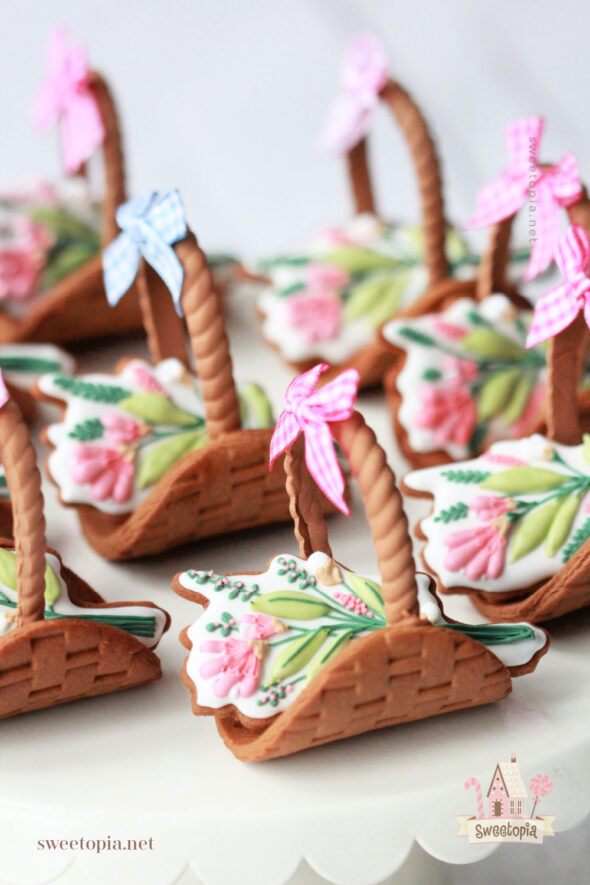
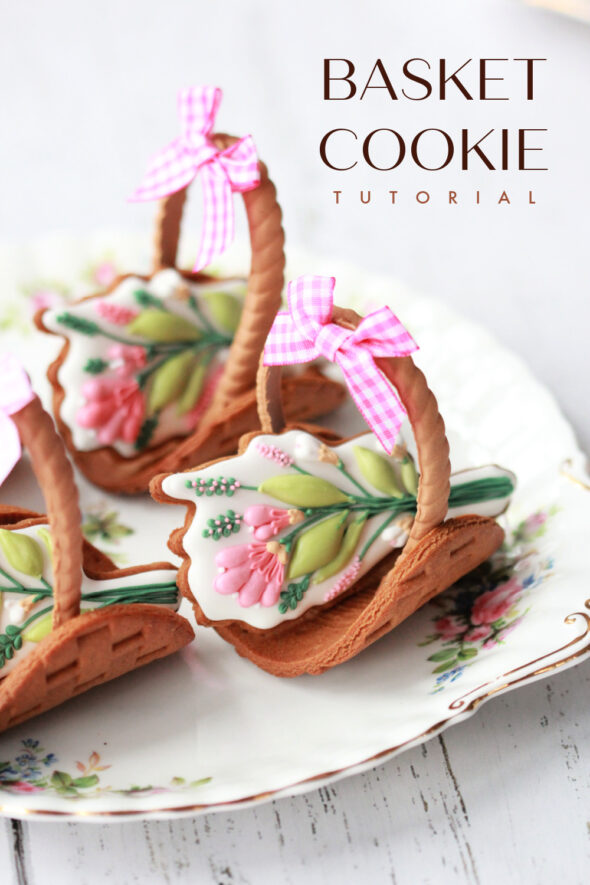
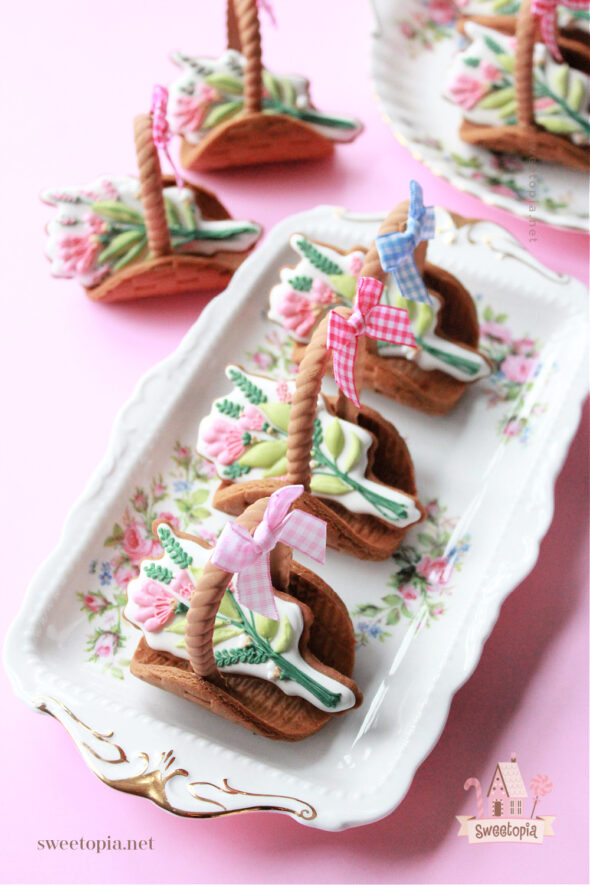
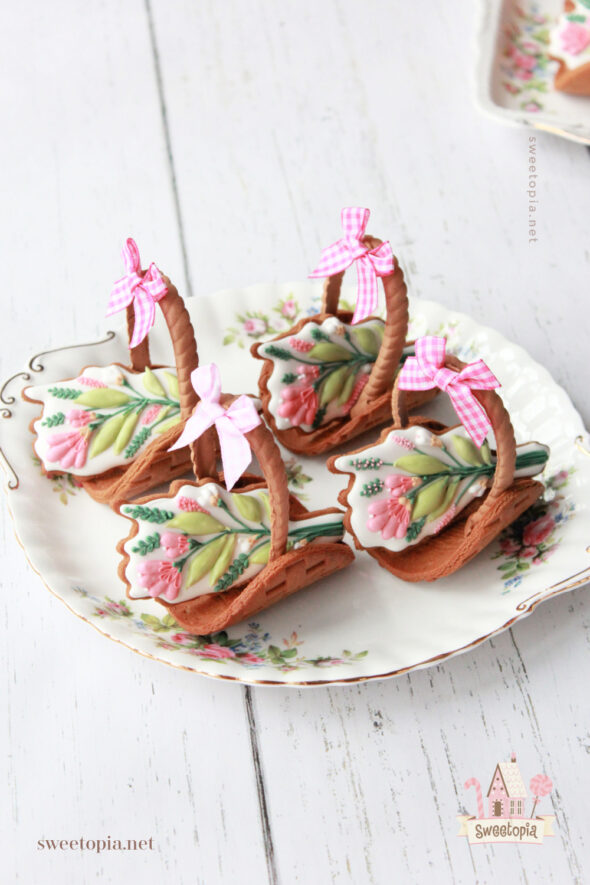
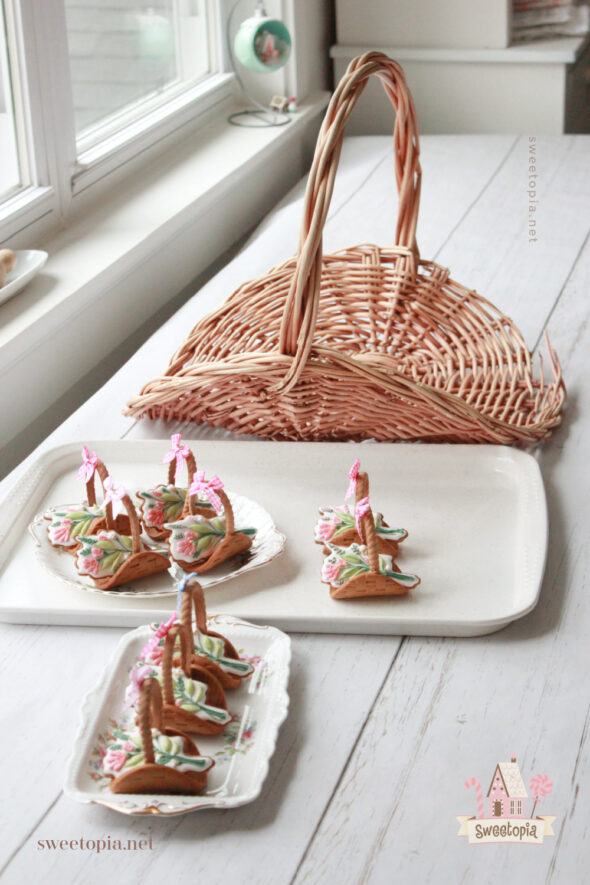
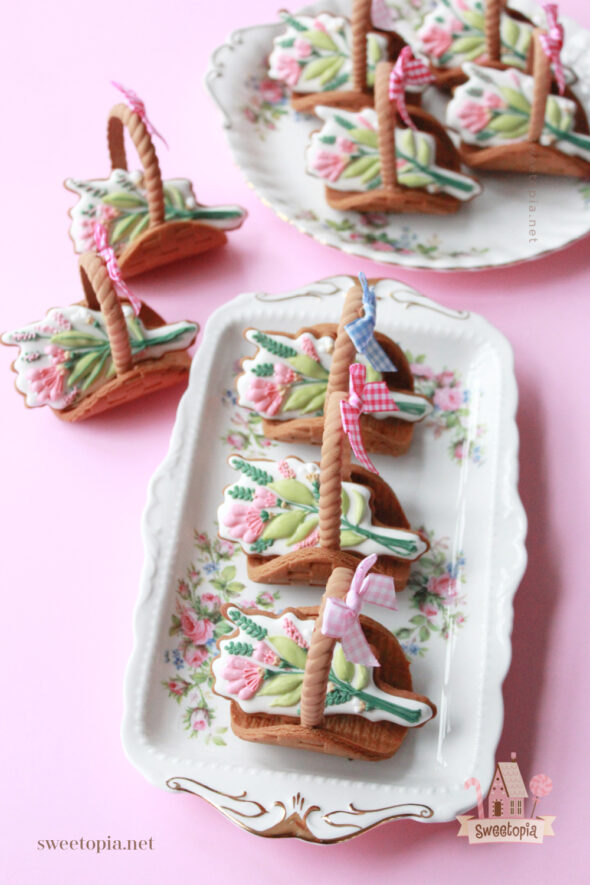
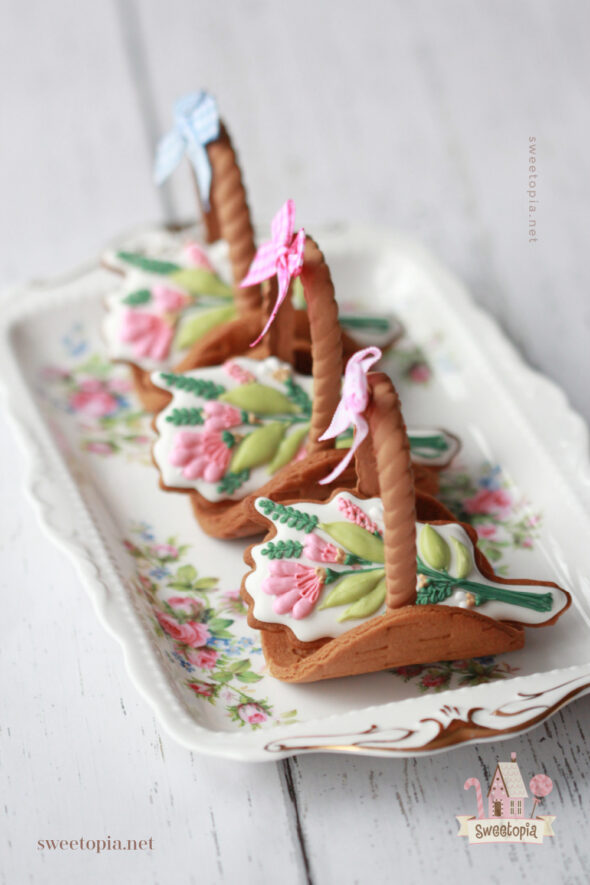
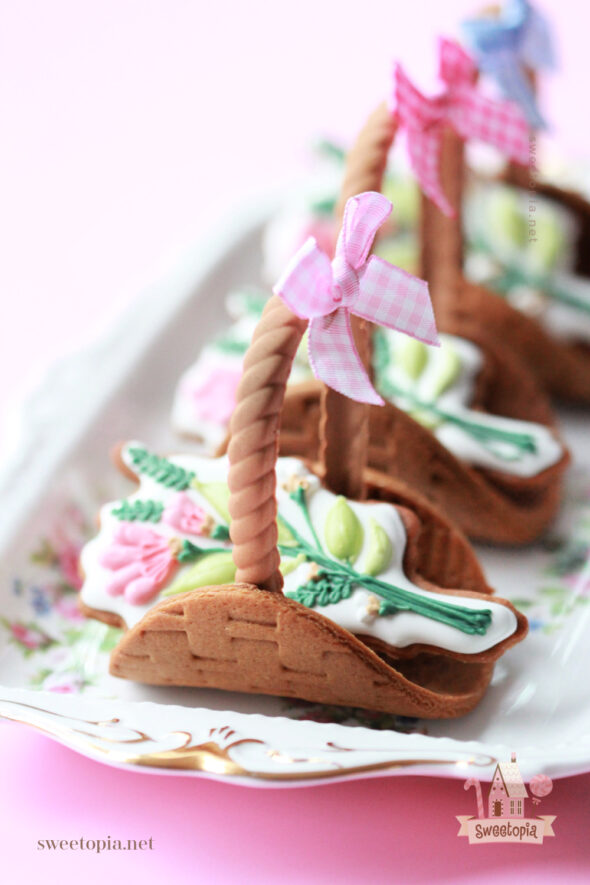
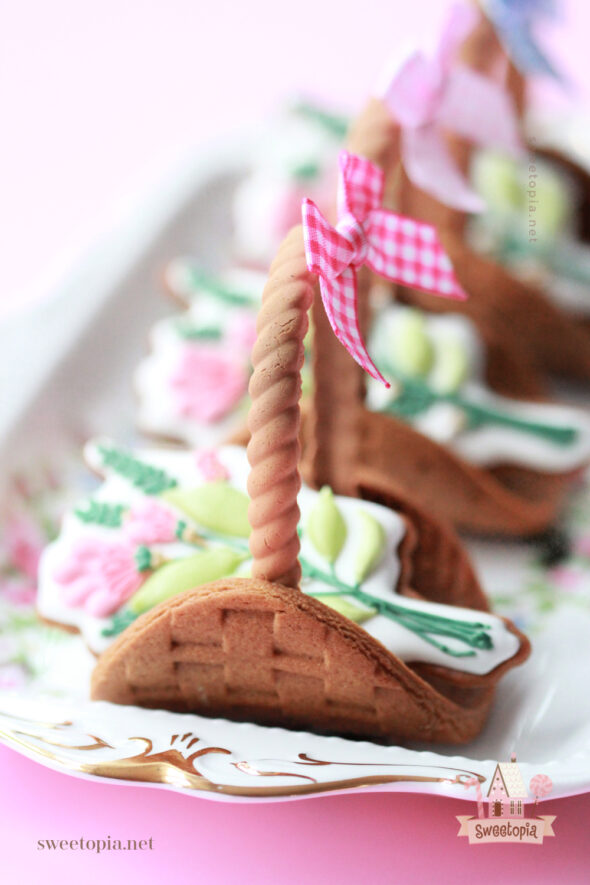
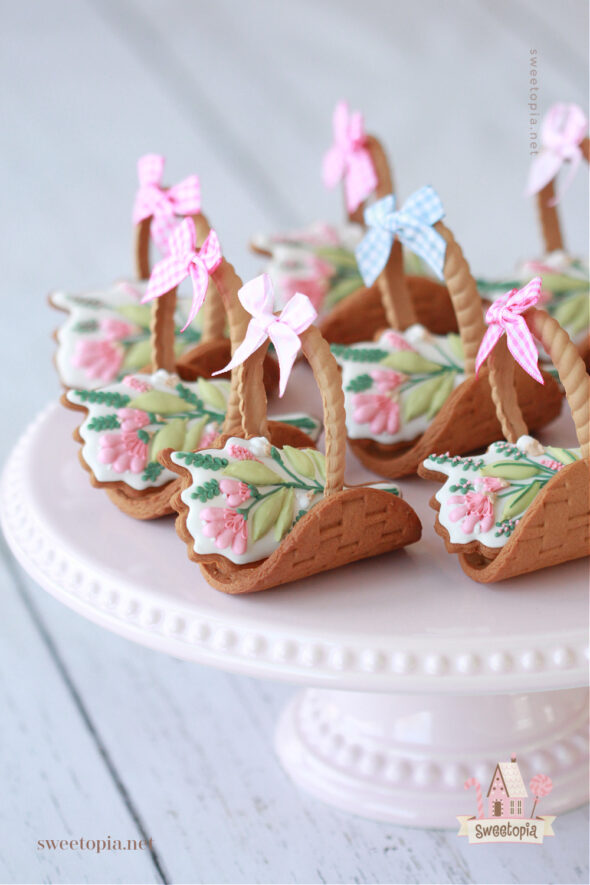
With mother’s day just around the corner, I’m ready to share a little cookie basket tutorial with you. I’ve decorated floral bouquet cookies to go in them, but you could easily switch up the theme and use them to hold candies, chocolates or decorated cookies in another theme. How cute would it be to have a little bunny cookie sitting in there! I had hoped to have these ready for Easter, to put little chocolate eggies in (or a wee Easter bunny of course), but actually am glad I was a bit delayed so that I could create these floral baskets for Mother’s Day.
Before I jump into the tutorial, there are a few important points to know about before beginning the project. First off, it’s important that the cut-out cookie recipe you use as the base for the basket hold their shape well. The key to these cookies keeping their shape lies not only in the combination of ingredients (exact measurement in baking is important) and omission of the leavening agent (i.e. baking powder), but in some crucial points in the process. You can find a whole post dedicated to cookies keeping their shape here.

If you’re making these at a time when the humidity in your area is high, having a de-humidifier on in the room you’re working in will help the cookie dry well and prevent icing from bleeding.
You can find more information on drying cookies here, a post on preventing cookies from bleeding here, and spotting here.

Cookie Recipe
I used gingerbread as the base for my cookies. You can find the recipe for the dough here. If you’d like to try a different cookie base, other recipes can be found here.
Make sure to make your gingerbread pieces quite thin. Mine are about 1/4″ or 0.5 cm, but I’d go even a bit thinner next time. Just be careful you don’t go too thin, or the basket weave impression may rip during the baking process.
Royal Icing Recipe and Icing Consistencies
You can find my favorite royal icing recipe here. The consistency of icing is key for easy decorating. Click here to see a YouTube video on finding the right icing thickness.
Complete Guide to Royal Icing PDF
You can find my Complete Guide to Royal Icing Consistency here.
Cookie Design Icing Consistencies
All the icing consistencies are medium, except for the thick, brown icing I used to adhere the basket handle and ribbon. You can find my Complete Guide to Royal Icing Consistency here.

Cookie Decorating Basics
Here are some posts which take you through cookie decorating basics. If you’re a beginner, you can use these videos as a guide to basic decorating.
{Video} Cookie Decorating Tools & How to Fill a Piping Bag
{Video} How to Outline and Flood Cookies with Royal Icing
{Video} How to Dry Cookies Decorated with Royal Icing

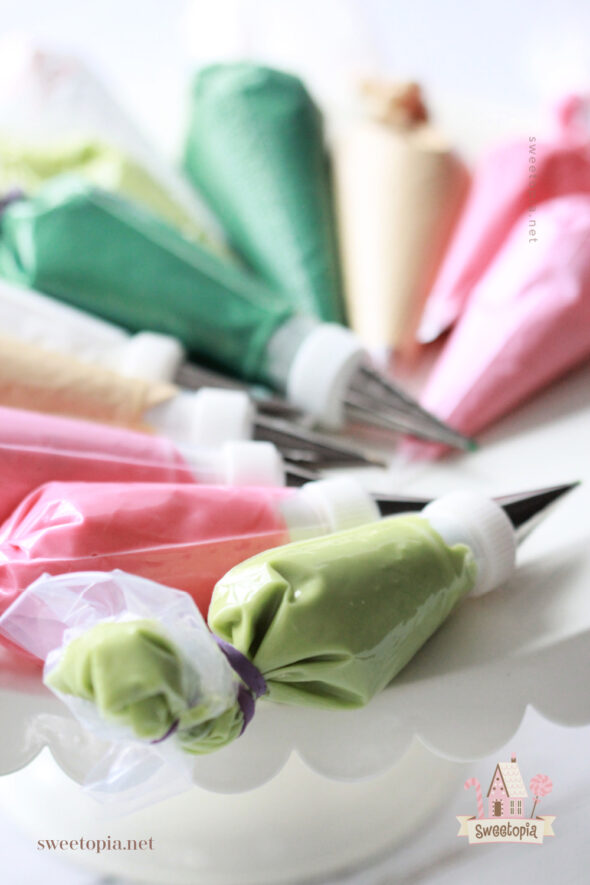
Decorating Tools
What you’ll need (The Amazon links are affiliate links):
- Piping Tips 1.5
- Piping Tips 4-6
- Piping Bags
- Tipless Piping Bags
- Couplers
- Americolor Gel Colors; Avocado, Brown, Forest Green
- Wilton Gel Colors; Pink, Brown, White
- Rainbow Dust ProGel Colors; Pink, Cream, Poppy, Strawberry
- SugarFlair; Honey Brown and Brown Gel Colors
- Scribe Tool or Toothpicks
- Pico Projector or Magnasonic Projector
- Arkon Remarkable Creators Phone and Tablet Stand (20% off with coupon code sweetopia)
- Mini Gingham Bows
- Small Fondant Rolling Pin
- Empty Tomato Paste Cans – 6 oz or 156 ml
- Mini Cupcake Pan
- Gumpaste
- Shortening
- Bouquet Cookie Cutter
- Oval Cookie Cutter (3.5″ by 3″ or 9 cm by 8 cm)
- Basket Weave Rolling Pin
- Dough Guides
Piping Bags
In terms of piping bags, I mainly used tipless piping bags for very fine details and PME 1.5 piping tips for most piping, and larger piping tips such as 4 to 6 to flood larger surfaces.

Puffy Royal Icing
If you’d like some tips and tricks on how to get that puffy royal icing look, I have a Digital Download Tutorial in my shop.

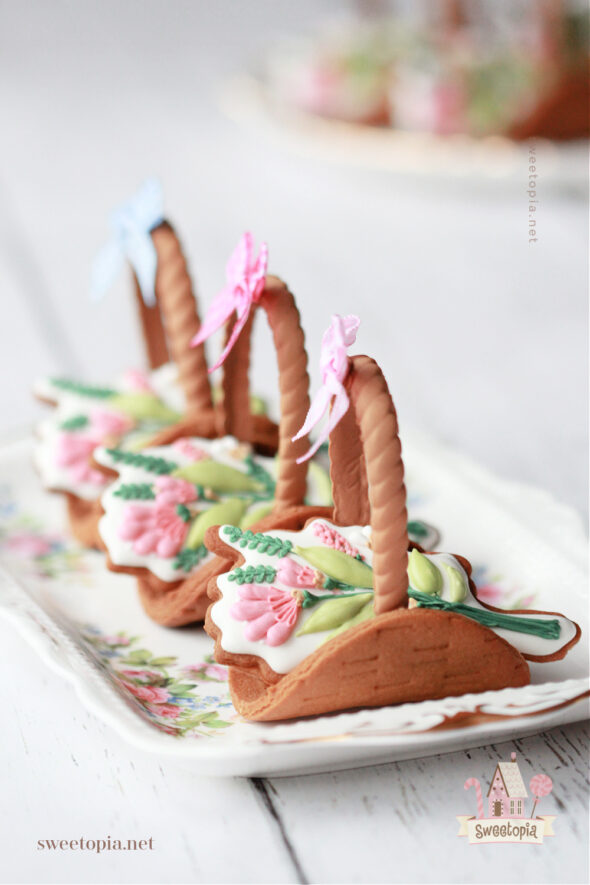
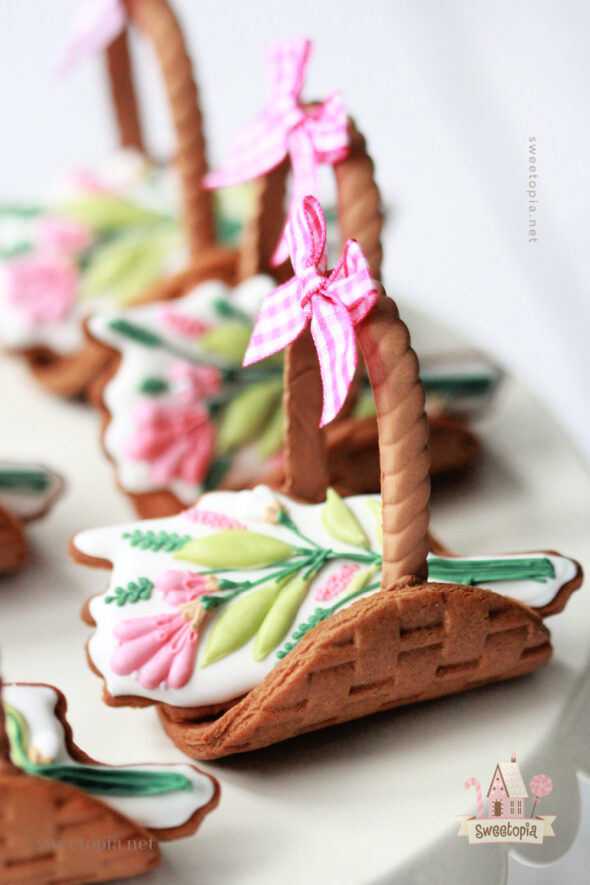
The inspiration for these cookie baskets came from the basket pictured below. You could also bake a rounder shape, more like a bowl, on the underside of mini stainless steel bowls. I did just that as an experiment and will share the results in a future post.
Video – How to Make 3D Basket Cookies
Video below and you can find a written description of the tutorial below.
Click HERE if you can’t see the video.
If you enjoy watching the video on different platforms, I’ve listed the various places on social media you can find it:
YouTube – this is the slowest version of the video.
How to Make 3D Basket Cookies
I recommend reading over the tutorial before you begin, to see which steps you can do ahead, according to your schedule. For example, the gumpaste basket handles can be made well ahead of time.

Step One: Place empty tomato paste cans on the underside of a mini muffin tin and place them in your fridge to chill, for at least one hour.
Step Two: Once you’ve made your dough, roll it out to about 1/4″ or 0.5 cm. I used dough guides to help make the dough uniform.
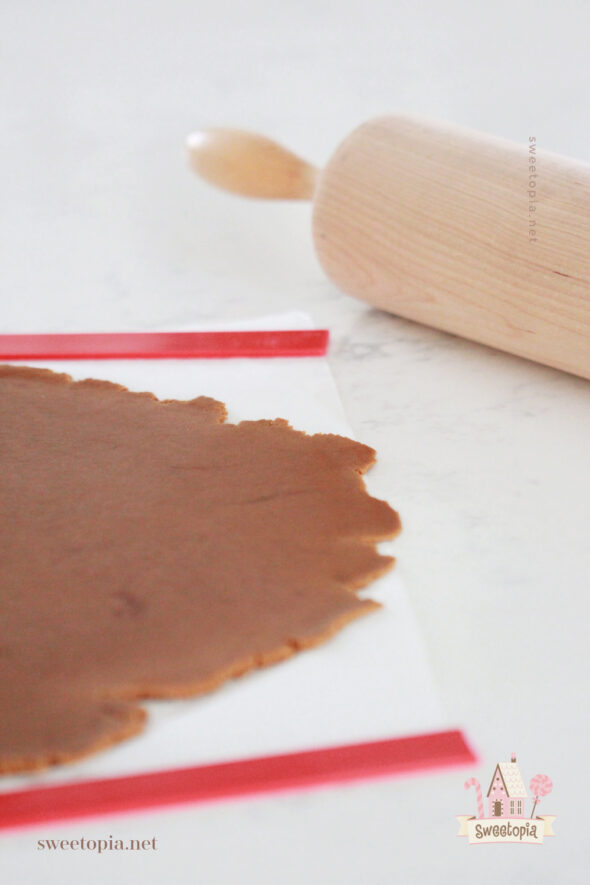
Do not chill the dough at this point.

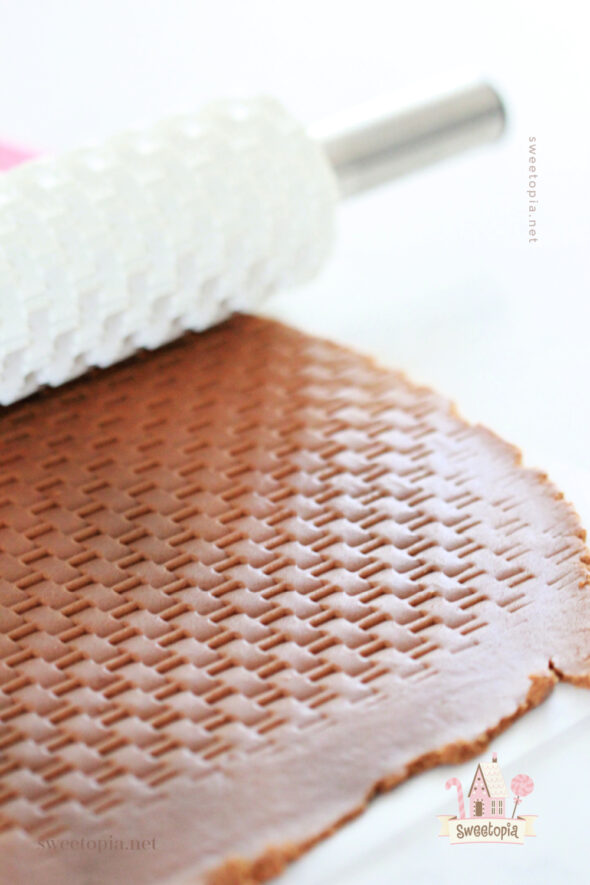
Step 3: Roll a weave pattern onto the dough using a basket weave rolling pin.
Step 4: Cut your oval cookie shapes out.

Step 5: The dough will be soft and pliable, so gently peel the oval cookie out

Step 6: Place your oval cookie shapes onto the tomatoe paste can exterior. You’ll need to prop up the cans on something, like an upside down mini cupcake pan, so that the cans don’t roll. Chill the dough in the fridge for 2-3 hours.

Step 7: Bake your cookies in an oven heated to 375 degrees Fahrenheit (190 degrees Celsius).

Step 8: Color gumpaste to match the dough as best as you can. I’ve listed the colors I used in my tools list above. Honey Gold helped the most!
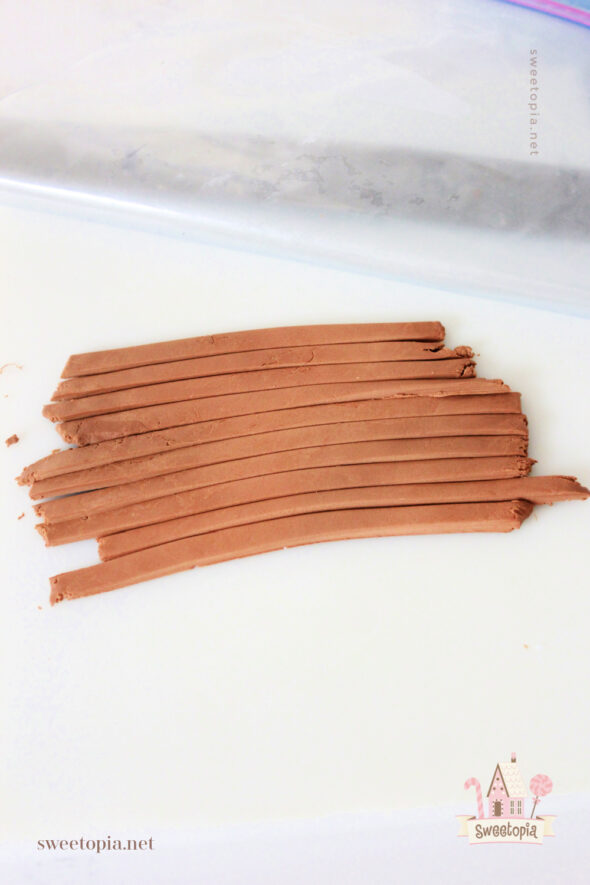
Step 9: Roll the gumpaste out using a fondant rolling pin. Using a knife or a bench scraper, cut strips of gumpaste, about the size of the rope mold you’ll be using. (See my list of tools). Thank you to Gisella of Sugarbush Delights and her mom Beatriz, of Cakes by Beatriz for letting me borrow the silicone mold for these!
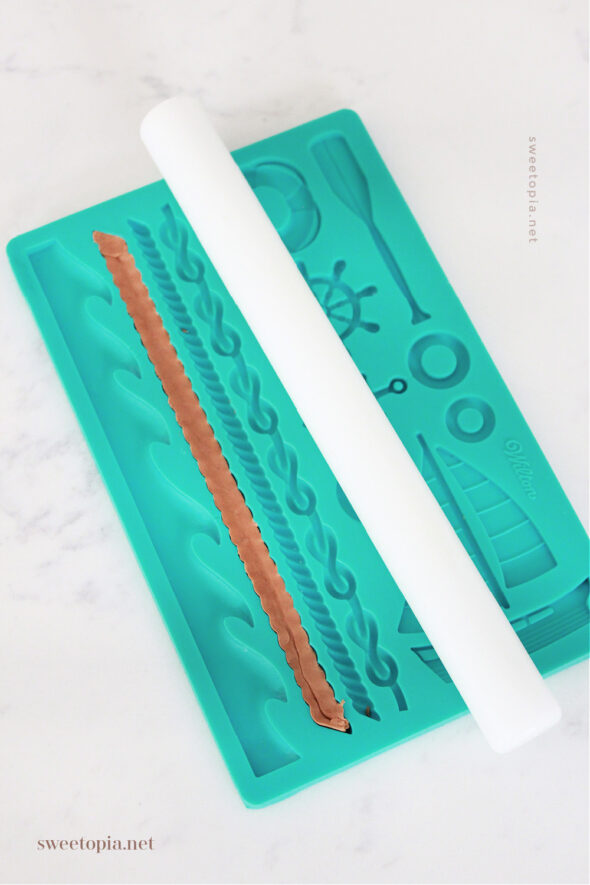
Step 10: Press the strip of gumpaste into the mold and press down with the fondant rolling pin.

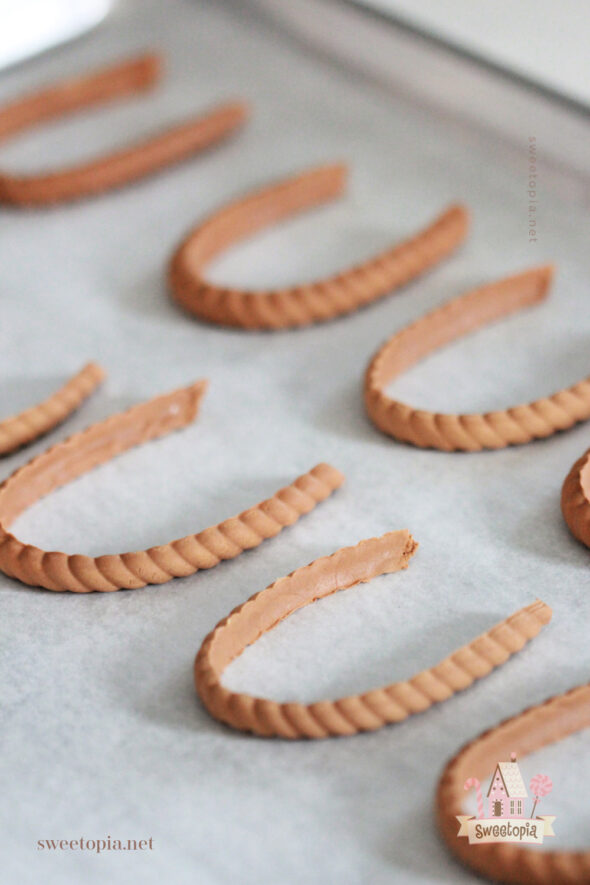
Step 11: Gently peel the gumpaste rope handle out, use garden wire (thank you Jo-Ann for giving me some!), or floral wire (I found it after I asked Jo-Ann for her wire), to use as a guide for the shape of your basket handle.

Step 12: Let your gumpaste handles dry for 24-48 hours.
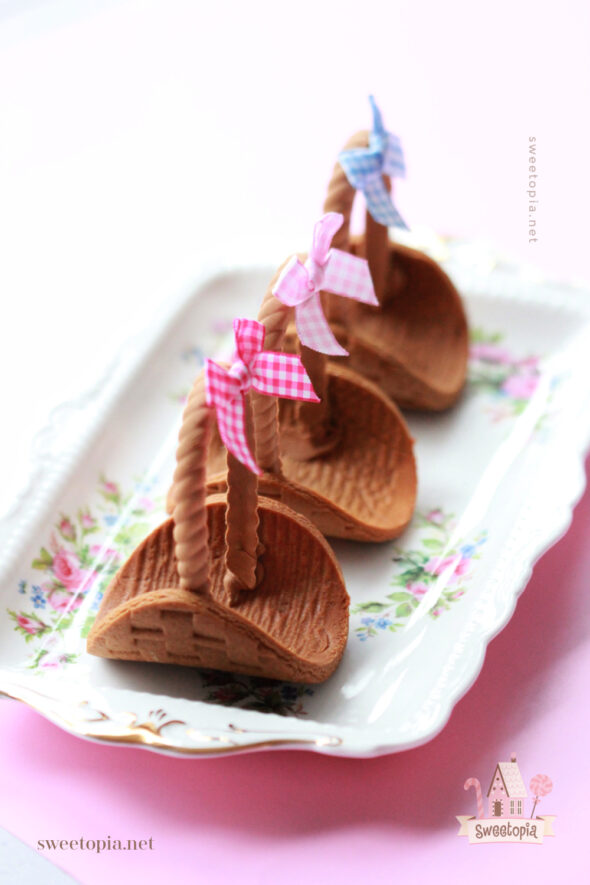
Step 13: Adhere the handles with thick royal icing, colored to match the gingerbread and handles.

Step 14: Adhere the ribbons to the handles with more thick royal icing. Let dry for a few hours.
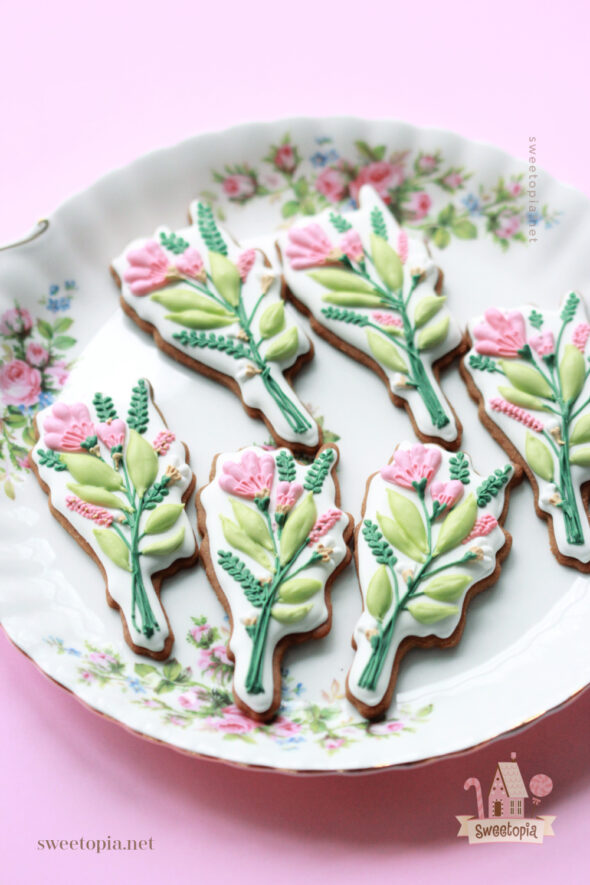
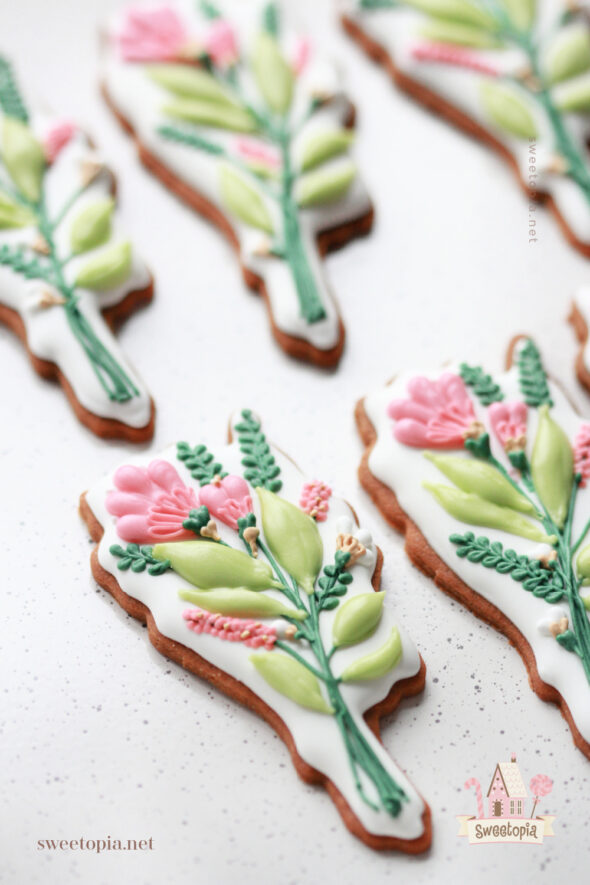
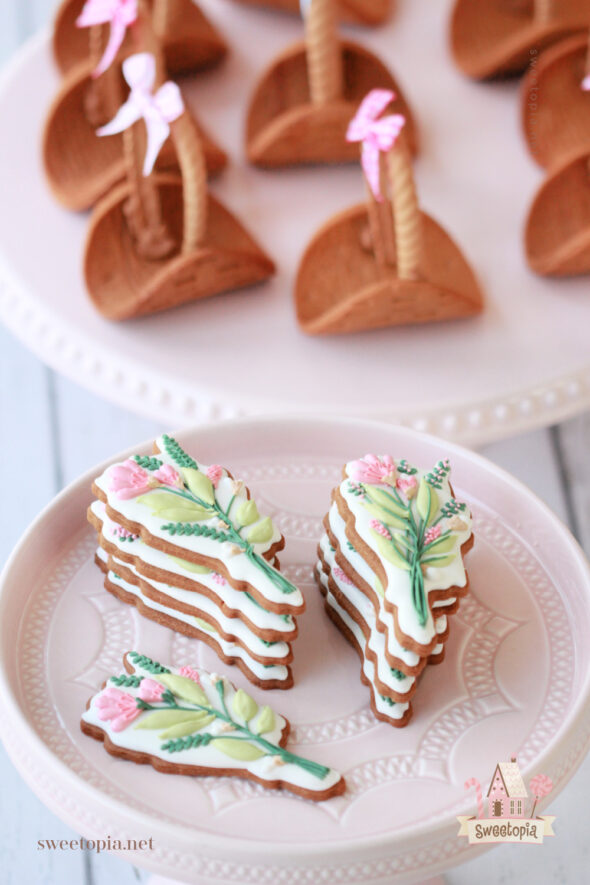
Floral Bouquet Cookies:
Besides the basics to decorating which I’ve shared above, here are a few notes about the the floral cookies:
For all of them, if I piped fine lines, the icing was a medium-thick consistency. For fine lines, I prefer to use a Tipless Piping Bag.
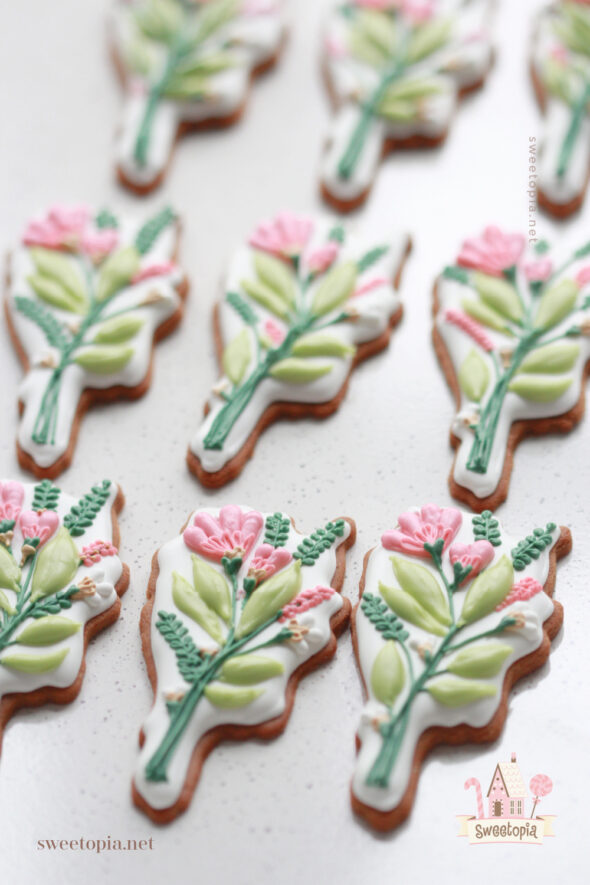
I used my Magnasonic Projector projector to project the designs and trace, as I’m not the best at freehand drawing.

The floral designs are from a greeting card by Hallmark. I couldn’t find an online version to link to.

Once the cookies have dried, place into the baskets and you’re done!
I think those are all the basics! Please feel free to ask me any questions in the comment section or on social media. You can find me on Facebook, Instagram, Pinterest, Twitter and YouTube.
Happy baking!
xo,
Marian


These are so cute! I’m definitely gonna make these. My question is; how would you package these?
Lilly
Hi Lilly,
I would put them in boxes like these; https://sweetopia.net/2012/04/wedding-cookie-cakes/
or, have some sort of sturdy base like cardboard lined with parchment, wrap with cellophane, and tie with a ribbon.
If you make them, let me know what you come up with!
Your work is very beautiful! I’ve been your fan for a long time, I don’t miss a tutorial. Thank you dear for sharing your videos Happy Mother’s Day to you kisses
Aww thank you so very much Maria! That means a lot to me. Xo
love these baskets. I tried to make them but couldn’t get the handle right. I have the same mold. is there a anyway to make them out of cookie dough so it’s safe to eat. simply cute
Hi Mal,
I’m sorry, I haven’t tried that, but, I’m sure you could! You could cut out a cookie in that basic shape and attach once baked.