

These cookies are perfect for beginners and fun to decorate at any level. I’ll share all the basic how-to’s below, please feel free to leave questions if you have them. Thanks to Doodlebug Design Inc. most of the design ideas and to How Sweet is That? for having the cutters custom made for me. You can also find the cutters here, if you’d like to make them too. If you like videos, you can find a full royal icing guide here and a complete guide to making cut out cookies here.

How to Decorate Mini Christmas Cookies – Simple Designs for Beginners
Click here if you can’t see the video.

Cookie Recipe
These are sugar cookies; you can find the recipe here. There are other cut-out cookie recipes here.
You can find the cookie cutters I used by clicking on the corresponding words below:
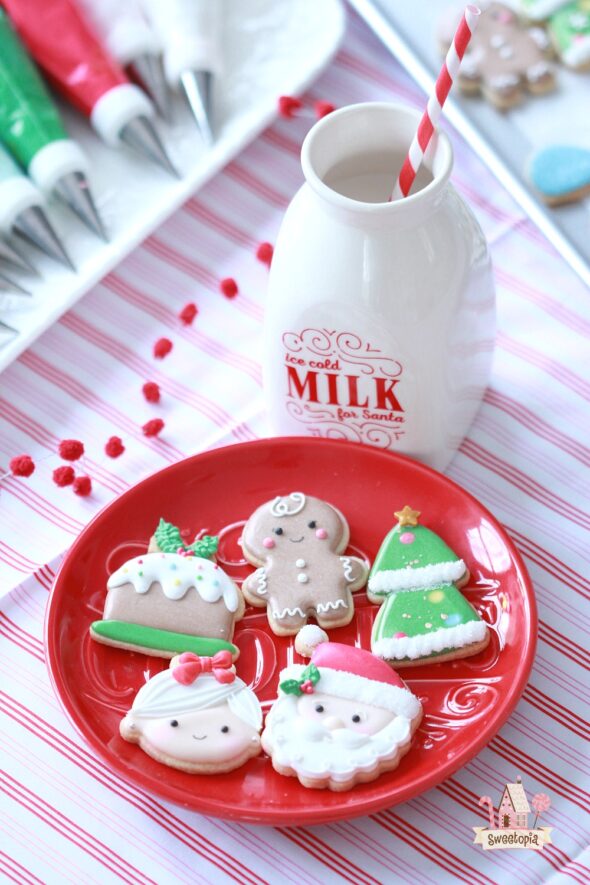
- Mini Tree Cookie Cutter
- Mini Mrs. Claus Cookie Cutter
- Mini Santa Cookie Cutter
- Mini Candy Cane Cutter
- Mini Gingerbread Man Cookie Cutter
- Mini Christmas Pudding Cookie Cutter

If you’d like to start baking and decorating early, click on the links to find posts on freezing cookies, thawing cookies and the shelf life of cookies.

Royal Icing
You can find my favorite royal icing recipe here. The consistency of icing is key for easy decorating. Click here to see a YouTube video on finding the right icing thickness.
You can also find my Complete Guide to Royal Icing Consistency here.
Decorating Items
What you’ll need (These are affiliate links):
- Piping Tips – PME #1.5, Decorating Tip PME ST50
- Piping Bags
- Couplers
- Gel Colors; Wilton Brown, Wilton Pink, Wilton No-Taste Red, Wilton Black, Americolor Forest Green
- Scribe Tool or Toothpicks
- Long Tweezers
- Frosting Sheet
- Snowflake Punch (make sure you check the size you want)
- Rainbow Dust Edible-Black Pen
- White Mini Non-pareils
- Silver Mini Dragees or Non-pareils
- Edible Gold Paint – Sweet Sticks
- White Sanding Sugar
- Bow Silicon Mold
- Red Fondant
- *Mini Pico Projector – You can find a full tutorial on the projector here.

Decorating Steps
This video on outlining and flooding is a good place to start if you’re new to decorating cookies with royal icing. These cookie decorating basics YouTube videos may also be helpful to get you started.

Besides the video tutorial on YouTube which I’ve shared above, I’ve also shared a few how-to videos on Instagram, which you can see here.

The video is in fast forward for the sake of time, but if you have any questions about the decorating process, please feel free to ask below!

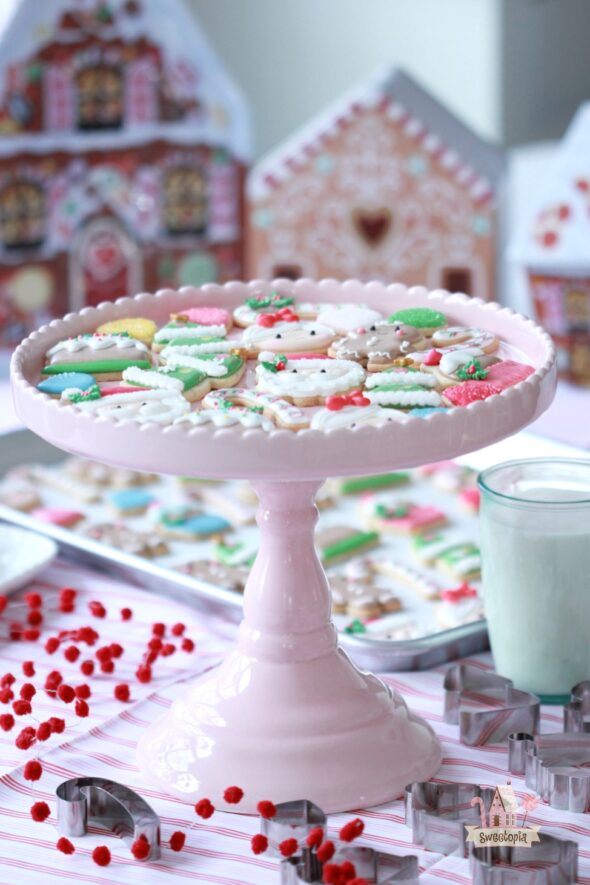
Thanks to Lorrie of Creative Bag for the mini boxes pictured in this post and to Sherry of How Sweet is That? for the cookie plate and glass gift!

Happy baking and decorating!
xo,
Marian


Good morning Marian, very delicate little cookies! Every one with so many details! Very beautiful and cute! Love them all! Have a good day and Advent! Love all your work and creativety!
ML
Thank you Maria! xo
Love them! so cute and tiny 🙂
Thanks so much Roshini!
I can’t enter to the cutters link, what can I do? I LOVE THIS COOKIES, THEY ARE SO CUTEEE!!!
Hi Lorena,
Weird, her site must be experiencing a lot of traffic right now, looks like it’s down. Check her site back later, I will too.
Her site is working again!
Using Mrs. Claus as an example, how long do you wait to flood different colors? Will the colors bleed onto each other? And what about the eyes? Won’t they bleed if you do that too quickly as well? Any help would be appreciated. Thank you.
Hi Jelie,
The best thing you can do is have a test cookie set aside… One that you can nibble on (or cut into), or just poke with your finger, to see how dry the icing is. I wait until the icing is set for adding colors beside one another. Maybe 5-15 minutes with a fan or dehydrator, a little longer if just air drying. It’s hard to pinpoint an exact time, factors like humidity in the air, how thick or thin your icing consistency is, how deep you piped your layer to the amount of icing itself.
If I’m piping colors which starkly contrast, such as black beside white or red beside white, I wait until the first icing is completely dry before adding the next. Again, having a test cookie you can poke and prod is great. Here is a post for you as well, on how to avoid bleeding:
https://sweetopia.net/2009/10/how-to-prevent-your-icing-from-bleeding-7-tips/ . (Note that I did not use a fan or dehydrator in that post, so tips referring to drying times can be shortened if you’re using those… again, a test cookie is great).
You might like this post as well; https://sweetopia.net/2010/12/10-keys-to-cookie-decorating-success-or-10-mistakes-to-avoid/
Hope that helps!
Thank you so much for taking the time to respond to my all my questions, and so quickly too! I really appreciate it!
My pleasure, Jelie!
Ohmy Marian, these CUTE little faces make my heart melt!!
Absolutely enjoy your versatility, the perfection of decorating those cookies is incredible.
They make one happy.
They make me happy. God blessed you with this gift <3
Love the tutorial.
Happy decorating to all the bakers 🙂
Love,
niner