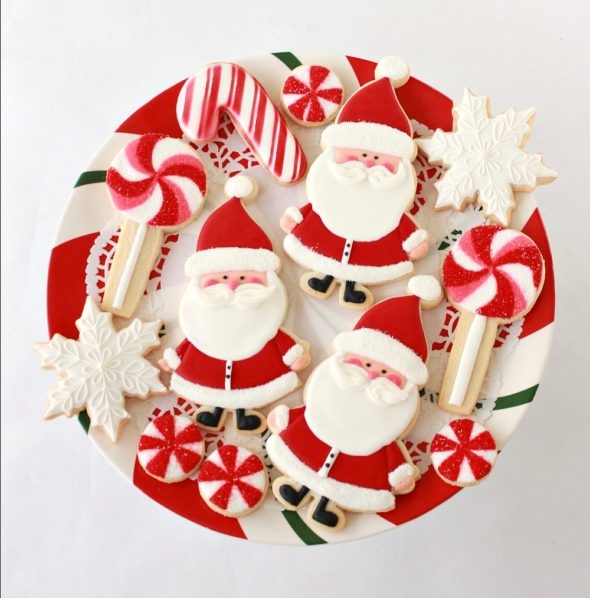
Just a taaaad bit early, I hope you can forgive me for sharing my jolly St. Nick cookies with you in early November!
I plan hope to be sharing my Christmas sweets with you weekly and have had this Santa cutter for a few years so was excited to finally decorate these.
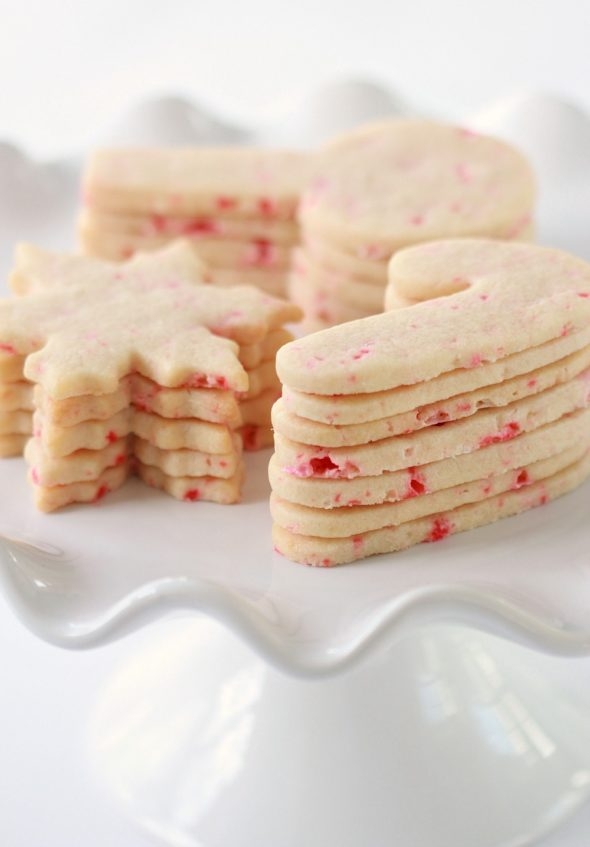
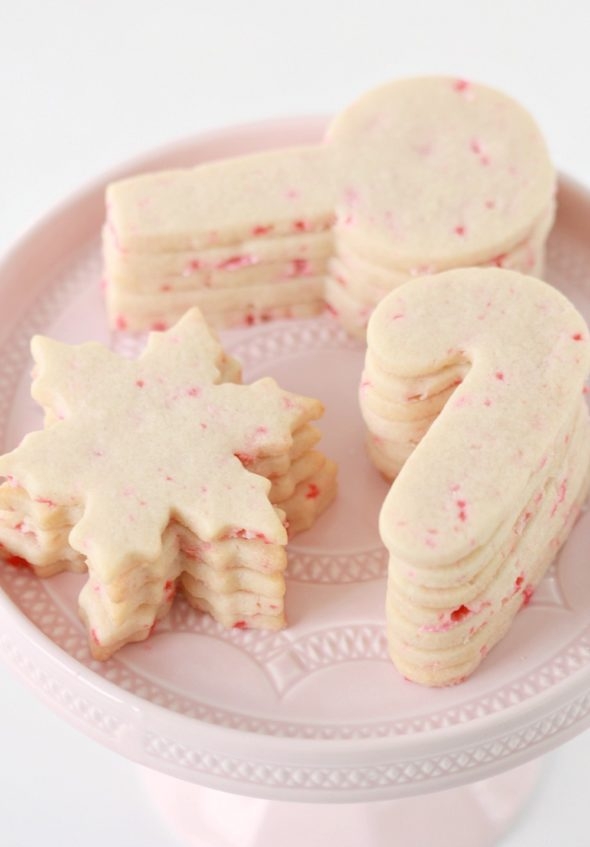
The idea to make a peppermint sugar cookie dough came as I was decorating these, which is why the decorated cookies pictured in this post are actually regular sugar cookies (You can find that recipe here), but I’ve shared the peppermint cookie recipe (and a few pics) below.
You can find the Santa cookie cutter, a custom cutter based on this Pier One gift bag, in two sizes:
Smaller Size: Cheap Cookie Cutter’s shop here.
Larger Size: How Sweet is That?’s shop here.
The decorating technique for this set of cookies is fairly straightforward, so I’ll share my basic tips in case you’re new to decorating, otherwise please feel free to ask me any questions in the comment section below.
Decorating Cookies
Find the cookie cutters I used here by clicking on each individual cutter below (Any links to Amazon in this post are affiliate links):
Cookie Cutters:
Santa Cookie Cutter (How Sweet is That? is offering a 20% discount with code SWEETOPIA).
Royal Icing Consistency
The consistency of icing is key for easy decorating. Click here to see a YouTube video on finding the right icing thickness for basic flooding and decorating. Here is a link to the royal icing recipe as well.
Decorating Items
What you’ll need (these are affiliate links):
- Piping Tips – PME #1.5, PME #2 and PME #3 , PME #43
- Piping Bags
- Couplers
- Gel paste colors
- Scribe Tool or Toothpicks
- Sanding Sugar
- Line Stencil from Stencibelle
It may seem strange to be sharing holiday cookies this early, but the beautiful thing about cookies, is that they freeze really well. If you’d like to start baking and decorating early, click on the links to find posts on freezing cookies, thawing cookies and the shelf life of cookies.
Candy Cane Sugar Cookie Recipe Notes
A few notes about the recipe:
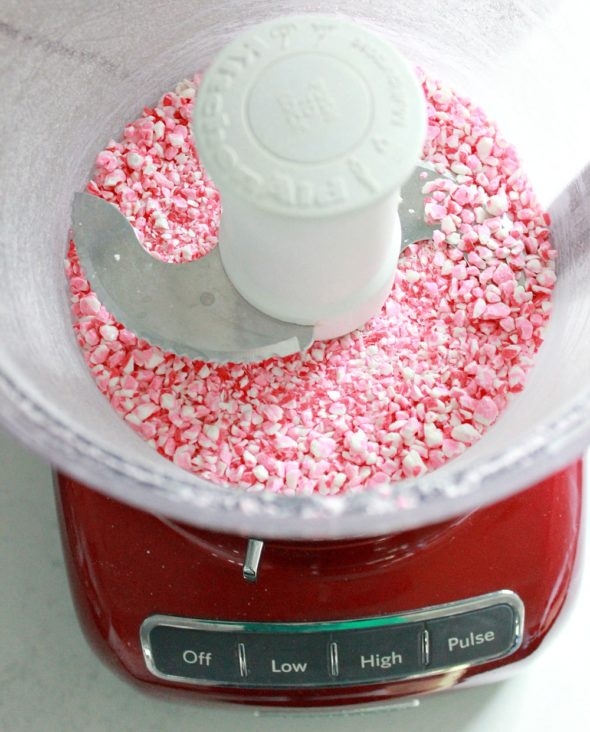
I used candy cane sticks and crushed them in a food processor (more on that below), but you can use any kind of candy cane or peppermint flavour. For an added peppermint kick, add 1 teaspoon (or more, depending on your taste) of peppermint extract to the recipe instead of the vanilla extract.
If you don’t have a food processor, place your candy canes in a ziplock bag, wrap the bag with tea towels and crush with a rolling pin. I’ve done this in the past and it works, but requires a little more effort on your part, and can be messy if the ziplock bag breaks.
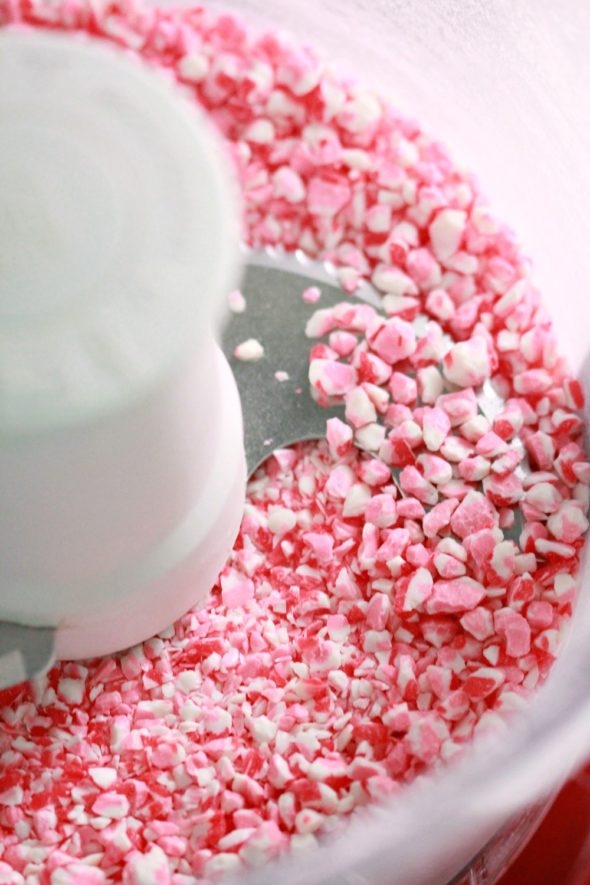
To crush in the food processor, just place your candy in and pulse until you’re happy with the size of the pieces. The smaller you go, the more candy powder there will be, which will turn your dough a bit pink. I did add a tiny bit of icing sugar which seemed to help the candy not stick together.
The large pieces of candy, once baked, melt and leave little craters, so when the cookies came out of the oven, I took a paring knife and cut around each cookie, to clean up the edges.
Candy Cane Cut Out Cookie Recipe
Candy Cane Cut Out Sugar Cookies
Ingredients
- 2 cups unsalted butter, room temperature
- 2 cups granulated sugar
- 2 large eggs
- 2 tsp vanilla extract
- 5 cups all-purpose flour
- 1 tsp salt
- 2/3 cup crushed candy canes
Instructions
- Cream the butter and sugar together in the bowl of an electric mixer on low to medium speed. (Use the paddle attachment). Mix until thoroughly incorporated - for about one minute. Scrape down the sides of the bowl with a plastic spatula and mix again for a few seconds more. Over mixing the butter and sugar in this step will cause too much air to be incorporated into the dough. If you'd like a light and fluffy cookie, that's ideal, however the dough will spread more during baking; not ideal if you'd like the cookie to hold its shape.
- Add eggs slowly and mix. Scrape down the bowl with your spatula at least once and mix again. Add vanilla extract. Stir briefly.
- Sift your dry ingredients together. (Flour and salt). Add all of the flour mixture to the bowl. Place a large tea towel between the edge of the bowl and the electric mixer so that the flour won't escape. Mix on low speed for 30 seconds. Remove the tea towels and observe the dough mixing; when it starts to come together add the crushed candy cane and mix until the dough clumps around the paddle attachment. The dough should peel away from the sides of the mixer and clump around the paddle attachment. You can also test the dough by pinching it between your thumb and index finger. If it’s soft but not sticky, it’s just right. If it’s too sticky when you pinch it between your fingers, add flour, ¼ cup at a time, and mix until you’re happy with the texture. There are various reasons why a dough can be too dry or too sticky, ranging from humidity in the environment, to what kind of flour you use, the fat content of the butter etc., however, there are ways to fix the issues if you run into them. Already mentioned, add flour if your dough is too sticky, and if it’s too dry, make sure you’ve mixed it as best as you can first, and if it’s still too dry, add a little water or milk until your dough comes together.
- Add your candy cane bits and mix until just incorporated. The longer you mix the pinker the dough will get, so mix until you like the color. (Again, mixing the dough too long can cause more spreading when cookies are baked though).
- Roll the dough out between 2 large pieces of parchment paper. Place on a baking sheet and into the fridge or freezer for a minimum of 1 hour.
- Cut out cookie shapes. Place on parchment paper-lined baking sheets. Re-roll scraps and repeat. If your dough gets too soft to work with, place in the fridge or freezer periodically to firm up again.
- Once all cut out, put cookie dough shapes back into the fridge or freezer for 10 minutes to 1 hour to chill again. They will then hold their shape better when baked.
- Preheat your oven to 350°F or 176°C.
- Bake cookies for 8-12 minutes or until the edges become golden brown. The baking time will depend on the size of your cookie.
- Let cookies cool to room temperature and decorate if you like! If you’re new to decorating cookies, here is a cookie decorating tutorial with everything you’ll need to know to begin!
Notes
Please feel free to ask any questions below and thanks for visiting me here!
Happy baking and decorating!
xo,
Marian













Love your cookies! They are so cute! Re: the peppermint cookie dough. I think I recently saw crushed peppermint candies in the baking aisle or the seasonal aisle at the grocery store too.
Hi Margot,
Thanks! Yes, that would save a step if you buy them crushed, thanks for sharing!
Sherry has ordered more Santa cookie cutters. If you send her an email she will put you on the list and send you a message when they are in.
Thanks for sharing Ruth!
I Would really love these cookie cutters. Do you sell them Or where could I purchase them? Thank you
Hi Karrie,
There are links to the cutters in the blog post, under the title, Cookie Cutters.
Happy baking!
So glad to see your post this morning! Kind of missed you. I just ordered the Santa cookie cutter. He is adorable. Thanks for your beautful posts.
Aww thanks Deb, I’m glad to hear it and have fun decorating your little Santas!
Love these Marian!! They look so adorable. These little black boots!! Ohmy! 😀
Absolutely perfect piping whatever you create. I am so proud of you <3
Anything white and red reminds me of Canada AND Christmas, I am all for it the next couple of weeks haha..
Much love,
niner
Hi Niner,
That’s true, red and white for Canada and Christmas! Would be nice to have you here for a visit at Christmas too… some day! Thanks for your sweet comment. xxo
Hello! I’m so glad to be able to follow you again. These cookies are the cutest ever. Just ordered the Santa cutter. Can’t wait to get started.
All the best from the other Marian .
Oh hi again other Marian! I love it, I so rarely come across another one, and I remember you visiting here. 🙂 Thanks for your comment. xo So glad you ordered the cutter, have fun decorating your cookies!
Your cookies are so beautiful! I’ve never made cookies like these but hope to if I can squeak out some time between my FT job and taking care of 2 little kids!
I’ve never really been successful at baking sugar cookie cutouts without them spreading so I’m going to look at your link. Thanks for sharing your lovely work and your recipes.
Aww thanks Jacqueline! I wish you all the best with your cookie decorating experience. Please don’t hesitate to ask any questions here, I’ll do my best to answer quickly. This link might help you as well… I don’t have two little ones but have a FT job and other commitments and need to break up my cookie decorating a bit. Here is how I do it:
https://sweetopia.net/2011/11/cookie-making-schedule-free-printables-ballet-tutu-cookies/
How do you transfer the dough from the surface, to the cookie sheet, without changing the shape of the cookies? I have used my hands as well as spatula’s and when using either one, they change their shape. Please tell me how to prevent this.
Hi Shelley,
I make sure the dough is cold so the cookie dough (at first) sticks to the cutter and lifts out with the cutter, making it easy to transfer. It doesn’t stay that cold for more than minutes so besides continuously sticking the dough back in the fridge as an option, I peel the dough around the cookie away and then use a cookie spatula to pick the cookie up. The dough does have to be cold enough that it doesn’t warp, so if it’s too warm, I’ll put the dough back in the fridge. Hope that helps!
Lovely to see a new post from you! Never too early for Christmas for me. These are adorable. Cheers Karen
Thanks for your lovely comment, Karen, and glad you don’t mind an early Christmas post too!
Can you tell me how you decorated the lolipop ones, please?
Hi Barb,
Sure, I outlined the round part with white 10 second icing, and filled it in with the same icing. (Wait to fill it in a little bit, until the outline has set, then fill it in). Pipe the red and pink lines right on the wet white icing, immediately. Take a look at this nail art video on YouTube; https://www.youtube.com/watch?v=z_OVGWxISlk That’s how I piped the red and pink icing on top of the white (with just piping bags and tips so the lines are thicker). I also piped the pink right beside the red, instead of leaving a gap. Once the colors are piped immediately sprinkle with sanding sugar.
Aaackkk! I forgot to tell you how much I love these cookies! It’s never too early for me to see Christmas cookies 🙂
Ha ha thanks Barb!
You are incredibly talented!! I would love to see how you did the lollipop cookies too! Thanks!
Thanks Jennifer!
For the lollipops:
I outlined the round part with white 10 second icing, and filled it in with the same icing. (Wait to fill it in a little bit, until the outline has set, then fill it in). Pipe the red and pink lines right on the wet white icing, immediately. Take a look at this nail art video on YouTube; https://www.youtube.com/watch?v=z_OVGWxISlk That’s how I piped the red and pink icing on top of the white (with just piping bags and tips so the lines are thicker). I also piped the pink right beside the red, instead of leaving a gap. Once the colors are piped immediately sprinkle with sanding sugar.
Thanks Marian! I appreciate the info!!
Happy Holidays!
You too Barb!
I had the same question! Beautiful cookies, Marian!
Thanks Jennifer!
Amazing, beautiful art work! Love Santa very much.
ML
Thanks Maria! Xo
Are there instructions for decorating the Santa?
If so, where are they?
Thanks in advance!
Hi Marla,
No, there aren’t but here is a basic description of the steps and tools I used. For piping, I used tip #1.5 for all steps except for Santa’s mustache, which is a PME #43. I began by outlining and flooding his jacket, hat and arms. Let that dry and piped his beard. Let that dry and piped his hat pompom, hat rim, cuffs and bottom of jacket and sprinkled sanding sugar on immediately. Let that dry and piped his face and hands. Let that dry and piped his face details boots and the white and black on his jacket. For drying time in between I waited a few hours for each. Hope that helps!
Love, love these cookies! As always your cookies are perfection! Never too early to start Christmas cookies because things get so busy later on. Now for the questions!! You are my cookie guru so I will ask you! Marian, every year I struggle with getting the red really red and the black really black. Afraid too much colouring will give a bitter taste. Read somewhere to add blue to red to deepen colour. Help! BTW my original inspiration for getting into this whole cookie decorating thing was YOU! You are the best!
HI Marilyn!
It’s been a while since you’ve been visiting me here and I appreciate it! Thanks for your lovely comments! For red icing, yes the slightly bitter taste with lots of food coloring does happen. Wilton has a no-taste red that helps though. I don’t put blue in mine, let me know if you try it and like that tip please. Here’s a post I wrote on coloring icing red, and the same applies for black:
https://sweetopia.net/2014/11/how-to-color-icing-red-decorated-christmas-cookies/
Have fun decorating!
Tried to order the Santa Cookie Cutter tonight. They are all sold out. Sad, sad. Sent a message asking when they might have more in. Hoping soon enough before Christmas to make them. Will order after if available. There’s always next year. Love your cookies.
Hi Ruth,
Sherry, the shop owner, has ordered more!
Christmas is better in early November, hehe. I’m eager to start decorating cookies for Christmas. Your cookies are so pretty 🙂 and this cookie recipe has to be yummy!
Love!
I agree!Looking forward to seeing your cookies!
Hi Marian,
I have been a fan of your work for years! I also tried to order your Santa cookie cutter which is out of stock. Hoping they will have them back in stock soon!
Thank you,
Lori
Thanks so so much Lori! Yes, Sherry has ordered more Santa cookie cutters. If you send her an email she will put you on the list and send you a message when they are in.
What flavor of royal icing do you pairbwoth these candy cane flavored cookies?
Hi Misty, I did vanilla (recipe in my recipe section… just called royal icing).
You’re killin Marian! So many awesome recipes this season!!! so missed you while you were away. you really came back strong! Just love you and your generous talent! thank you for sharing!!!
Hi Marian!
I’m planning a peppermint party styled shoot so these cookie ideas will be perfect! One question regarding the lollipop cookies. I see you instructions below, which I understand, plus I watched the you tube video which was super helpful. Just a quick question: did you first pipe the red part of the swirl them immediately top with sanding sugar, let dry, then do the same for the pink and white? Just curious how you git each section of color so perfect without running in to each other and the sugars staying separate! A million thank you! I am constantly inspired by your work and have been a fan for many, many years. It’s akways an extra special day when I see something from you in my In Box! XOXO
Hi Tina,
Thanks for visiting me for so long! I do remember you and appreciate your always kind comments! xo
So, for the peppermint and lollipops, I piped the whole surface with white royal icing, then piped the red on top immediately, and then the pink. Sprinkle the sanding sugar on right away and let dry! The red tends to bleed a bit into the white because of the sanding sugar but it wasn’t too bad. Hope that makes sense and helps you!
Hey! Am I blind? LOl… I just followed this all the way to adding the flour and I can’t see anywhere when it says to add the candy cane??!! I’m going to just try and add them now, might be hard to incorporate it now though. Urgh, maybe I just can’t read it right lol!
Thanks
Sorry Gemma! I got so busy explaining details about dough etc. that I forgot to mention to add the candy cane bits in. And yes, add right after the flour has been incorporated!
Hi Marion, is the cookie cutter sold anywhere else besides Canada? I love that santa!! Love your too. I am in the US. Thanks so very much for your awesome blog. ♥️
Hi Debra,
I think Cheap Cookie Cutters will have it available soon. https://www.cheapcookiecutters.com/ Try contacting them so they can tell you when it will be ready. Happy decorating!
How much parking powder? It says soft with flour and salt, but it’s not on the list?
I meant baking powder!
Hi Aubrey,
Thanks for bringing that to my attention! I do not add the baking powder when I’m making cut out cookies, as it makes them spread too much. I like my cut out cookies to be crisp and hold their shape. It doesn’t affect the taste and hardly affects the texture. Happy baking!
How much baking powder
Oh I just saw that you don’t add baking powder but you listed it in your directions
Thanks for noticing Sherrie, I’ve taken it out of the instructions now!
I love this cookie cutter! The website you mentioned in the post is sold out. Cheapcookiecutters.com has it though! 🙂
Thanks!
p.s. How Sweet is That? has them back in her shop too now.
really cool write up Show Pingbacks & Trackbacks got here.
Hi, hopefully you reply soon!!! I don’t have a stand up mixer, and I thought my hand mixer had a paddle attachment but it’s either missing or I’m crazy! Is there any way mixing this by hand will work??? Any tips?? Please help! – Claudia
I’m sorry for the delay, how did it end up going for you?
I noticed baking powder wasn’t in the recipe, just making sure that’s correct?
Thank you
Hi Liz,
Yes, that’s correct. It makes the cookies spread a bit. The cookies are still delicious without it!
Hi Marian, these are just adorable. I know you used 10 second icing for the outline and flooding on the lolipop and candy canes, but did you use that same consistency for the red and pink piped details (stripes, swirls)?
Hi Claire,
Sorry for the delay, I had string of Christmas gatherings over the last week. Yes, I did use the same icing for all those details. Wishing you a Merry Christmas!