
Once Upon A Cookie ~ Princess Jasmine
It’s been a while, hasn’t it, since I last posted a cookie from the Once Upon A Cookie series I’m slowly working on. If this is the first one you’re seeing, I’m using this adorable piece of art by suisei-ojii-sama to make a set of fantasy princesses cookies. So far, this is my third princess, and the other two are here:
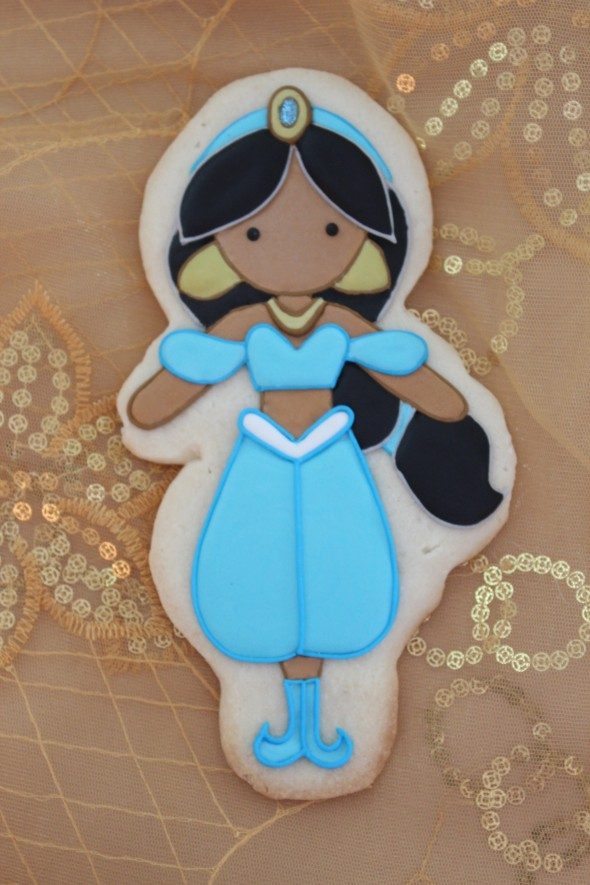
And now princess Jasmine. She was fairly straightforward to make, the only thing which took a little longer was figuring out how to get icing to match the mustard color. More on that in the tutorial below. So, without further ado…

How to Make a Princess Jasmine Cookie
You will need:
- Sugar Cookie Recipe here or Gingerbread Recipe here.
- Royal Icing Recipe here.
- Piping Tips (#1.5, #2, #3)
- Couplers
- Piping Bags
- Food Gel Colourings – white, black, Americolor warm brown, Wilton brown, sky blue, teal, lemon yellow
- Kopykake Projector
 (Im not skilled at drawing so need to use a Kopykake projector to trace the images)
 - Paring Knife
You can make your cookies all in one day, but I like to break it up a bit. Here are a few schedule examples:

Instructions:
Making the Cookie Base
To begin, I printed my image and made the outline a little darker with pen as the image didn’t have sharp outlines. Drawing darker outlines helps the image show up better with the Kopykake Projector![]() .
.

Insert the image into the projector and draw the shape of the cookie you’d like onto paper. You can use other material besides paper, like a transparency sheet or cardstock. If you’d like to keep the template for more than a few cookies or for future uses, you can even have it laminated at your local print shop.

Cut out your template and place it onto your dough. Cut out your shape using a paring knife. I usually make a few, even if I only want to end up with one cookie. That way I’ve got a back up if one cookie breaks. (And I’m a clutz so I need to have back-ups!).

As the dough is soft at this point, you can smooth the edges down with your fingertips (forgot to take a pic of that). Bake and let your cookies cool.
Something to note ~ If you’ve got let’s say 100 of these to make, using a hand-cut template like this probably isn’t something you’d want to do. Too labour intensive in my humble opinion. You might want to look into buying a cookie cutter kit![]() or, if you’re crafty that way, buying what you need at the hardware store to make your own custom cutter. I wouldn’t want to make 100 Jasmine’s either way though, she’s more of a detailed cookie to be put with some simpler designs.
or, if you’re crafty that way, buying what you need at the hardware store to make your own custom cutter. I wouldn’t want to make 100 Jasmine’s either way though, she’s more of a detailed cookie to be put with some simpler designs.
Preparing and Coloring the Icing
The consistency of the icing is key. For a how-to on how to find the right consistency, please see this video here. To color the icing, I like to print a color pic of the image I’m using, and use it to try and match the icing color to the picture. I dab a small amount on the paper with a toothpick, and try and see how I need to change the color until I’m happy with it.

For the Jasmine cookie, I used the following gel colors:

I ususally like using the squeeze bottle, Americolor chocolate brown instead of the Wilton, but I was out the nearest store to me which carries food gel is Michael’s (they only have Wilton where I live). I ended up really liking it.
It took the longest for me to figure out how to get right the mustard color, and although I can’t give you exact amounts of each gel paste, here are the combinations I used to make…
- Mustard – Lemon yellow, warm brown, regular Wilton brown.
- Blue outline of Jasmine’s pants etc. – sky blue and a touch of teal
- Blue of Jasmine’s pants etc. – above color diluted with more white icing
- Grey – touch of black
- Skin tone – Wilton brown, touch of warm brown
- Dark brown outline – Wilton brown
Outlining the Cookie
You’ll need the darker brown, the brighter blue and grey for the first decorating step. You can find tips on piping royal icing in see my cookie decorating tutorial or YouTube videos.

Using piping tip #1.5 and my Kopykake Projector![]() , I outlined the following lines first:
, I outlined the following lines first:

No worries if you make a mistake, like I did below. I just used a toothpick to scrape off the icing I didn’t want. If your cookie base is a bit colored, gently use the toothpick to remove that surface of the cookie, revealing an uncolored cookie beneath!

Flooding the Cookie
Once you’ve let the outlines dry, flood Jasmine’s face, legs and torso and white belt in. I used a #2 piping tip.

Shake the cookie gently to help smooth the icing over. In this case her shape wasn’t too delicate, but just a tip if you’re working with a very fragile shape and intricate flooding areas ~ make your icing a little runnier so you don’t have to shake the cookie as much (5 second rule – See here for the video), and so the icing runs into tight areas easier. Be aware that runnier icing causes more craters to happen though, and is harder to control.
Let the face and body icing set for about an hour and then add the next layer of icing details; in this case, Jasmine’s hair, hairband, shoes, pants and the base of her sleeves. I used a #2 piping tip for all colors but the blue, where I used piping tip #3. For larger areas, like her pants I like a larger piping tip to flood the area faster.

Notice that I made her pants ‘poofy’ (lots of icing), but her feet less full. Small areas of flooded icing tend to develop craters caused, most likely, by air pockets under the icing and surface tension. Filling small areas in with less icing, helps to alleviate this issue.

Let those areas dry for 6-12 hours (Time depends on the humidity in your area. Please see here for a video on drying decorated cookies).
Final Details
Pipe the top layers of detail, in this case, Jasmine’s sleeves and top, outlining her pants etc., and filling in her earrings, necklace and jewel.

Let those areas dry and fill in her her top and another layer of her her – this time just her bangs. Layering icing creates a little depth.

On to one of my favorite parts – disco dust!

Thanks to those of you on Instagram who helped me chose which blue disco dust I should use! (Sorry about the shadowy iphone pics btw!).

While I was waiting for the responses on Instagram, I went ahead and piped Jasmine’s eyes with black icing and a #2 tip.

The final touch – adding the disco dust to the wet blue icing at the center of Jasmine’s jewel.
Serve as is or let dry and package in a cellophane bag tied with ribbon. I didn’t make them this time, but wouldn’t Alladin, Alladin’s lamp and the carpet be adorable cookies to go with her?!

Please feel free to drop me a line below if you have any questions or comments!
Happy decorating!
xo,
Marian


Wow!!! I’m speechless, that is the most darling cookie ever!
You have the patience of a saint. I’m always in awe at your cookie work. Great Job! If it ever occurs to you how to jimmy up a contraption so that us homebodies can pretend we have a kopykake… we’d be ever so greatful!
That is so beautiful!
WOW! Each time I think you have made the most beautiful thing ever, you come up with an even more amazing one. She is truly wonderful. You are such a creative genius. I love your site, and even though my cookies NEVER look like yours, I feel inspired every time I see what you are doing. I know I have more practise ahead of me, and I just love to look and see what you have made next.
You are my inspiration. Thank so much for sharing.
Marian..
I have seen a preview before and I absolutely loved it. And now, to see how you actually put this whole piece of art together blows my mind.
You know I love your creations but I am here to tell you again: I absolutely ADORE your talent 🙂
Hope you have a good start into the week, much love girl!!
xoxo
niner 🙂
I Agree with all the above comments. And I’m sure you’ve heard this a hundred times but when one sees work like yours you can only compliment it and thank you for sharing your inspiration, time and work! Congratulations on another gorgeous cookie!!
Beautiful cookies and that sequin material is the perfect backdrop.
Marian!!!!!!! Absolutely awesome!!! Your cookies are so, so, so….. maravillosas!!! (sorry, in spanish sounds more wonderful jajajaja). I am painting some cookies for my daughter Paula (this sunday is her birthday) and although I’m trying to do my best, they look like Cinderella’s stepsisters if you compare them with your princess Jamine…
Congratulations, Marian and thank you so much for sharing your job with us… You’re the best!
Can I but these already done?
Awesome really describes it best. If only I had a granddaughter, your patience, your imagination, your talent……. Well you get the idea.
I’m just about to start experiment with cookie decorating (tools are in the mail) and your tutorials are so helpful!
she is just adorable!
So beautiful! I wish I had a Kopy Kake!
This tutorial (and all your work) is awesome. I always have trouble with my supposedly thin lines being too thick – even using a #1 or #1.5. Is my icing too runny? Is that the reason?
What consistency works best? It looks like you use the same consistency for outlining and filling, but that never seems to work for me.
Love your cookies!! You’re going to force me to get a Kopy Kake!!!! 🙂
Wow…that is a lot of work for 1 cookie (can you imagine doing 100 of these). Your cookie turned out awesome…great tutorial.
Thanks for your comments everyone! xo
Ha ha @ Holly! Hardly, I should tell my DH you said that… He knows I can be the most impatient person. I think making one of these was enough … I’d have to make simpler ones to go with them if they were an order.
Seriously, how sweet, @ Janis! Thanks!
You tooo, @ niner bakes: Enjoy your week and see you on instagram! xo
HI @ Cher: I’m sorry I don’t do orders, but these lovely ladies do: https://sweetopia.net/cookie-decorator-directory/
HI @ Marilyn: I have a video on royal icing consistency adn another one on piping lines – have you seen them on my YouTube page? Please come back and ask let me know if you have, and we’ll help you narrow it down.
Wow!!! This is a really detailed cookie!! I can’t believe all the planning that went into it. You make it seem effortless, but I am sure a good deal of thought went into which part needed to be flooded for others so you could end up with this STUNNING piece of art with all those layers and perfect piping!!!
just love it!
Wauw, this is absolutely amazing! It’s beautiful! So talented!
Marian – This is yet another lovely cookie from you! I so appreciate all of your detailed instructions. Your timeframes are also a revelation to me. Cookie decorating doesn’t have to take all night (just several evenings). Thanks again, Kristina
There are lotsa effort and time you put into each piece of art work. You are world class, best of the best you know 🙂
wow how amazing…beautiful art work again.
thank you for teaching us all your talents.
ML
She is adorable! I’ve had to make my own templates on several occasions and while it is something I don’t relish doing (hand cutting is so time-consuming)it certainly is a lot less expensive than ordering a custom cutter.
Wow…!!! excellent job…!!!! I just need a kopykake to do it easy.
absolutely gorgeous!
You are ah-mazing! Your cookies are made with so much precision – I love it and this one is no exception.
What a beautiful and perfect job!!
Too good….do u do classes? I’d come all the way fr Aust to take them.
just some words to tell you how amazingly talented you are!!
i really really love everything you do,this is so sweet!!!
it seems like you are the most patient woman in the world,taking time to perfect all the details,to get the perfect color,etc…
anyway,i can t find the right words to explain what i feel when i visit your blog(i m not that good in english ,unfortunately!)
i know i would never get such a talent(because i m not that patient!!!ha,ha!)
but thank you very much to inspire all of us who are trying to bring beauty in our life.
happy decorating marian
I look at your site so often and I just wanted to say thank you for all your help that you don’t even know I’m taking! : ) You are amazing and so talented. Between you and Sugarbelle, I’ve learned enough that I was able to make lovely iced tye dye t-shirt cookies for my 4 year old’s class. They looked wonderful thanks to you guy. Anyhow, thanks so much again for all your lessons and uploads!
Warmly, George Ann
WOW! These are so adorable! And, a perfect addition to a party! Thanks for sharing!
OMG! That`s all I have to say 🙂
You keep amazing me, I salut you
Thank you xoxo
Oh my goodness… this is the cutest thing I’ve ever seen! I would LOVE it if you could do a tutorial doing the Ariel… my favorite princess. I can’t wait to try one of these little beauties!
Thank you for the tutorial! You give me an idea for my daughter birthday.
I made an Ariel cookie!
Thanks for sharing!!!
Hola amiga!!..entré por casualidad en tu blog y la verdad es que me ha encantado, tu trabajo es una maravilla y ya me he hecho seguidora de tu blog.Te felicito i admiro tu pasiencia con el decorado de galletas con Royal Ising, seguire tus consejoa a ver si me animo con ellas.
En donde dice sitio Web puse uno de mis blog pero te sigo con el otro y mi facebook es Silmarí Petostería Artesanal, soy Argentina y vivo en España. Encantada de haberte conocido.
Hi Marian!
So happy to have discovered your wonderful blog! All the cookies are beyond amazing, and this one might be my favorite, so far. Still exploring your website. I just recently tried my first decorated cookies, and I am already addicted! You are so right, not as tasty as a cake, but so much more fun to make, it is hard to stop! I baked 150 cookies over the weekend, and now I am decorating them. I even wanted to skip dinner with my hubby, just to stay home and keep decorating today 🙂 . And everything you do is so inspiring, it just makes me do more. I was decorating last night till 5:30 am in the morning hahaha that’s how in love I fell with it.
I ordered all the food colorings, tons of cutters, and of course all the disco dust color amazon had on sale. I have a question though: are these dusts edible? It does not say edible on them, and I am worried. Should I tell people not to eat that part of the cookies? They add so much to a cookie, and kind of don’t want to stop using it, so I just might tell friends not to eat the cookie all together hahaha.
Thank you for your wonderful work and useful tips,
Ajda
Thanks for all your kind comments!
@ Ajda: Wow, that makes me happy to hear that you got the cookie ‘bug’ too! Thanks for your sweet comments!
Disco Dust- non-toxic and as far as I know, under review by the FDA to be labelled as edible, much like gold flecks in Goldschlager, but as I’ve recently found out, not labelled as ‘edible’ per say. That means that it won’t harm you if eaten (non-toxic), and will go through your system, but it would probably be a good idea to let your clients know about it. Maybe make a few for show cookies with disco dust if you’re concerned or they’re concerned and others without for consumption. Hope that helps!
I’m finally getting a Kopykake projector for Christmas! Can you recommend some sites and resources for finding detailed/ cute/ unique images of things that can be made into cookies?
Absolutely, Vanessa, I like shutterstock.com or istock.com
Have fun!
Gorgeous cookie. Thanks for the tutorial.
Omg!!! You are so talented!!
I really need some Jasmine cookies for my twin sister’s surprise birthday party!(I know it is my birthday too but I live in the USA now and she is in Brazil so I’ll surprise her on out birthday and I’m planning a party for her with Jasmine princess Jasmine theme! Lol). Jasmine is her favorite princess and she would love those.
You really don’t make them to sell???? Do you know anyone that would make those around DC area or anywhere that could ship from?!
I’m now really in love with those cookies!
You are very talented!!!