
Looking at my post now, I suppose I should have called it, Citrus Cookie Recipe, because you can easily interchange the lemon for orange or lime. But, there is a special reason why I wanted to mention lemons, which I’ll explain in a bit.

A little forewarning for you, this is a different kind of a post. A small change from the regular programming. 😉

It was about two years ago, this time of year, that I went through some life-changing events. Nothing terrible, not to be alarmed, but definitely different and unexpected. I certainly made my mistakes along the way, but the old adage, “When life gives you lemons, make lemonade” (or, in my case, make lemon cookies!), has certainly been true.

Besides the obvious message – making the best out of a situation – making cookies and treats has been a way of relieving stress. And as I mentioned in #19 of this post, decorating cookies can be a zen experience in that you focus on nothing else than what you’re doing, so worries fall away, and pretty cookies are the result.

Along with the “When life gives you lemons…” saying, another fave on myPinterest board, Word Love, rings true for me; “Finding joy in the unexpected”. I’d love to hear if you have any favorite sayings too!

So without further ado, here’s a little tutorial on how I made these cookies…

How to Make Lemon, Orange or Lime Decorated Cookies
Click on the item below to find it online:
What you’ll need
- Lemon Cookie Recipe (below)
- Round Cookie Cutters
- Royal Icing Recipe
Add 1 Tbs real lemon, lime or orange juice - Piping Bags (3)
- Couplers (3)
- Piping Tips (#3, #6)
- Americolor Electric Orange Gel Paste
Made two versions & like the brighter Americolor Electric Orange better than Americolor Orange - Americolor Electric Green Gel Paste
- Lemon Yellow Americolor Gel Paste
- Americolor White Gel Paste
- Toothpick
*
*
*
*
*
**
*
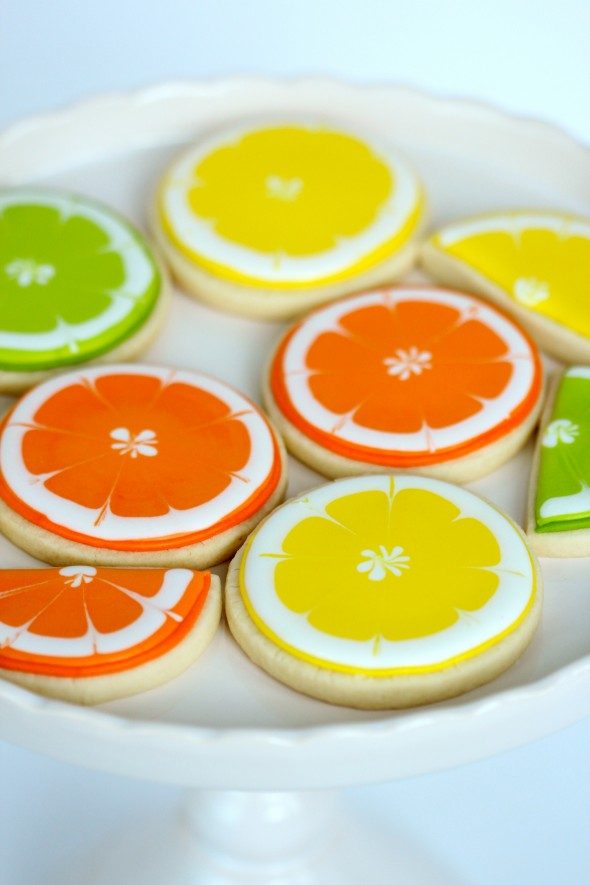
How to Ice the Cookies
Here’s a pictorial summary for you:

And broken down a bit more…

Step 1. – Outlining – Using a #3 piping tip, outline your cookie with royal icing. I like using a larger piping tip to outline and fill in larger areas, as the ‘flooding’ goes faster.

Step 2. – Flooding – Fill in the center of your cookie with the same piping bag and icing, either right away to help the icing melt into each other, or 10 minutes later if you’d like to see a distinct outline. I use the same icing to outline and fill in, as it saves time. Here’s a video if you’d like to see how.

Step 3. – Shaking – Shake gently to help smooth icing over. A couple of tips – You need to be gentle with the cookie while you’re shaking it, so that it doesn’t break, and working quickly is important so that the base doesn’t start to dry.

Step 4: – Wet on Wet Technique; The 2nd Layer – Using a #6 piping tip and white icing, pipe a circle close to the perimeter of your cookie and a dot in the center. (You can use a smaller piping tip here, it’s personal preference. I liked the look of a thicker white line).

Step 5: – Marbling – Drag a toothpick through the wet icing, starting from the outside and working your way to the center of the cookie. If you think of your cookie as a clock, I dragged the icing at 12 o’clock, 3 o’clock, 6 o’clock and 9 o’clock, so that the circle was split into four quarters, and then split those sections in half. If you’re particular about every line being perfectly white, with no little dabs of color, wipe your toothpick between each drag. Working quickly is important as the royal icing starts to set almost immediately. For a video on how to marble cookies, click here.

Step 6. – Shaking – Shake gently to help smooth icing over.

Step 7. – Drying – {Instagram photo} Let your icing dry for 12-24 hours. If you’d like to see a video on drying decorated cookies click here.

And if you’d like to add some seeds, pipe a small white dot of icing, with a little yellow on top, and slightly drag a toothpick through it, towards the center of the cookie.

Btw, these orange cookies were made using Americolor electric orange gel coloring… preferred it to just Americolor orange (the tutorial cookies were made with that color).
And the dough itself – sweet sugar cookies with a lemony zing – I really enjoyed the added dimension in zesty flavour!
Lemon Cookie Recipe
{Click here for the printable version}

Notes:
- You can experiment and add more or less lemon, according to your preference. All my cookies were lemon, although if I were making a huge batch of cookies, it’d be neat to match the cookie flavour to corresponding cookie color. Lime cookies would be interesting, wouldn’t they!? If you try it before I do, please let me know what you thought.
- The zest adds quite a bit of flavour and looks like this in the dough (please excuse the dark iPhone photo):

- You can leave the zest in or take it out – it’s all personal preference.
Cookies in Fall/Winter 2012 Issue of Weddingbells Magazine
And last, but certainly not least, I was so thrilled to be asked to make these citrus cookies by Weddingbells Magazine, for their Fall/Winter issue. I’ve been excited to share these with you since March when I made them.

I can’t even describe how fun it is to see them in the stunning magazine spread below:

If you look closely at the print above the cookies, you’ll see mentioned, “Price upon request”. A wee typo; a DIY blurb was meant to go in there, but, no worries, for those of you who are here wanting to order cookies, I’ve got a bevy ot talented ladies who can make them for you! You see, because I just don’t take cookie orders, I’ve created a World Map Directory of people who do! Click here to find a decorator near you, or any one of them on the list who ship.
If you’re a decorator who would like to be added to the list, please see this page.
I hope this tutorial has helped you! I welcome any questions or feedback… Have I forgotten to mention something? Do you need clarification on anything? Please ask or let me know!
Have fun creating!
xo,
Marian


Wow!!! You make it look so easy. I have seen others do citrus cookies but, yours is my favorite.
Hi Marian!
Thank you so much for sharing all of your talents here! You are so inspirational! I have a question: Is there baking powder in this recipe?
Thank you so much,
Summer
Aw, thanks @ Jane!
Hi @ Summer, I leave it out so the cookies don’t spread. Still tastes great and isn’t too dense.
@ marian:
Thank you so much for your quick reply! I’ve got the flour/salt sitting here right now! lol Thank you again for this fabulous website. You really give great help to newbies like me and I am so inspired by your creations. Each post truly makes my day.
Just made my night, thanks @ Summer! xo
Thank you soooooo much 🙂
thank you soooo much! 🙂
So cute, Marian!!! I love these! And congrats on the mention in the magazine!! woot!
Just a general question, when you flood your cookies do you change the tip to a larger tip after you outline, or do you flood with the same sized tip?
Hi @ DiAnne: Same size. =) You can watch how i do it on my youtube video. (flooding and outlining cookies). xo
Thanks Marian ! Just one more question to pester you with – when you make your templates (ie,Eiffel Tower) do you use cardboard or some other material ? As soon as this heatwave passes through SW Ontario, I am SO baking up a batch of cookies to start creating. 🙂
Absolutely, @ DiAnne: I know what you mean! I’ve been baking early in the morning or late at night!
I use paper or cardstock if I have it. xo
I’m trying all 3 flavours. Picked up the ingredients today. We’ll see how the lime flavour turns out. I don’t doubt the lemon and orange will be good for sure.
Yay! @ Kelly-Jo: Please let me know how it goes!
@ marian:
So great!
I’ve made all 3 flavours! I made the orange as a 3″ with both round and scallop rounds to see which I like better.
I made the lemon as a 2 1/2″ with the same two style cutters and I made the lime with a 2″ round, again both regular and scalloped edges.
They all taste great!
I’m about to do the royal icing. I’ll keep you posted!
BTW: Even without the icing they taste GREAT! All the flavours. The zest in each one easily identifies the flavour and looks so good. My kitchen smells wonderful.
Yay! @ Kelly-Jo, that’s fabulous to hear! I’m so, so glad you like them! You just made my day. =)
I made the cookies this week. Without the frosting they have a wonderful delicate flavor but I found when the icing went on I lost the flavor. I added lemon extract to the frosting and they were by far my favorite. I am teaching my children and their friends how to bake and decorate cookies and this is a nice and easy project for them.
Cheers
Hi @ Andrea B: Yay! Wonderful to hear! Thanks for the lemon idea and to you, your chlldren and friends, have fun!
I made these cookies last night, and tonight I will be decorating them. I am so excited to see how they turn out, I actually used key lime juice and zest 🙂 Thanks for all the tips, can’t wait to have our summer party!
Oh super! Have fun, @ Katie and let me know how it goes.
i totally love them. they can’t taste as fabulous as they look like…
I linked to your recipe on my blog – thanks for sharing!
doro K.
Hi hope you try them @ doro K.! Thanks for linking up. xo
Hi Marian, First off, I LOVE all of your sugar cookie designs (I have made quite a few myself)!! I made these last night and they turned out great, except for the white icing. It looks a little translucent… I was wondering how you were able to get the solid opaque white for the edges? Do you add something extra to your white icing? Thanks!!
Oh my goodness, @ Brandi! Yes, I forgot to mention that I colored my white icing, white! Thank you for bringing it to my attention with your question. xo
Thanks Marian, for the quick response! That makes sense 😉 I will definitely add white next time I try this recipe! Thanks again!
Lovely! What a brilliant idea.
Thank you for this wonderful tutorial Marian! I will try to make these cookies and decorate them one day. Congratulations for being a celebrity in wedding magazine.
More power to you!
Hi Marian,
Thank you, thank you , thank you so much for sharing the cookie tutorial with everyone. It’s an awesome project.
Hi Marian,
I have a question: for 2 cups of butter what is the corresponding measure in grams? Your blog is incredible. I’ve learnt lots of useful ideas so far and I hope to apply them soon. I’m from Paraguay in South America. All the best!
Hi @ Denise: On the butter packages in Canada, 1 lb is equal to 454 grams or 2 cups of butter.
Thanks for your sweet comment!
Dear Marian,
I’m a huge fan of you, your cookies & tutorials and I’d like to say special “thank you” for this particular idea. My first attempt to do “marbling” was far from the look you got for your lemon cookies, but as the logo of my sugarcraft shop has one lime slice, I couldn’t resist trying 🙂
All the best!
Polina
Hi @ Polina: A special thank you to you too, for leaving me such a lovely comment. xo
Hi Marian! 🙂 I’ve been lurking around your blog for a while, wanting to make cookies but not getting around to doing it. I want to do a batch this week to practice for a friend’s birthday, and these cookies sound awesome! Just one question before I do: can I halve this recipe and the royal icing recipe in this post for my practice run?
Also, thank you so much for the tips and recipes! I have loved baking cupcakes for a while, but reading your blog really made me want to start baking cookies. <3
Also, it says in the recipe to mix for 3 seconds after adding the dry ingredients. This may be a dumb question, but is that really 3 seconds, or 3 minutes? 😀
Thanks!
These are just adorable. They look absolutely delicious!
Those cookies looked a little out of my skill set, but I loved the graphic and stole it to attach it to some cookies I made for a friend that needed a little pick-me up. Thanks so much! http://trophyw.blogspot.com/2013/05/lemon-cookies.html