
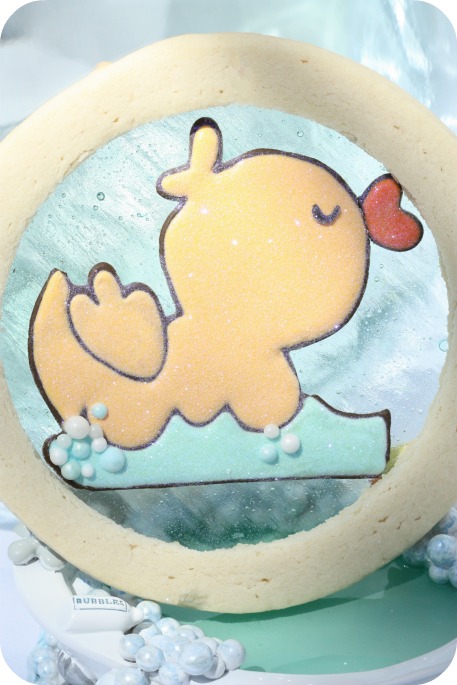
Baby shower cookies with a bath theme.
I guess you could call these baby shower, shower cookies. Ba dum dum dum. (I know, groan; sorry).

You could also call them ‘candy cookies’, because the center of each one is made of a candy coating called isomalt.![]()
It’s a sugar substitute which can be a used to make all sorts of sweet creations such as candy ‘jewels’ (which really only look clear, not sparkly). If you’d like an easy alternative to boiling sugar or other candies for your confections, isomalt is quick and simple to use. It is also used as a sugar substitute for diabetics, and like most sugar substitues can cause flatulence etc. if consumed in large quantities. Maybe make sure your child or guest doesn’t have more than one cookie. 😉 Or you can use crushed, clear hard candies as an alternative for the center.

If you’d like to make these you’ll need:
- Sugar Cookie Dough (click here for recipe)
- Royal Icing (click here for recipe)
- Isomalt

- Candy Thermometre
- Circle Cookie Cutters
- Food Gel Colorings
- Piping Tips ( #2)
- Piping Bags
- Couplers
- Parchment Paper or Transparency Sheet
- Shortening
- Disco Dust
How to Make Cookies with a Candy Center
Step One: Making the Cookies
Make your sugar cookie dough and cut out shapes using cookie cutters![]() of your choice. I used two sizes of circle cookie cutters to make these:
of your choice. I used two sizes of circle cookie cutters to make these:

Use a pin to create a little hole in case you’d like to hang the cookies. Bake.
*
Step 2: Making the candy isomalt center
Preparing the isomalt involves adding water and melting. See this post here on how to make it. For this batch, when the temperature reached 280 degrees Fahrenheit, I added one drop of light blue paste coloring to tint the isomalt a baby blue. You can also add any kind of flavouring you like!

One tip: Make sure you boil the isomalt to the right temperature (310 degrees Fahrenheit). It needs to be at the ‘hard crack’ stage so that it will cool and crack where you’ve made your circle impression. If you heat it to lower temperatures, when it cools, it will have different textures, depending on the specific temperature you heated it to. Here’s a pic of my candy thermometer, which lists the various stages:

*
Step Three: Adhering the candy center
Using royal icing, pipe icing onto the back of the cookie and gently adhere your isomalt shape.

*
Step Four: Let icing dry
Let dry with isomalt side down.

*
Step 5: Making Sweet Bubbles

Time to get the ‘bubbles’ ready for your cookies. I used these white sugar pearls![]() and made some bubbles of my own using royal icing and PME pearl lustre spray
and made some bubbles of my own using royal icing and PME pearl lustre spray![]() .
.

To make the royal icing ‘bubbles’:
A) Using a number 2 tip, pipe royal icing dots of different sizes and colors (I did baby blue and white), onto slightly greased acetate paper. Parchment or wax paper works too.

B) Let them dry and then lightly spray with PME pearl lustre spray.![]() It might be hard to tell in the picture, but it gives them a little bit of a shine.
It might be hard to tell in the picture, but it gives them a little bit of a shine.

Step 6: Royal Icing Transfers – Making the outlines for the designs
Pipe the outline using a #2 tip. (For more information on making royal icing designs, see this post here).

I’m not skilled at freehand drawing, so I used a Kopykake projector to help me create the shapes for the center of the cookies. The designs are copied from these stickers:

The packaging is long gone, so I can’t remember what brand they were, but I bought them at Michael’s Craft store. (If you know the company name etc., I’d love it you’d leave the info. in a comment below).
For a detailed tutorial on using the Kopykake projector, click here.
*
Step 7: Royal Icing Transfers – Flooding the Outline
Fill in the shape with royal icing and sprinkle disco dust on them right away.

When the icing is dry, gently shake off the excess disco dust.
As an aside, I’m I’m looking forward to sharing some info. with you on disco dust FDA approval. I love using it and am happy to finally hear concrete news from Pilar of Sunflower Sugar Art, that their disco dusts have been given FDA approval. I’ll share more information when she passes the paperwork on to me (She’s in Spain right now, lucky girl!).
*
Step 8: Adhering royal icing transfer to cookie
Apply a small dab of icing to the back of the royal icing decoration, and gently place it on the isomalt background.
![]()
Step 9: Add bubbles
Adhere bubbles with a tiny dab of royal icing.

And they’re done!

I do have to say that these definitely took longer than the average cookie to make. Making the isomalt centers of course added another step, and I ran into a little glitch…
Because I incorrectly assessed the size I needed for the duck cookie, I ended up having to break off a little bit of the water to make him fit:

In the end I just re-piped that corner of the outline, filled it in with icing and a few bubbles covered up some tiny cracks.

These cookies would be fun to hang in some sort of a display or prop up against something, like this little bathtub I have here, so that the light shines through the candy.

I was thinking this type of cookie would be perfect to create a fish-bowl cookie. You could make a fish bowl shape with sanding sugar ‘sand’ at the bottom, pipe starfish, seaweed and little fish on the isomalt. If you decide to make them, send me a link/photo; would love to see what you come up with!
Taste-wise, with the combination of cookie, candy and royal icing, you’ll certainly get your dose of sweetness.

You may also like to see more baby shower cookie ideas in this post here.

I hope you enjoy making these too. They are definitely a little more effort to make, but so fun to create! If you have any questions or comments, please drop me a line below and come join me on facebook here.
Happy decorating!
xo,
Marian


such pretty cookies! you are so creative!
Marian, that’s incredible!!! It really looks like water!! Wonderful work you made. Thank you for sharing it….
That is INSANE!
Beautiful. but still insane!
I LOVE IT!
Hope the new parents loved it too 🙂
WOW! Those cookies are insane! I love them!
Just when I think I’ve seen it all in cookiedom, you come up with these. WOW!
WOW WOW WOW!!
Good morning first 🙂
OHMY I LOOOOOVE this tutorial! LOVE THE OUTCOME, it’s just so amazing what you do Marian.
I imagine people sitting in front of their Computer with their eyes and mouth wide open now haha…
This is just incredible…YOu bet we all want more isomalt creations of you 🙂
Thanks SO much for this post…what a wonderful start into this week. Wow.
blessings on you
niner
Oh wait, what about MAYBEEE doing a video tutorial on Isomalt??? 🙂
This is new to most of the people I think, so that would be a great ideaaa hm?
🙂
xoxooo
Wow! Marian, how creative and incredible. I LOVE them! You’ll be happy to hear that I ordered a KopyKake and it’s coming over in a shipment from a friend who’s moving to CH. So I will get it in August! I truly can’t wait! I will wait until that arrives to give this new technique a try. So fun!
Thanks as always!
Nikki
Wow! once again you blow me away with your talent and creativity. What are you pouring the isolate into to get the right size disc for cookie. Marian do You think attaching another cutout cookie ring on the opposite side of cookie, would make it too heavy to hang?
Thanks for sharing such beautiful and helpful tips.
Teresa
You are a cookie genius! Love your idea and the use of isolmalt. Have a great week. 🙂
These are just truly amazing and beautiful! I love reading your blog – keep up the awesome work!
Very unique and sweet cookies and another great tutorial Marian!
Wow! that’s insane. So talented!
Adorable! So creative (but I would expect this from you!). Great tutorial as well! I’ve always wanted to try using isomalt and now you have given me the inspiration to! 🙂
So original, so nice, so beautiful, so cute!!!!!! Thank you for the tutorial and congratulations for your job!!!
these are the cutest thing EVER!
Wow, they are beautiful! Thank you so much for the tutorial, it was wonderfully done. My question how long do you let it cool before cutting? Thank you.
These are BEAUTIFUL Marian! You are awesome:)
Very, very cool Marian. I love it when people blaze new trails. I’ve heard of isomalt but have not seen anything like this when it comes to how to use it. Brilliant tutorial! The bubbles…I have no words. Speechless. *jaw hanging open even* 😉
*_*no words…This tutorial it’s amazing!
these are fantastic. I am not sure if I missed it but could you let me know what you used to get your isomalt shape?
Thanks,
Brenda
Very cute! Excellent work! Thanks for sharing.
Thanks for the comments everyone!
@ niner from wechooseorganic.com: Thanks, good idea! I’ll add the isomalt to the video tutorial to do list. =)
@ Nikki: I hope you enjoy the Kopykake! It’s definitely an ugly, but useful tool. lol.
@ Teresa Kunkler: I poured it on parchment which was sitting on a baking sheet. It flows out quite easily. You can move around the baking sheet so it spreads out as you like. You end up with a large surface are of isomalt. Take the cookie cutters you chose and press it into the isomalt. It will make an impression and when the isomalt cools, you just break the pieces where you need to. Here’s a post which shows more pics:
https://sweetopia.net/2009/10/halloween-decorated-cookies/
What a great idea to put another piece on the back! I didn’t think of that! I think it would be heavier, yes, but as long as the cookie isn’t too big, it should work. Maybe even make the cookies thinner than what I’ve done here.
@ Tracy: It left it for about half an hour too cool.
@ Brenda: Hi Brenda, I used cookie cutters; here’s the post where I show more pics etc:
https://sweetopia.net/2009/10/halloween-decorated-cookies/
Wow .. that is amazing .. 😀 really genius ….
Incredible…you aro so creative…congratulations your cookies are amazing…
holy moly….these are amazing.
Amazing!! Really cute!!
My question is… can I put the isomalt (hot) direct in the cookie ring? Thanks.
Genius, BRAVO! You are truly an amazing baker and decorator! I have never seen cookies like this in my life:)
Oh Marian, These are just GORGEOUS!
Wow! These are great! You are so creative — I like how you mixed different kinds of bubbles, it gives it a much cuter look then how I would have used all white! I have a baby shower coming up and will attempt these 🙂
Thanks for the great ideas!
Oh, Marian!!! You are the QUEEN of all time!!! Fantastic post!
Those cookies look amazing! Thank you for sharing and for the introduction to isomalt! Lovely! 🙂
You amaze me!
WOW! That is a lot of work, but it looks beyond amazing! My jaw is on the floor. Take a BOW!
Does the middle taste like a lollipop?
@ Farrah’s Kitchen: It tastes like a light version of sugar (not quite as sweet). Isomalt is actually a sugar substitute which some diabetics use because it doesn’t alter the blood sugar level much, and has less calories than sugar.
Taste-wise, to make this taste like a lollipop, you could add extract flavoring of your choice. The possibilities are endless!
These are so beyond genius, I can’t stop staring at them! Wow. Blew me away! (Those bubbles, the centers, oh my). I naturally posted on edible crafts 🙂
Ingenious! Can you pour the isomalt in the baked cookie center, instead of adhering it to the back? It might save a step if it works! But then again, you won’t have the same “shadow box” effect. Either way, it’s a great idea!
Hi Marian,
Love the effect with the isomalt and as always: love the disco dust!!!
Evelyn
Incredible! Adorable! And you always find the BEST stickers with outline and everything for your KopyKake! Fantastic job and thanks for sharing!
I love that new product!! It is perfect for so many products!! Thanks for sharing the info. Your cookies are awesome,perfect for a baby shower!! I love the idea!
I love these! I have heard of isomalt, but have never used it-until now. I can’t wait to try it out!Thanks for a great post!
So creative I love it !!!!
@ meaghan (the decorated cookie): Thank you so much! I’m thrilled!
@ Melissa H.: You can put the dry isomalt (where it looks like white little balls {can see a picture where I linked to the Halloween cookie post}, into the center of the cookie and bake, and it melts in the oven no problem.
The only thing is, I haven’t figured out exactly HOW much isomalt to put in the middle of the cookie… and how would I explain how much to add per cookie? You see, sometimes I put too little in the middle (but didn’t know it), baked and then it melted, but didn’t form a sold mass. (had holes etc.)
If I put too much isomalt, it may not be melted by the time the cookie bakes.
So, it CAN be done, but it would take a little bit of experimenting with the cookie you’re making, to figure out the timing.
Another thing you could try, is to pour it into the cookie cutter as a mold. I didn’t do a lot of experimenting with this though; the one time I did try, I guess I may not have been pressing down hard enough on the cutter… the liquid isomalt seeped through the bottom.
Thanks for your comments everyone! xo
oh my goodness, these are the most precious thing ever!!
oh…Marian wow wow…. that is all I can say.
you are amazing,so creative the best teacher in this world…. I love your blog!
ML
CAUTION…Isomalt causes Big time GAS!!!
So your “friends” should take that into account. My uncle used Isomalt to make diabetic fudge and one piece was certainly enough.
This was a wickapedia listing
Isomalt is a sugar substitute, a type of sugar alcohol, used primarily for its sugar-like physical properties. It has only a small impact on blood sugar levels and does not promote tooth decay. It has 2 kilocalories/g, half the calories of sugars.[1] However, like most sugar alcohols (with the exception of erythritol), it carries a risk of gastric distress, including flatulence and diarrhoea, when consumed in large quantities. Therefore, isomalt is advised to not be consumed in quantities larger than about 50 g per day for adults and 25 g for children. Isomalt may prove upsetting to the stomach because the body treats it as a dietary fiber instead of as a simple carbohydrate. Therefore, like most fibers, it can increase bowel movements, passing through the bowel in virtually undigested form. As with other dietary fibers, regular consumption of isomalt might eventually lead one to become desensitized to it, decreasing the risk of stomach upset. Isomalt is typically blended with a high-intensity sweetener such as sucralose, so that the mixture has approximately the sweetness of sugar.
@ Deborah Holm: That could be unpleasant if you ate too much! Thank you for letting us know!
I wanted to see a visual of 50g so measured out sugar (don’t have any more isomalt) to see.. Pic here:
http://twitpic.com/58alop
Each cookie won’t have even 25g or 50g of isomalt in them, but certainly if a child ate several cookies they might experience flatulence etc. I personally didn’t experience it, but it definitely is good to know for anyone making them. I will definitely pass this information on, thanks again. 😉
wow…this is so CUTE and cool! I could care less bout getting gas eating something this cute but nonetheless it was good to know that FYI about isomalt….
Wow, amazing cookies and great tutorial! I love all the different techniques you showed and end result – awesome!