
There’s something about turtles that I find so endearing.

I don’t know if it’s their slow but determined way of getting about, or how they can disappear into the ‘homes’ they carry on their backs. Either way, they’re a fascinating creature, and as part of our Earth Week celebration at school this week and World Turtle Day on May 23rd, my classes are making Turtle Cupcakes to raise money for American Tortoise Rescue.
I know, World Turtle Day?

According to Wikipedia and American Tortoise Rescue (ATR), “…the day was created to help people protect and celebrate turtles and tortoises and their disappearing habitats around the world… ATR is the founding sponsor of World Turtle Day and is certified by state and federal agencies as a nonprofit corporation to provide for the protection of all species of tortoise and turtle.”
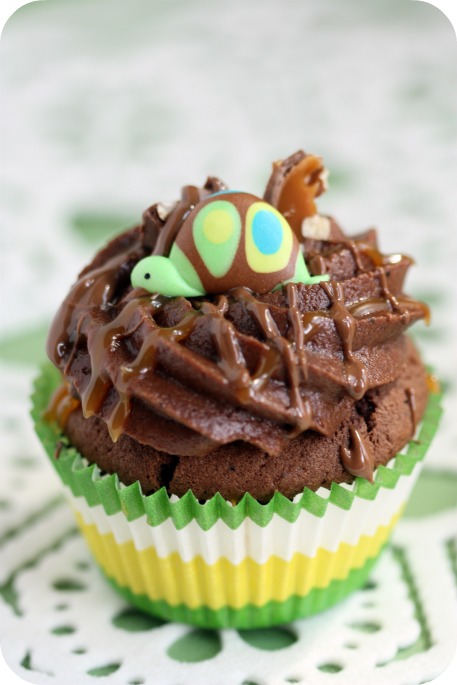
Hope you like my sweet version of these ancient fellows and definitely enjoy this decadent chocolate cupcake with a tall glass of milk!
If you’d like to try making these, the recipes and how-to’s follow:
*
How to Make Turtle Toppers:
The round turtle design comes from these Doodlebug scrap-booking brads, HERE.
![]()
You’ll need:
- Royal Icing Recipe and Food Gel Colorings
- Piping Tips #2 and #3
- Piping Bag
- Coupler
- Parchment Paper or Acetate/Transparency Sheet
- Shortening
- Black Food Color Pen
*
Instructions:

Step 1: Using a #3 tip, pipe a circle of green royal icing on slightly greased acetate paper.
Step 2: Using a #3 tip, immediately fill in the center with brown icing.
Step 3: Gently shake the acetate paper on the table so that the icing smoothes over.
Step 4: Wet-on-wet technique – Using a #2 tip, pipe the dots on the brown icing
Step 5: Immediately pipe the second layer of dots.
Step 6: Gently shake the acetate paper on the table so that the icing smoothes over.
Step 7: Using a #2 tip, add the head, legs and tail
Step 8: Let the icing dry for 24 hours and add two dots as eyes, using a black food color marker.

The second turtle kind of happened while I was playing around with the icing. Here’s how you do it:

Clear as mud?
I didn’t think I’d be using him in this post, so didn’t photograph how I did it, but hopefully the instructions were clear enough.
The best thing to do is try it out and the key element to the instructions in the photo above, is that you take the piece of acetate paper, slide it under the edge of the circle of royal icing (the turtle shell), and then move the acetate paper as if you’re about to scoop up or scrape off the icing; it makes the circle curl and create the shape of a domed turtle shell.
So now on to the cupcakes themselves:

Turtle Cupcakes
When you bite into this cupcake, you’ll find a chocolate turtle surprise!

*Note: It may look like the batter around the turtle isn’t fully baked but the tester (barbeque skewer lol), came out clean!
Besides the recipes, you’ll need:

Chocolate Turtle Cupcakes Recipe
Chocolate Turtle Cupcake Recipe
Ingredients
- 2 2/3 cups (12 ounces) all-purpose flour
- 2 1/4 cups plus 2 tablespoons (4 ounces) unsweetened cocoa powder
- 2 tsp baking powder
- 1 tsp baking soda
- 1 tsp salt
- 1 cup (8 ounces) sour cream
- 2 tsp pure vanilla extract
- 1 cup (8 ounces) unsalted butter
- 2 cups (14 ounces) granulated sugar
- 2 large eggs
- 1 1/4 cups (10 ounces) coffee
- 24-28 chocolate *Turtles *You can buy the name-brand Turtles, but bulk food stores usually carry them as well. If you can’t find them, substitute some chocolate melts, a few pecans and a caramel square.
Instructions
- Preheat the oven to 350°F. Line your muffin tin with liners.
- In a large bowl, sift together the flour, cocoa powder, baking powder, baking soda, and salt. Set aside.
- In a separate bowl, combine the sour cream and vanilla extract. Set aside.
- In the bowl of an electric mixer fitted with a paddle attachment, combine the butter and sugar and beat on medium speed until smooth.
- Set the mixer to low speed and add the eggs, one at a time, scraping thoroughly between each addition.
- Alternately add the flour and sour cream mixtures to the butter mixture in two batches, starting and ending with the flour mixture. Scrape down the bowl after each addition.
- Gradually pour in the coffee. Scrape down the bowl and beat until thoroughly combined.
- Scoop the batter into your cupcake liners with a spoon or ice cream scoop.
- Bake for 26 minutes or until the center of the cupcake has just set. (I insert a barbeque skewer to check).
- Take out the cupcakes, make a little hole in the center with a knife and insert a Turtle chocolate as far as the cupcake allows.
- Bake for another 4 minutes. Once cupcakes have cooled and you’ve removed them from the muffin tin, top with chocolate icing and *optional toppings.
Chocolate Buttercream Icing Recipe
Ingredients
- 24 ounces semi-sweet chocolate chips
- 1 1/2 cups 35% cream
- 1 tbsp clear corn syrup
- 1 tsp vanilla extract
- 12 ounces unsalted (room temperature) butter
- 16 ounces (1 lb) icing sugar *also known as confectioner's sugar
Instructions
- Use a double boiler to melt the chocolate and cream together. (Make your own version by placing a glass or stainless steel bowl on top of a pot with simmering water). Stir occasionally until the chips are melted.
- Off the heat, stir in the corn syrup and vanilla and allow the mixture to cool to room temperature.
- In the bowl of an electric mixer fitted with the whisk attachment, whisk the chocolate mixture, softened butter and icing sugar on medium speed for a few minutes, until it has thickened.
*Optional toppings – Caramel sauce, melted milk chocolate and small pieces of Turtles chocolates. I cheated and used the caramel dipping sauce from the supermarket, which you can usually find by the apples. One tip about applying the caramel; I heated it up in the microwave for about a minute, then put it in a canvas piping bag fitted with a #2 tip, and piped it on. This prevents big globs of caramel from falling on your cupcake (although that could be kind of yummy!). Squeeze bottles work really well for this and melted chocolate as well.
In the bowl of an electric mixer fitted with the whisk attachment, whisk the chocolate mixture, softened butter and icing sugar on medium speed for a few minutes, until it has thickened.
* You can find a video on how to make the cupcake swirl here.
Hope you enjoy making these rich chocolate turtle cupcakes!
I’ll leave you with this:

Sorry. Couldn’t resist! (You can thank my husband for the joke).
xo,
Marian
p.s. Thanks for making me laugh with your ‘turtle speech bubble’ suggestions on facebook!
p.s.s. An update on the new Sweet of the Week contest – Wow! I’m so happy to see you’re sending me your pictures and please keep on sending them. I have enough for weeks to come and am wondering if I should add more photos to each contest. Let me know your thoughts.
Check out this week’s contest HERE and vote for your favorite sweet.


What great cupckaes. I can’t thank you enough for giving us the recipe, and so wonderfully detailed as well!
Wow! The cupcakes are adorable. To cute. Job well done.
Just so darn cute! And I love that you added the candy turtles inside- a little yummy surprise 🙂 Can’t wait to make
How cute! I love these, I bet they taste as amazing as they look! Congrats on Top 9!
This is a truly amazing post! These cupcake are absolutely gorgeous, and the tutorial makes this actually seem doable! Thanks:)
These look absolutely AMAZING! I love the caramel surprise inside. This is my first time on your blog and it’s adorable (and mouth-watering)!
These are too cute. We have a couple of serious turtle lovers in our family, so I will definitely give these a whirl. You are so talented at teaching others how to make beautiful things. Thank you for sharing!!
I am so impressed with these and the fact you give us a tutorial on how to make our own. You are amazing. Thank you. We have turtles for pets (the only pets we have) and these would be so fun to make with my boys. Congrats on making Top 9 on Foodbuzz. You deserve it!
The turtles are irresistible!! Perfect cupcake adornments, especially for the springtime
too cute! and you make them look so simple.
Hahaha…”shell station!” These look adorable AND delicious, Marian!!!
Hi Marian,
these must be the cutest turtles I have ever seen. And the joke: hilarious! 🙂
Evelyn
Ciao complimenti per il blog!! Ti scrivo per informarti che sto facendo un contest nel mio blog! se ti va di partecipare vieni a vedere di cosa si tratta!! Ciao e grazie!
http://www.myart-robertomurgia.blogspot.com/2011/05/cook-with-my-art.html
Is the cupcake batter supposed to be really runny? Also the recipe lists milk but I don’t see where it goes in the batter.
Thanks!
Hi Kerri, yes it is! Sorry I made a mistake typing; I’ll add in the milk. Thanks!
These are too cute. Thanks for sharing.
Stacy
OMG YUMMM and Adorable!
These are so cute!! I am thinking baby shower! I love your blog and thank you for the wonderful tutorials and beautiful photos of your sweets!
http://allpossiblethings.typepad.com/possible_baker/2011/05/blessing-cake.html
Wonderful! I’m always learning something over here…. You really know how to up the ante for the wet-on-wet technique. Did I count four colors? Plus, love the different shaped turtles. They are cute little critters, aren’t they?
Marian these are adorable!……not to mention sound fantstic!!! you are always so generous in sharing your “how-to’s” you ROCK!!!
Have a fabulous weekend and thanks for linking up too!!
These are so cute! And the cupcakes sound amazing as well. I love filled cupcakes.
I’d like to invite you to link-up with Sweet Tooth Friday. I hope to see you there. http://alli-n-son.com/2011/05/26/lemon-chocolate-cupcakes/
These cupcakes look fantastic and I will have to make a batch! Thank you for this recipe and photos.
Love, love, love! The little turtles are the cutest little guys ever, and I love that they’re topping turtle cupcakes! Brilliant job!
oh my goodness! can it be any cuter?
Thanks for linking up Marian! I featured your post in my wrap up http://tidymom.net/2011/summer-food-and-fun/ Hope you’re having a fabulous holiday weekend!
I made these, and they didn’t turn out well… at all. I was sort of disappointed, seeing that they looked so great they turned out so blahhh. They could use some baking pwd thats for sure. Overall, I expected a lot better results…
I’m sorry to hear that staceycakes! Did they look like the pic with the turtle inside?
This is a perfect post! Thank you for sharing with us all these details and step by step photos. Perfect job!! Bravo!!
So adorable! I might have to try them with chocolate!
The side view turtle is very clever..:)
My nephew is turning one this august and im looking for ideas and this cupcakes look so pretty! i love your tutorials! 🙂
Oh boy am I happy to have found you on Bloggy Moms! I am looking forward to making all kinds of tasty treats.
http://www.ourbananamoments.com
http://www.facebook.com/ourbananamoments
Marsha
The are absolutely ADORABLE and I bet they are DELISH:D I’m gonna have to try these. You are extremely creative and an inspiration to all of us bakers and decorators.
Hi Marian, I find your blog so inspiring. Love this post!! Just a quick questions please, how do you lift the transfers without them breaking? I have tried before and they just seem to break and crumble – is there something wrong with my royal icing or is there a special technique? Thanks :o)
Hi Kiwi Newbie =)
The fact that I put a little bit of shortening on the transparency I use helps the transfers come off easier, but I still need to be really careful when I take them off.
I pull the transparency over the edge of the table so that half the shape is hanging over and then I gently pry the transparency away from the shape. (rather than pulling the shape away from the transparency). Keep turning the shape until you’ve pulled the transparency away from it on all sides.
It’s hard to explain; I hope you understand! There’s a pic here if you’d like to check it out (the heart shape):
https://sweetopia.net/2011/01/valentines-love-cupcakes/
Also make sure your transfers are really dry. If they’re a little wet in the middle, that part will stay stuck to the ‘paper’ and will therefore break easier when you try to take it off.
Hope that helps!
xo
@ marian:
Thanks Marian – that helps a lot. Will give it another go over the weekend. If I don’t have transparency paper can I use greaseproof paper? You have so many amazing articles. Wish I had more time to practice! Thanks again for the advice :o)
Hi Kiwi Newbie, greaseproof paper works!
Thank you! This is wonderful inspiration! Then again, so is your entire site. A cookbook please?! Pretty please with sprinkles?!?!
CUTE CUTE CUTE… Your turtles are just adorable. I really want to try my hand at the Royal Icing toppers. You make it look so easy! They add so much pizzazz to a such a simple thing to make.
I have to use carmel squares for my recipe and I have a concern about the texture after all is said and done. Do you think, when you bite into this cupcake, that the carmel will still be soft from being melted in the oven or does it go back to it’s former, kind of hardened state? I think you made this one with the actual turtles candy, so maybe you don’t know, but I don’t have them available to me here.
Thanks and I hope to hear from you!
Hi Sarah! Sorry it’s been a few days! I missed this one.
My guess is that they might be a little harder to bite into than a turtle center because they’re harder to begin with, but maybe if you cut one in half it would be easier to eat?
I would love to hear how this goes if you try it!
LOVE these turtles and can’t wait to try them! They will be adorable cupcake toppers for a turtle-themed baby shower I am hosting. I am not familiar with the royal icing recipe so I’ll be using that for the first time… can these be made ahead and frozen or do they not freeze well? Thanks!
@ staceycakes:
I am with Stacycakes on this one. The directions say scoop batter with an ice cream scoop. The batter was liquid! If it was supposed to be that way, the directions were very misleading. I did not have a good result at all. I LOVE your blog, and have learned so much when decorating my cookies, but this recipe was a disaster for me!
@ Colleen B.: I’m so sorry to hear that Colleen! =(
We use a scoop (students and I) to make sure the portions are even, no matter what the consistency of the batter. It is definitely a runny batter though! (I think i mention that in the comments somewhere). Perhaps I will go back to the post and add that in.
Soo sorry it wasn’t a great experience for you. Maybe I can help. How did it not work out?
xo
@ Marian (Sweetopia):
Marian, thank you for your reply! They were overbaked even though I took them out early, and they were very dry. The batter was so liquid, and I have never had cupcake batter look like that before. The guys at work barely touched them. Maybe I will try them again and be aware that the batter is very runny and check them earlier. Thank you for listening!
Maravilloso tutorial,me lo guardo para hacerlo algún día,muchas gracias!!
Hi! I just made the turtles (without cupcakes).
May I know how long I can keep them? And what is the best way to store them?
I’m not planning on making the cupcakes til next week.
Thanks
Hi! I just made the turtles (without cupcakes).
May I know how long I can keep them for? And what is the best way to store them?
I’m not planning on making the cupcakes til next week.
Thanks
Hi @ Cheryl: This post will answer all your questions: https://sweetopia.net/2011/01/how-do-you-store-royal-icing-and-how-long-can-you-keep-it/
xo
Can’t wait to try this icing!!
Hi marian!
i so love your cookie designs.. very inspiring^^ i want to try this turtle topper, on our cupcake for a party in 3 weeks time… can i make the turtle ahead? how many weeks can it stay? wouldn;t it spoil in 3weeks time?