
Can you tell how these cookies took half the time to dry than usual?
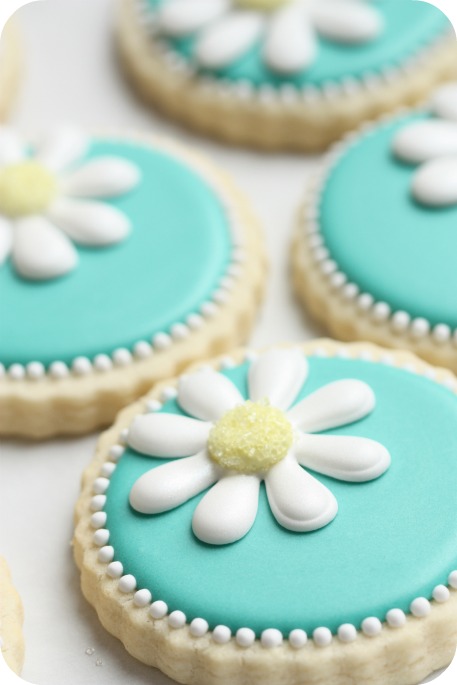
If you haven’t figured it out, maybe a hint… It has something to do with the fact that the daisy petals are able to ‘hang over’ the edges of the base.

The daisies are royal icing transfers. 🙂 (I’ll show you how I made them in the video below).
Instead of having to pipe the design on my base and then wait to let that dry, I was able to pipe both the teal base and the daisies, let them dry, and in 24 hours, adhered the daisy to the cookie. Voila! (The things that make me happy. Lol).

If you’d like to see how these were made, including a few tips about decorating with the Kopykake projector , click on the video below.
*
{Video} How to Make Decorated Daisy Cookies
If you can’t see the video, CLICK HERE.
And a quick pictorial overview:

A note in here for those of you who read my photography tips post; I orgininally made the collage below first and then decided to put all the steps in one, so made the collage above… and forgot to fix the lighting… can you see the difference?
![]()
Anyways, a few other things to mention:
- After I made the video, I decided to spray the cookies with PME pearl lustre spray
for a little sheen.
- If you’d like a more detailed pictorial how-to on making royal icing transfers, click here.
- I used Americolor food gel color
for the base of these cookies:

- These cookies might work well as ‘name-tag’ favours if you added the names to the open space.
- Thanks to Kim of The TomKat Studio and HGTV for including these cookies in their Yellow & Blue Easter Brunch!
- I’m working on a thorough Kopykake Projector
Tutorial Video. Coming… soon? For now, for those of you interested, here’s a post on it (click here).
- The KopyKake projector isn’t needed to make these cookies; you could just trace the daisy instead of projecting the image. I like the projector because 1) it’s faster for me to just pop the image in and project and 2) more importantly, if I’m making a more detailed image like the owl cookies in this post here, I’m able to see the second layer (owl’s eyes and belly), whereas if I were tracing I’d only be able to trace the first layer (brown body).

What would you like to see in the next video? Drop me a line in the comment section below, on YouTube, or my facebook page here.

And in case I’m not able to post again before then; Happy Easter to you!
I hope the Easter Bunny brings you sweets. 😉
xo,
Marian


These are so beautiful in their color contrast and simplicity! I love it all, but especially the uniform beaded border. Thanks again, for sharing the cookie love!
Your cookies are always so beautiful! I love the turquoise and the soft yellow. Thanks for the great idea with the transfers! Happy Easter to you too:)
Wow thay are beautiful
Thank you for showing us your beautiful cookie video! I am going to make some flower transfers for Mother’s Day!
Ohhhh there we go, there it is 🙂
Love your post, Marian…So detailed as usual…Thats why everyone loves ya haha.
Thanks a million, ms. gorgeous 🙂
Ill hit you with an email later by the way 🙂
Many blessings!!!
XOXO
ninah
Looking forward to your email niner! xo
Such a great tip with the piping circle! Thanks for sharing! I have problems too with piping perfectly round circle! 😀
Gosh, genius, they are so simple and beautiful, I love how you paired the colors! I’m thinking of doing these for Easter, my only problem is, they don’t sell Meringue Powder where I live(Czech Republic, and shipping takes ages, sigh). So, I was wondering, would you have some alternative recipe for Royal Icing?
You need to stop calling me that Marce776 LOL.
You can definitely make this recipe using an egg white base. I don’t have on one my blog, but if you googl royal icing made with egg whites you’ll find an answer. (As long as you have the right consistency for decorating, the recipe should be fine!)
Hahaha, I’ll try, but it’s hard not to! I’ll def google, thank you for the tip!
Thanks for the comments everyone! Faithy it’s good to ‘see’ you again! =)
LOVE your cookies!! Thank You for sharing your idea to do the circle! GENIUS!! The colors on your cookies are BEAUTIFUL!!
~Kathy
You do such amazing work. Always a pleasure to receive advice from you.. and I am very grateful also
Brenda
Marian,
Excellent video! Your work is so clean and crisp! Now I know why. You’ve given me a few tipes I’m going to try on my next batch of cookies. Once again, thanks for sharing! xo
Love your videos! You have a great gift to teach! Thank you for sharing.
how beautiful again…. I love your creation, the color combination is very nice.
Happy Easter Marian
ML
hello,thanks for all the details I´ve learned how to do many things with blog.happy easter
They are so beautiful, that I would love one of this cookies for me!
Have a great week 🙂
Hi Marian, it’s always so much fun watching your tutorial videos! It looks so easy to do this, but my hand is so shaky. Do all your cookies look so perfect on the first try?
Nice sunny greetings from Austria!
Sonja
@ Kathy: Thanks! I can’t take that title though hehehehhe. Too much pressure!
@ Brenda, @ Susan, @ maria, @ ruth, @ Mari’s Cakes: Thank you so much! =)
@ Sonja: My hand is shaky too, and I don’t even drink coffee! I find that the more I do it the better I get… even on the same day… The last cookies I’ve made usually look nicer than the first ones.
These are *just* precious, Marian! So sweet and perfect for springtime!
LOVE IT!!!! <3
Marian, your cookies are the best! I love it.
Thanks for another wonderful tutorial! I love the look of these. I usually make my indentation before I bake the cookies, and will do that for circles, numbers or any other shape I may want to draw on after. I also never got around to thanking you for the plug on facebook – I am so technically handicapped that I could not figure out how to leave you a comment there 🙂
I would love to see how you make the perfect little dot border around these amazing cookies. I’ve been doing a little baking, but my ‘dots/beads’ just never look this wonderful and uniform — I get that little drop string at the end when I stop the pressure. HELP!
These are BEAUTIFUL! I love them!
This is such a beautiful cookie and the instructions make it look so easy, although I know it won’t go as smoothly for me :). I am going to try these for the first batch I have to deliver to camp this summer.
Thank you so much for sharing your talent.
@ bridget {bake at 350}, @ Sammy Russo R., @ Tatyana, @ Lydia Thank you!
@ faigy: Great tip!! I’ll have to try that too!
@ Korine: I show how to pipe the dots in the video; would you like a little bit more explanation? It sounds like your icing is a bit too thick.
@ Cookies4kids: I’ll bet you’ll do it too!
Thank you Marian…
Gorgeous as usually! Thanks for the video. I love all the tips I get from you. My cookies just keep getting better, and when people ask about them I always tell them I have a great teacher! (Of course I then direct them to your site)
Those are some seriously *fabulous* cookie! Thanks for the great informative video! Have a lovely Easter!
Aw shucks @ Delfina, @ Evelyn, @ Wenderly! Thanks!
Wenderly, I added you on DailyBooth 😉 Looking forward to more pics!
Absolutely Beautiful. Definitely a work of art! I wish my hand was a steady as yours 🙂
@ Kathleen: Are you kidding me?! Heheheheh,my hand looks like I’ve drunk coffee all day… I should do a close up on it.
Try resting it on the table (your arm). xo
Hi Marian! beautiful cookies, and a great idea to make the daisies as an icing transfer… Thanks for sharing your work with all of us.
Happy easter for you too!!
I love your work.
Best regards from Argentina. 🙂
Marian,
I love this video! Your cookies are just such sweet little works of art. I appreciate you posting the videos as I’m a really visual learner and am always looking to improve.
Thanks again!
@ Nilda, @ Mariana, @ Erin Wilhelm: Thanks ladies! ~Nice name Mariana 😉
Marian, great tutorial, as usual.
I was always taught that grease was the enemy of royal icing!
I guess the world isn’t flat, either, right?
xo,
Gail
@ marian:
Jajajajajaja, yes, in fact, beautiful!. 😉
Regards!.
These are fantastic, thank you for the video
@ Gail: You say the wittiest things! You’re the best! (And I think mixing grease with royal icing is bad).
@ Mariana: lol
@ Lisa: My pleasure!
Adorable, Adorable, Adorable!! Your videos are awesome.
Marian,
How thick do you roll out your cookie dough for your sugar cookies? They look like a pretty thick cookie.
Thanks,
kareninthekitchen
These are beautiful! Thanks for always sharing so willingly.
Thank you so much for sharing your ideas, your skills, your recipes, and your ideas!!! you are such a generous lady with an amazing talent! I have never seen such beautiful cookies! Love love your website, especially your videos!!! Blessed be!
These are spectacular Marian! Simple and elegant. Love them!!!
Thank U so much that you are showing your techniques. I’m learning so much!! I’ve never done decorative cookies before. I’m feeling so inspired!!!
Thank U!!!
Yaneri
I just love these! Beautiful colors, beautiful design…I wish I could eat one! 🙂 Great tutorial too, thanks!!
@ Melissa: Thanks! So are yours!
@ Karen: About 3/4 of an inch or 1 cm thick.
@ Linda Wilkening, @ Faricha, @ Renee (kudso kitchen), @ Yaneri, @ Darla @ Bakingdom: Thank you for the sweet comments!
Gorgeous!! Happy Easter!
There are lovely and the colours are beautifuk, I would like to know how could I do black royal icing, when I did it I need a lot o wilton black but the colour was gray… thanks a lot
Ana
Thank you!
Ana, I use LOTS and LOTS of Americolor black.