

When Kim at The TomKat Studio gave me the cookie theme of the month for her HGTV shoot, daisies, these were my first choice; easy to make, fun to eat & perfect for spring! (Although I made them and the video at the end of February! … You’ll see. Please be kind I’m still getting used to making videos! Lol).
The video below shows how to make them step-by-step and for those of you who prefer photos, scroll down a bit further. The pictorial for the second kind of daisy cookies featured in the video is coming soon!
If you can’t see the video CLICK HERE.

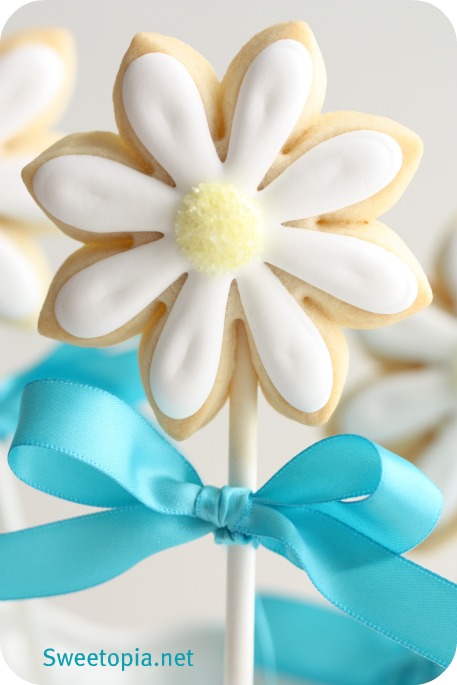
How to Make Daisy Cookie Pops
If you’d like to try making these, you’ll need:
- Sugar Cookie Dough Recipe (or cookie recipe of your choice)
- Rolling Pin
- Parchment Paper & Baking Sheets
- Daisy Cookie Cutter

- 8 inch Lollipop Sticks
- Royal Icing Recipe and Americolor food gel coloring (yellow & white)
- Piping Bags & Couplers
- Piping Tip (#2 or #3)
- White Sanding Sugar
*
Making the Cookie Pops:
1. Once you’ve made the dough, roll it out between two sheets of parchment paper and then leave it in the fridge to rest for approximately one hour. I rolled my dough about 1cm or 3/4 of an inch thick.

2. Now you’re ready to cut the cookie shapes out of the dough and stagger them on a baking sheet lined with parchment paper.

You’ll need to place them apart so that there’s room for the cookie stick.

3. Making sure your dough is soft (room temperature), insert the lollipop stick into the dough, about one to two-thirds of the way through. If your cookie cracks a little, use your fingers to gently press the dough back into place.

If you’ve got a larger cookie, such as the mask below, you may need to fortify the back of the stick with an extra bit of dough. Add a small piece of raw dough to the back and it will adhere during the baking process.

4. In order for the cookies to hold their shape better when baked, chill the unbaked cookies in the fridge or even freezer for at least an hour.

5. Bake for 10 minutes at 350 degrees Fahrenheit or until the edges are slightly golden in color and the middle of the cookie no longer looks wet.

6. Prepare and colour your royal icing. The thickness of the icing is important if you’d like to use the same icing to outline and fill in your petals. Please see this video if you’d like more information on icing consistency.

7. Using a number #2 to#3 piping tip, outline the petals of the daisy by following the shape of the cookie. Fill them in right away. You may need to shake the cookie gently to help the icing smooth over.

8. Let your base dry for at least a few hours (the more humidity, the longer you need to let the icing dry), and then add yellow center.

9. While the yellow icing is wet, sprinkle sanding sugar over it and gently shake off the excess.

10. Let the centers dry and finish off your cookie pop with ribbon of your choice.

Hopefully this ‘how-to’ has been helpful for you! I’d love to hear your feedback, comments, tips and tricks, if you’d like to drop me a line in the comment section below, on twitter, or my facebook page here.
xo,
Marian

p.s. More cookie pop ideas… Made these for Bakerella when she came to Toronto this past December (chocolate sugar cookie recipe will come (for those of you who emailed), promise! Still tweaking it a bit.

Perfect for masquerade mask cookies:

and these lollipop cookies I made a few years ago:

p.s.s. Plain ‘ole daisy cookie are sweet & easy to make too:

p.s.s.s. Update – The video for the round daisy cookies can be found here.


These are so perfectly spring! Thanks for the detailed instructions. I love the blue gingham in the pictures too….
Hi Marian! I really Love your cookies, you are amazing!
Love from Argentina (:
Thanks for your fabulous tutorial!
Un beso, Miriam G.
Wow, I’ve just come across your site, it’s so beautiful and your skills are amazing! Looking forward to seeing more. Niki x
Beautiful cookie pops! The daisies look perfect! Have a wonderful weekend 🙂
Thank you very much!!!
Chari from Spain!!
Another FAB tut!! Thank You! LOVE the daisies!
~Kathy
Marion, thank you for the great demo. In the beginning of the video you mentioned also showing how to make the other cookies with the kopykake projector but I don’t see another part to the video. Can you tell me where it is? Thanks!
Thanks for the comments!
Barbara, I originally wanted to put both cookie how-to’s in the same video, but youtube won’t allow videos longer than 10 minutes, and mine went over, so I had to split it. The next one is coming in a few days. Thanks for asking!
The artistry and precision that it takes to decorate cookies like these always amazes me. The presentation is so utterly exquisite (the princess and fairy cookies the other day!) I can just imagine them being served in gorgeous and inventive ways.
exellent job,you’r a great teacher….
cute daisie pops. I love to have one…
MT
Thank you for an amazing video tutorial. Your cookies are so perfect. Wish you a wonderful weekend. Always looking format to your amazing videos.
What a great tutorial. You look so natural in the video. I love the masks. They are my favorite.
Brilliant as usual, a real inspiration!
love Natasha (London)
Those are so sweet!
Very good tutorial and helpful, but the most beautiful is the landscape and the snow!
i love your videos. you inspire me to decorate my own cookies
thanks so much for the video, and really all of the information you share on your site!
i see based off of the link you provided you use wilton lollipop sticks, but i bought some recently and noticed on the packaging they say “not for oven use.” have you experienced any problems baking with them?
Oh do I ever feel like a loser!! LOL. Thank you for that!! I haven’t experienced problems though, no.
Enjoy the video tutorials, they really help. I would be interested in knowing how you made the masquerade mask, we have a masquerade fundraiser next thursday and I think it would be great for the kids to make a decorate.
Thanks Melissa! There’s a decorating how-to on them in the tutorial section of Sweetopia. (Tutorial section is on the left hand side of the blog, under Sweet Categories). It’s called ‘How to Decorate Mardi Gras Mask Cookies’.
Have fun making them!
Love your video, would love to see how you made the round ones also. Hope to make these for my daughters birthday next week. Thanks!
Perfectly explained! I just made a whole slew of cookie pops for a party that took place this morning. Love the dasies. So simple and cute.
Thanks for the comments everyone!
Kimberly, the second video/post is almost ready to go!
A great “welcome spring” cookie. Thanks for the post
Best, Sandie
hi marian
just wanted to tell you that your video tutorial is great!!that’s amazing how easy it is for you to decorate cookies!!
thanks again for all your tips ,videos and tutorials,i m a big fan of you!!!
Thanks Marian!
Perfect, as usual 🙂
Debbie
What a fab tutorial! You are the treat decorating queen!!
Oh my these are SO cute!! What a fun treat!
Hi Marian,
I found your blog and glad I did =)
it has so many good information and you are so good at this
I have question, how I baked the cookies without lose the shape? I did as you suggested to put on the frezer but the edge of the cookies always changes (especially when the cookies is thick).
btw, I use conventional oven (need to put the oven in top of the stove)
Thank you so much Marian
Hi Olivia,
I’m so glad you like it!
This post goes over all the things I do to help dough keep it’s shape:
https://sweetopia.net/2011/04/top-8-tips-on-preventing-cookies-from-spreading/
Let me know if you have more questions. =)
Thank you so much Marian…
I’ve tried as you suggested but I still face the same problem…
It’s so hard for me to find the butter that has less water on it…
My friend give me suggestion to replace 2 tbsp from the flour with Maizena Flour with the same size.
What do you think of this?
And I have question for the stick..I replace the stick with the bamboo stick, but after I baked the cookies the stick won’t stick one the cookies strongly…so it’s easy to fall..
So I think the problem is becos the stick is round and the dough cannot stick into it. What do you think? =)
I hope I can find the solution for it….
Thank you so much Marian…my cookies goddess =)
xo…xo
Hi Olivia,
I’ve never tried replacing small amount of the flour with maizena (cornstarch), so I can’t give you my feedback on it, but, it’s worth a try! I would love to hear how it goes with you then.
Another suggestion, maybe take out 1/4 cup – 1/2 cup of butter then. It will probably affect the flavour a little bit, but since you have less butter, spreading will probably happen less. Just something to try!
Also never tried putting bamboo sticks in the cookies; good to know that they don’t stick strongly to the cookies. I’m not sure if the problem is that the stick is round (because the sticks I used were round and they stayed fine), or if it’s the material (bamboo). How about trying popsicle sticks?
Hope playing around with these ideas helps!
Hi Marian,
do you know what is the cause the dough of the same recipe came out different even though I use the same recipe?
Sometimes the dough is more sticky than the other dough
Thanks a bunch xo xo…..
Hi Olivia,
There are so many variables which make a difference in baking; it can be finicky.
Some factors which make a difference:
1) Weather/Environment – especially the humidity in the room. More humidity means your dough will be stickier, and you may have to add more flour
2) Ingredient Quality – Even using a different brand butter can make a difference. (Different butters have more or less water content. More water in butter makes cookies spread more).
3) Even though one might think everything was done exactly the same, even opening up the oven to peek at the cookies can make a difference/can affect the outcome of the cookies. -Especially with spreading.
You may have already seen it, but maybe the post on preventing dough from spreading will help:
https://sweetopia.net/2011/04/top-8-tips-on-preventing-cookies-from-spreading/
Hope that helps!
I’m concerned about the thickness of the cookies. I roll my “non pop” cookies about 1/4″ thick. I know they need to be thicker to put on a stick, but do you really roll them 3/4″ thick? I was hoping 3/8″ would work, maybe 1/2″ at most. What do you think? Thanks!
Me encanta tods las tutoria. Gracias.
Hi I have a batch of cookie pops in the oven right now! Where is the chocolate sugar cookie recipe? With Valentines day around the corner I bet they would be hit!
Thanks
Jennifer
Thank you for the tutorial on the royal icing consistency and learning how to make decorations with it. How much do you sell your cookie pops for? I am going to be opening my own store soon and will be making and selling treats but not sure on some of the pricing.
girl, it does not get better than this! thank you for sharing!!
Hi,
I’m thinking of making these for my sisters bridal shower in June, if I’m making around 100 of these, and the shower is on a Sunday, could I make them on the Thursday before? and how would I keep them to stay as fresh as they can be?
Thanks,
Tiffany
HI @ Tiffany: Check my tutorial sections for 1) Cookie decorating schedule and 2) How long do cookies stay fresh.
xo
I just found your website and can’t stop watching your videos!!! They are so helpful. You mentioned to add a bit of raw dough to the cookie if the stick shows through, do you bake them again and for how long?
Hi @ Bonnie: I put the raw dough on the back of the stick at the same time the top dough is raw too, then bake it. Hope that helps and thanks for your comment!
Marian, your cookies are wonderful just as your are. I love all your cookies and decorating ideas, my attempt to decorate a butterfly cookie didn’t turned out as plan. But I had followed your tutorial and still working on it. Thank you so much 🙂 Your a sweet genius!!
Hi Marian,
Your website is fabulous!!! I wanted to share with you the way I do lollipop cookies. I use bamboo sticks, which I insert in the cookies immediately after I take them out of the oven. The cookie still hot adheres to the stick very well. I made hundreds of them and, honestly, it’s a toddler proof method.. The cookie stays on the stick until the last bite!!
Thanks @ Laura, have fun playing around with your next batch!
Hi @ Giada: Thanks so much for sharing! I’d love to try that the next time I make cookie pops!