
It’s been a while since I’ve posted, so let me take this opportunity to wish you a Happy New Year! I’m excited to begin 2011 with a treat for you! If you haven’t already ‘met’ her, I’d like to introduce to you the extremely talented cookie decorator Callye, otherwise known as SweetSugarBelle. I’m so thankful she’s here today to show you how to create camouflage cookies! Check out her tutorial below as well as all her *amazing* cookies over on her blog, The Sweet Adventures of Sugarbelle.
*
Camouflage Decorated Cookies Tutorial:
*
Hi, I am SweetSugarBelle, and I am addicted to patterns! I blame it on my mom and her lifelong love of plaid. It was all over our house growing up, and in fact, if you ask her what her favorite color is, that will be her answer.
*
I have always been drawn to patterns. I love to look at them and dissect them, and since I became “cookie obsessed” I have perfected ways to recreate them ON a cookie. One of my most frequently asked questions is how to make camouflage cookies.
*
I was so excited about visiting Marian, that I decided to use Sweetopia’s “signature colors” to demonstrate =)
It’s really a quite simple process, but since this is achieved using the wet-on wet technique (such as marbling cookies) you MUST work quickly!
*
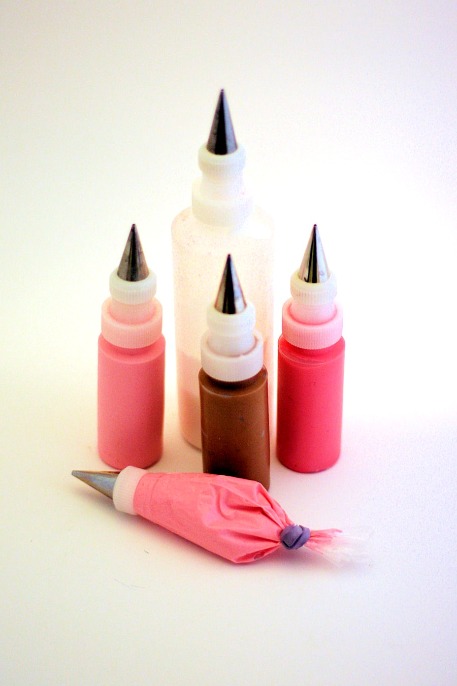
So to begin, PREPARE YOUR COLORS. You can use 3 or 4, whatever you prefer. I chose light and dark pink, white and chocolate brown. {If you are interested in “traditional” camo, I suggest forest green, moss or avocado green, brown, and black} You will also need one color for outlining the cookie. I chose the color that I wanted to be most primary, light pink.
Step 1: Outline the cookie…

Step 2: Using the primary {outline} color make puzzle shaped pools of icing in random places inside the outline. * Be sure to leave lots of room, you still have three more colors to go*

Step 3: While the first color is still wet, move on to the second color making the same shape. {It’s okay if they touch, that’s the idea =)}

4. I know this is getting repetitious…

To finish, fill in the last open spaces with the darkest color. This is not a must, but I like the “POP” it gives the final product.

Let them dry completely and you are done!

A few tips for success:
-
Work on only 3-4 cookies at a time. If you get too far ahead of yourself, the icing will dry and your pattern will be “bumpy” not smooth and flat.
-
Choose colors that coordinate well. I find that a good source of inspiration if you are looking for colors that go well together is baby bedding…no snickering, it works!
-
Outline the cookie in a lighter color and save the intense one for accents.
-
If you are worried about goofing, find something camouflage to look at such as a piece of clothing, scrapbook paper, or a Googled image to refer to until you are comfortable with the technique.
With a little practice, this technique is EASY BREEZY! And super cute!
Thank you Marian for inviting me to visit one of my most FAVORITE cookie blogs! You are one of my cookie heroes, and a constant inspiration!
*

*{Photographs by BCD Photography}


Yep, Callye IS amazing! Great tutorial; she makes it look so easy:) YOU are amazing too, Marian!
Where did you find the tools to complete camo cookies? I am looking for the tools you have in the first pic. I am hoping to get started on various crafts and baking projects and want to be prepared by getting the tools I need
Thanks,
Tisha
Hi Tisha,
I believe Callye (guest poster) answered that question in the comment section above.
wow, wow, wow!!! LOVE these! I’ve tried ONCE to make camo….nowhere near as pretty as this…I love how you did it! AND I love the PINK!
You girls are SO good! I bow down to you both!
Hi, can I check, for outlining, can I use the same icing i use for the primary colour flooding? I noticed that Callye used different icings(1 in bag,1 in bottle). Whats the different consistencies? Thanks so much!
Love these! Thanks for the step by step directions! I am so going to try these!
What type of icing was used here?
Attractive section of content. I just stumbled upon your website and
in accession capital to assert that I acquire actually enjoyed account your blog posts.
Anyway I’ll be subscribing to your augment and even I achievement
you access consistently fast.