10 Keys to Improving Decorated Cookies {If you’re not already doing them}
These are just a few simple things which would have saved me some frustration had I known them when I first began decorating cookies. I still make some of these mistakes now and then, especially if I’m in a rush, which leads me to my first point…
1) Time – If possible, give yourself enough time to make your cookies so that you enjoy the experience more and fewer mistakes occur. Of course, that’s not always feasible, especially if running a business, but as much as possible, make sure you’re not rushed or pressured.
2) Mixing food paste or gel colors – Make sure the coloring is thoroughly mixed into the icing. When it’s not, you’ll often see a ‘streaking’ effect once the icing is applied (See image below). This can also happen if your icing is too runny or when the water separates from the icing sugar (More on that coming up).

3) Avoid over mixing royal icing – When making your royal icing, over mixing it can create a sponge-like texture when the icing dries. Too much air gets incorporated and when the icing is dry, it easily crumbles when touched.
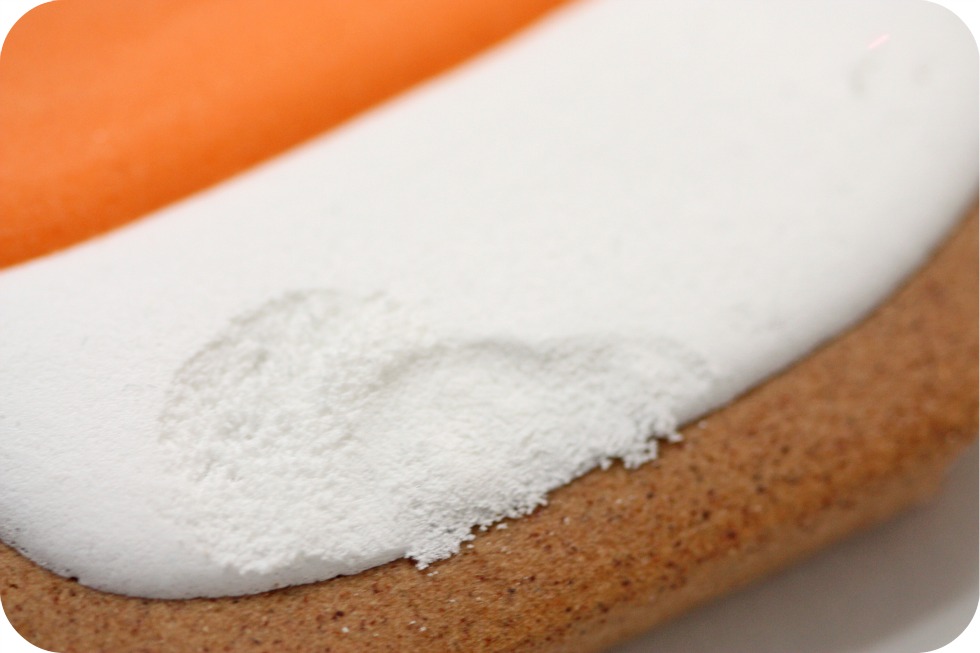
In this case, over mixing means quite a while; the royal icing in this image had been mixed on low speed in my kitchen aide mixer for a good 20-30 minutes! {Or more? I had forgotten about it 😉 }.
4) Consistency of icing – The consistency of your icing is key for decorating success. Different consistencies can be useful for different purposes. For more detail, use a thicker icing, for a smoother finish, a runnier icing. For outlining and flooding the cookie right away, I use the 10 second rule.
The 10 second rule: Drag a butter knife through the surface of your royal icing and count to 10. If the icing surface becomes smooth in anywhere between 5-10 seconds, then your icing is ready to use. If it takes longer than approximately 10 seconds, the icing is too thick. Slowly add more water. If your icing surface smoothes over in less than 5-10 seconds, it is too runny. Mix your icing longer or slowly add more sifted icing sugar to thicken it.
If you like visuals, here’s a video which shows the 10 second rule.
5) Runny royal icing – This ties in with icing consistency, but is worth mentioning on its own. If the icing is too runny it will flow too quickly out of the piping tip, making it difficult to control how you pipe, especially for outlining.

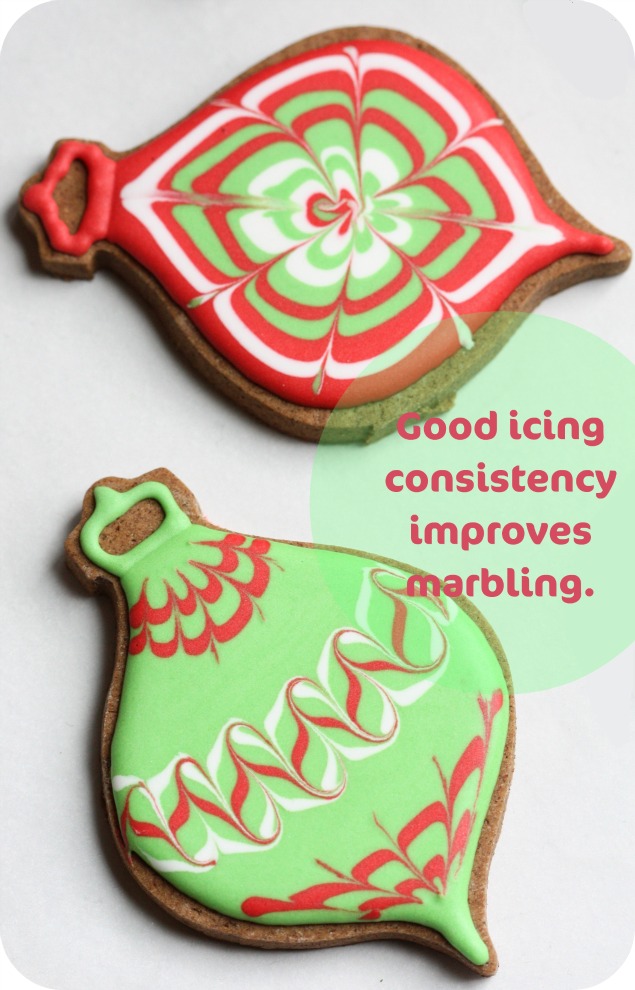
Runny icing is great for marbling, but even marbling isn’t as successful when the icing is too thin.
6) Make fresh piping bags each time – The water and icing sugar in your royal icing will separate over time. How long it takes to separate depends on how runny your icing is; mine usually takes at least 4 hours or more before it begins to separate.
It’s for this reason that you cannot leave your icing in the piping bags for a long periods, for example overnight, and continue decorating with the same bags. The water will pool in the piping bag and on your cookie when you go to apply it.
7) Planning your cookie design – Make sure you’re able to do a particular design before you say yes to it. Years ago I said yes to a friend who had asked for 100 motorcycle cookies. When I realized how detailed they would have to be to look good and when I realized I wasn’t capable of implementing the design (I didn’t have the KopyKake then and I’m really not good at drawing freehand), I had to go back to her and ask her to pick something else.
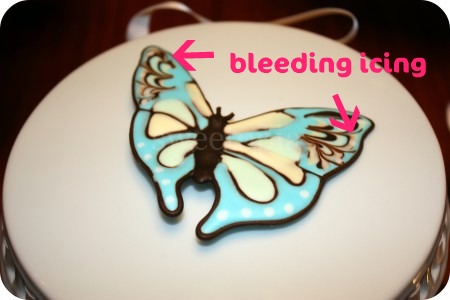
8) Bleeding – Whenever using intense color such as red or black, bleeding seems to happen more. The best way to prevent bleeding is to minimize the amount of humidity the cookies are exposed to (de-humidifier, air conditioning, air-tight storage once they`re dry). More on preventing bleeding here.

9) Tint your white icing white – Confused yet? When I first began decorating I would leave my royal icing I was using for white cookies, untinted. The difference is subtle, but to avoid an off-white look, actually color your royal icing white. The snowflake above is an example of untinted royal icing, and the snowman is an example of icing tinted white.
10) Practice! – Although these tips all contribute to decorating success, good old-fashioned practice always helps!
For more detail and cookie decorating tips please check out my Cookie Decorating Tutorial or my Top 10 Tips. If you have any tips which you’d like to share you’re welcome to leave a comment below.
Happy decorating!
xo,
Marian


Hi,
I have been searching around for an answer to a particular problem that has cropped up a few times when decorating – blotchy icing. Hope you can help. I use americolor gels to colour my royal icing, which is made with icing sugar and egg white. I don’t add water. Recently I made a batch of poodle cookies – some were black, some blue, some pink and some purple. The same batch of icing was divided among four bowls and coloured. Great results, except for the purple, which dried with lots of pale blotches. The next batch of cookies I did were some flowers, using pink, orange, blue and green colours. Same problem again! Used the one batch of icing for all the colours, with everything fine except for the orange, which had the same blotches as the poodles.
Am very keen to avoid this happening again. Any ideas? Thanks.
Pamela
Hi Pamela,
Would you send a picture to sweetopia AT inbox DOT com please? It’ll help to see them!
Thanks!
@ marian:
Pictures sent – hope you got them okay!
Hi Marian,
I’ll be doing for the first time cookies with skintone color. How I have no idea how to get that color. I saw you did the did the cute braided girl in skintone for her face. Can you share your tip in how to make this color? Thanks!
Sandra, I use tiny, tiny amount of peach with a TINY amount of brown to tone down the pink a bit. Depending on what exact shade you’re trying to achieve, add more brown, more peach, try pink if you like, and golden yellow works too. No matter what, use tiny, tiny amounts at a time, mix, and see if you like it. I find it a bit of a tedious process because I’m so careful, but it’s better then adding too much.
If you do add too much, add more white icing to tone down the colour.
You can also take a little blob of icing on a tupperware lid and play with the colours on a small scale, kind of like a painter’s palette.
Hope that helps!
I’m new to decorating cookies, so please bear with me. When you say tint your white icing, what color do you use to tint with?
Also, what do you use to color your icing with in the first place? Food Coloring? Gels?
Thank you in advance!
@ Jennifer: I use Americolor food gel white to tint icing white.
For all colours, I use Americolor or the occasional Wilton food gel.
Hope that helps!
Hi! I made sugar cookies and they were perfectly flat when I put them into the oven. The problem is that when they came out, they held their shape but had a slightly bumpy surface. This is particularly an issue because I want to lay a stencil down on them and color with Wilton food markers and it won’t lay flat because the cookie is no longer flat! What can I do next time to prevent this?
Thank you!
Hi Marian
I made some decorated cookies and used the 10 second rule to make sure the icing was the right consistency before I started, however now that they’ve dried the centres of the flooded areas appear to have sunk a bit, so there’s a dip in them and they’re not nice and flat like yours.
I did the outlines and left them to dry overnight as I didn’t have time to do the flooding the same day.
Any idea what I did wrong with the flooding part?
Thanks!
@ Ali: My guess is that the centre of the cookie could just need more icing (fuller). It would be helpful for me to see a photo of the cookies – are you able to share it on Facebook or email me please?
Thanks Marian. I’ve upload a photo here: http://s917.photobucket.com/albums/ad13/AliPru/?action=view¤t=IMG_0493.jpg – hope you find it helpful!
Hi Marian,
I love all of your posts and there are all very inspiring!
I have a problem with my royal icing, I’ve decorated my cookies 2 days back and until today, it’s still not hard yet…and for some that has turned hard, the texture of the icing is rough/spongy…I think I did over mixed the icing as there are a lot of holes in my icing….^__^
I’ve also ommitted cream of tartar from my recipe, is this the main cause my icing couldn’t turn hard?
It’s so hard to get the right consistency!….
Hope you can help..Thank you…:)
@ Ali: It says, the ‘specified media does not exist’. Paste another link maybe?
@ Kelly: It sounds like the icing was over mixed, yes. Cream of tartar does help stabilize the icing too, but the recipe should still work without it.
Have you seen my video on finding the right consistency?
Take heart, once you get it, it will become much easier every time!
I LOVE your website. Someone pinned one of your cookies and i followed the pin to your blog. You are amazing and I LOVE that you share ALL your secrets so we, too, can have the perfect cookie! Kudos to you….happy baking!
@ Arrie: Why thank you, Arrie! What a pretty name btw.
Marian,
I found your website while I was searching the net on how to decorate cookies. I was leaning toward making some Curious George cookies for my son’s birthday but was not sure, however once I found your page I fell in love with cookie decorating. I m hooked. I ve spent the past few days looking through your wesite. You’ve inspired me to try my hand at making cookies and decorating them. Wish me luck!! Keep up the great work. It really inspires newbies like myself. It’s nice to have someone “hold our hand” through the process.
Hurray @ joann! I’m so glad to be some help to you! Please don’t hesitate to drop me a line should you have any questions. Have you seen my cookie decorating schedule in the tutorial section? That might be helpful for you. Have fun!
First of all I LOVE your site!!! I always turn to it when I need help trouble shooting and I’m so greatfull that your willing to share your helpfull tried and true hints! I’ve been experimenting with Royal icing…. tricky and tempermental stuff ! A book I’ve been following said if I was using a stand mixer, which I have been, to mix on HIGH 5 minutes but it makes sooo many bubbles. I keep trying different things to alter my results, but it seems fool proof. I have read your tricks and tips for less bubbles, but could you please share the exact way that you do it? Nothing like piping a design, only to find the next morning, it has holes in it that can not be patched up unnoticeably! HELP!
Sincerely,
Michele D.
@ Michele: Oh I feel your frustration! I mix my royal icing on low for sure, and once I’ve colored my icing I let it sit a bit, and air bubbles rise to the top… which I promptly pop 😉 and then fill my piping bags.
Icing with a thinner consistency actually seems to get more air bubbles, especially when filling in smaller areas.
That being said, it’s still a perplexing topic! See this post here:
https://sweetopia.net/2010/02/part-2-how-to-prevent-air-bubbles-in-royal-icing/
Have fun decorating, and if you have any more feedback as well, I’d love to have you come back and visit!
Hi Marian,
I love your website! I;m wondering how you get your icing so shiny? Mine dries to a really matte finish and I’m not liking the look.
Thanks so much for all the info you share!
Hi @ Lindy:
It’s probably because some of them (photos) are taken when the icing is wet. Take a look at this post:
https://sweetopia.net/2011/11/gluten-free-coconut-cupcakes-with-coconut-frosting-shiny-royal-icing/
An earlier poster said that her cookies weren’t flat enough. I’ve found that by decorating the back of the cookie, I get a really flat surface with crisp edges AND I cover up what is normally the ugly part of the cookie!
Hi @ Staci: Well that’s a really cool idea, thanks!!
Hi Marian,
I’m literally losing my mind here. My problem is I can never get good consistency when doing fine lines with tip nr. 1. I want to do nice thin lines and cursive decorations but the lines start to roll and curl which shows that icing is to thick. If I redo it and make it just a little more runny then the lines are to thick and not that fine anymore…. Please do you know what I’m doing wrong here? I see so much fine lace work and that is my goal, to be able to lace decorate. Thank you so much for all the helpful tips.
Hello @ Mrs S.: Here’s a post which should help:
https://sweetopia.net/2010/03/how-to-prevent-your-tips-from-clogging-and-what-to-do-if-it-happens-top-10-tips/
It’s about clogged tips, but, use the same process to ‘sieve’ your icing… it may help!
marian wrote:
Hi Marian,
Firstly thanks for all your advice and fabulous website and videos. I’m 1 year into my iced biscuit obsession and it shows no sign of waning!
I’m having a problem with my white icing, which is yellowing after it dries. I think it may be absorbing butter from the biscuit. I use meringue powder rather than egg white ( which always seem to start out yellower anyway) and the past couple of times I’ve also added Wilton white colouring. So it starts of a beautiful colour…I do my white base (outline and flood) but when I come back a few days later (I live in London but work in Switzerland so all my projects are rather protracted!) the base is no longer a pristine white but now a cream colour. Not the desired effect!
My biscuit recipe is all butter and I use whole eggs. I’m wondering if I should try replacing some or all of the butter with white fat, but that sounds highly unpallatable!
Any advice?
Hi @ Tammy: It could be that the butter is seeping up into the icing yes… Have you tried these suggestions yet?
https://sweetopia.net/2011/07/how-to-avoid-spots-on-icing/
Hope that helps!
@ marian:
That’s fantastic advice! Thanks for the tips! You’re a star!
Hi Marian! Thanks for the tips. After looking at your photo, I’m 100% sure I overmixed my royal icing. My question is whether there is a way to salvage this icing in this case, or do I have to start over from scratch? Will it correct itself if I allow it to rest for a period of time?
Hi @ carolyn: Oops! You’ll need to make a fresh batch in this case.
All the best on the next one!
I find the snowman biscuit is really nice…
Hi Marian! First of all, I just wanna say that you’re my source of inspiration when it comes to baking and frosting, you are trully talented 🙂 I have one question, how do you add blush on top of your cookie just like the first picture? thanks xoxo
Danke, @ Schokolade😉
Hi @ Vania: dusted on with dry pink luster dust. Easy as that!
Hi Marian,
I really inspired with your website ^^ Thanks before ^^
I have a question that can’t be solved for a long time. When I have done decorate my cookies, they turn to soggy. So that I always bake them again to make them crunchy, but I always find that the icing color changed, it’s turn older and not beautiful as before it baked. So, What should I do to solve it?
Thanks a lot
My pleasure, @ Maria Hendriani, glad to hear it.
Humidity wreaks havoc with baked goods of all kinds. Here are a few posts which should help;
https://sweetopia.net/2012/01/video-how-to-dry-cookies-decorated-with-royal-icing/
https://sweetopia.net/2011/07/how-to-avoid-spots-on-icing/
They are both related to your issue, and the solutions are the same. All the best to you!
@ marian:
In my family we have always made the shiny icing with only water, icing sugar, vanilla, and karo light corn syrup. I have never been able to get the same result putting karo in other icing.
I use royal icing to decorate my cookies but sometimes the icing all falls off in one perfect shape. Any help with this would be amazing. I just can not figure it out.
Hi @ Melanie: Interesting. This hasn’t happened to me. I’m wondering if it’s really, really dry, where you live? Also, which cookie and icing recipes are you using?
Well they are dog cookies LOL so it is wheat flour peanut butter and water baked till they are dry and hard. The Icing is just the wilton cookie flow icing off the package. Ay ideas? Maybe a different icing recipe?
A colleague linked me to this site. Thnx for the details.
Hello Marian, my husband and I make cookie cutters in which we do craft shows selling our cutters and demonstrate the shapes to the public, including decorating to inspire people. Our environments are various at different venues, ie hot cold etc and I am hoping you can assist me in the best ‘rolled’ icing to colour and use to demonstrate. I bought ready made icing and coloured it but found it to be thin and sticky, and due to the warmer weather it just didnt stay nice for the day and was difficult to use. I ended up of all things using playdoh as it had more substance however by the end of the day it had dried and curled and looked unprofessional. I probably need a lesson in fondant, gum sugar etc. and what is the best to use. would you mind me contacting you to have a quick discussion? I appreciate any assistance you may be able to offer me. Kind regards Dahna
Hi @ Dahna: I don’t do fondant covered cookies often, but have done it a bit, so hopefully these tips help:
-if your fondant gets dry, massage a little shortening into it while you’re kneading it. Not sure if this works with play dough.
-if it’s too sticky, knead some icing sugar into it, and roll it out on a marble slab (if you can bring a small one with you) covered in either icing sugar or cornstarch.
Warm weather is tough for any sugar work, but hopefully those tips help!
Thank you big bunches Marian, those tips will definatley help 🙂
I was thinking just for the demonstration exercise I could also try using gum paste as it seems to be thicker. Any thoughts on that rather than fondant in my demos? Thank you very much again for your time. Regards Dahna
@ marian:
Yes, gumpaste might be worth a shot, @ Dahna. It does have a tendency to dry out, but try and see how it goes. Good luck!
Thank you once again 🙂
@ marian:
Hi, I’m very new to baking and need some help! Is it possible to pipe icing details on top of ready to roll icing cut-outs? I made some gumpaste cutouts and tried embossing them with a patterned rolling pin but the pattern was too faint no matter how much pressure I used, so hoping piping the pattern instead would be possible?
Thanks in advance for any help, your tips really make a difference to amateurs like myself 🙂
Great tips! I am pinning 🙂