
I’ve had many questions regarding decorated cookies since I began 7-ish years ago, so I thought I’d share some of my favorite decorating tips I’ve learned over time. By no means am I an expert, but I hope you find my top 10 suggestions helpful.

There are so many ways of decorating cookies; you can cover them with fondant, rainbow sprinkles, delicious melted chocolate… I could go on, but one of my favorite ways is to flood a cookie with royal icing (flood icing). To basically cover the cookie with a smooth, glossy, sugary coating; piped in such a way that your icing becomes a design – instant sugar art! My tips today refer to decorating cookies with flood icing.
I’ve got an in-depth tutorial here, which goes over how to flood in detail.
How to Flood Cookies with Royal Icing – Top 10 Tips
1. Use a good icing recipe. See here for one of my two faves from cake central user Antonia74. Another favourite is from Peggy Porschen’s book Pretty Party Cakes, but won’t post it here due to copyright infringements.
2. One of the most important things I’ve learned about cookie decorating is that if your icing isn’t at the correct consistency or thickness, the experience can be very frustrating. The trick I use to make sure my icing is just right is called the “10 second rule“.
Drag a butter knife through the surface of your royal icing and count to 10. If the icing surface becomes smooth in anywhere between 5-10 seconds, then your icing is ready to use. If it takes longer than approximately 10 seconds, the icing is too thick. Slowly add more water. If your icing surface smoothes over in less than 5-10 seconds, it is too runny. Mix your icing longer or slowly add more sifted icing sugar to thicken.
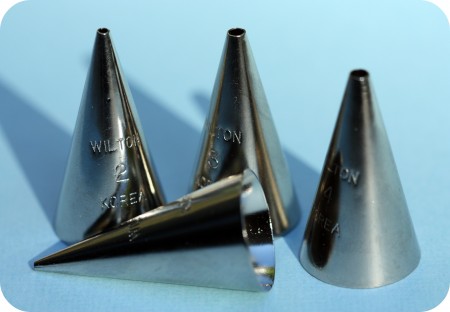
3. For tip sizes, my favorite tip is #2; it’s great for outlining and filling in. For larger cookies use tip #3 or #4 and for smaller cookies use tip #1.

4. Seal the top end of your piping bag closed with an elastic band for less mess.
5. Practice piping on your work surface or parchment paper before you begin your cookies, so that your hand gets the feel of it. I usually find I need a few minutes of playing around before my piping improves. Decorate your least favorite cookies or extra cookies first; that way if you make a mistake it won’t matter as much!
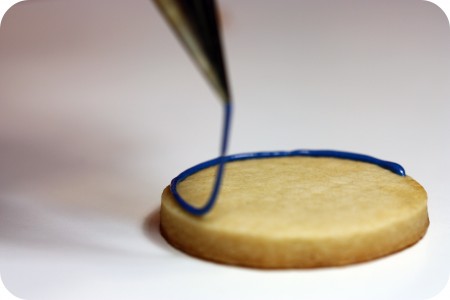
6. When you’re outlining the cookie, about a centimeter in begin lifting the piping bag away from the cookie, so that the icing just falls onto the surface. You’ll be able to control your piping easier that way.
7. If your hand is shaky, rest your arm on the edge of your work surface while decorating.
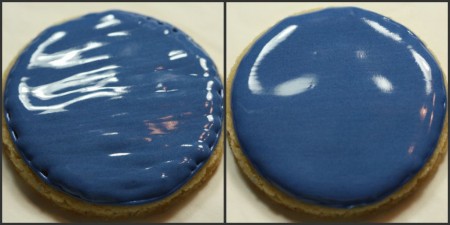
8. After you’ve finished applying the icing to the cookie, shake it gently to help settle the bumps if there are any.

9. If you notice any small air bubbles, pop them with a toothpick or pin right away. If you don’t, the air bubble usually pops on it’s own and leaves a hole in your icing. (See acorn which squirrel is holding in the image above).
10. Let your cookies dry for at least 24 hours before you package them. They won’t get stale as the icing acts as a sealant for freshness.

These are just a few of my favorite tips which would have helped alleviate some frustration had I known them when I first began decorating cookies. If you have any tips which you’d like to share you’re welcome to leave a comment below.
Happy cookie decorating!
xo,
Marian
p.s. In case you missed it, f you’d like a tutorial on how to make the owl cookies, you can find it here.


I just want to thank you for all your helpful tips!!!!
Hi Marian you have such a lovely blog! It’s such a help.
In making the RI, is there a way for me to use fresh egg whites instead of meringue powder? Meringue powder is very hard to come by where I live. Thank you!
Thanks Patricia!
Yes, RI with egg whites was the original/traditional version.
I don’t have a recipe I could send you right now as I normally use meringue powder, but I’m sure you can find one on google. It’s basically egg whites and icing sugar… if it’s too dry add another egg white, if it’s too wet add more icing sugar.
Lemon juice is also usually added.
Hope that helps!
Hi Marian,
I love your Royal Icing tutorials. They are so pretty.I’m a fan of the piping method and not the fondant method for cookie decorating.
I am about to embark on my own cookie decorating adventures which I doubt will be good enough for blogging but I was thinking of practicing the techniques on store bought cookies so that I wouldn’t waste a precious homemade cookie with my amateur attempts. Is that slack of me? I feel like I’m being a cookie cheat.
That’s one excuse but my main one is that my oven dates back to the 70’s and only works when it feels like it 🙁
I need to get a new oven.
@ Patricia:
Hi Patricia,
Try http://www.joyofbaking.com for an easy egg white Royal Icing Recipe.
I haven’t tried it myself but her cake recipes work a wonder for me and always come right for me. Stephanie who runs the site does a great job of testing recipes and adapting it for home bakers.
Thanks for sharing the link bubble&squeak!
Lol; I wouldn’t worry about it – you’re just practicing! Another idea is to just practice piping on parchment paper greased with a wee bit of shortening.
You can make royal icing transfers/run-outs/flood-work which are basically sugar decorations. You can place them on cakes, cupcakes etc. if you like or just practice your piping!
I’ve got a post on royal icing flood work here:
https://www.sweetopia.net/2009/12/how-to-do-royal-icing-flood-work-or-runouts/
Hope that helps!
Marian,
what do you use to fill your cookies with icing? a toothpick? I wasn’t able to find it above!
thank you for this post, i know it will be very helpful 😉
Kate; Do you mean after I’ve flooded the cookie using a piping bag?
I usually fill it enough that I don’t need a toothpick to push the icing around. I just flood the cookie and shake it a bit to settle the icing. The icing is runny enough that it pools into the corners.
There’s a fairly detailed tutorial here which might help you a bit as well.
https://www.sweetopia.net/2009/06/cookie-decorating-tutorial-general-tips-butterfly-cookies/
If I haven’t answered your question (or understood it correctly), please leave me your feedback and I’ll do my best to help!
Hi Marian,
I am so loving your owl cookies those are the best I have found on te internet so far!
Now, I have a client that wants that design on cookies, my question is:
I always use color flow to flood my cookies, but on these cookies you cannot even see the outline in the brown part of the body or in the white part where the eyes goes or in the blue part of the tummy…How do you do it?? I really need help on these! Thank you so much!
Hi Ruthy,
No problem! The icing has to at the right consistency… not too runny, not too thick… Then you outline and fill in right away. I use the ’10 second rule’ to help me figure out how thick the icing should be.
For that rule and other tips please visit my cookie decorating tutorial.
https://www.sweetopia.net/2009/06/cookie-decorating-tutorial-general-tips-butterfly-cookies/
Hope this helps and feel free to leave another comment if you need more assistance!
Wow!! You’re cookies are amazing. I want a Kopykake. I read that you use the same icing to pipe and flood, without thinning the flood icing. My question is, how the heck do you get so much height to your flood icing without it spilling over your outline? It’s so 3-dimensional.
HI Lisa, The KopyKake does help!
The key to the icing is definitely the consistency or thickness. You want it to be runny but not toooo runny. It pools or floods with a little encouragement (shaking the cookie when you fill the outlines in).
Have you seen my Cookie Decorating Tutorial? It goes over the 10 second rule and other tips as well. It’s in the Tutorial section under “Cookie Decorating Tutorial – General Tips and Butterfly Cookies”.
Hope that helps and happy decorating!
Thanks for the quick response, Marian. I have been pouring over your blog since I found it. I have read every tutorial and am ready to dive in. LOL I’m baking a batch of sugar cookies and RI as we speak. I usually use a recipe I found on iambaker.com for my RI and use a toothpick to help the flood icing into the corners but I’m going to try yours today. I also do the two different consistencies, one to outline and one to flood. But, I’m going to try the 10 second rule and give it a try. It would definitely be easier. Keep your fingers crossed!
Good luck Lisa! You can find me on twitter or my facebook page too if you have any more questions!
Thanks for your AMAZING TUTORIALS and you are just truly talented..Bless you
wow! i am only 14 and find your creations so inspiring, i love them! by just looking at your guided steps i have learnt so much.
These cookies are very cute,keep up the good work! 🙂
OMG, this could not have come at a better time for me. I’m turning the corner into being good at decorating cookies- but Royal Icing has been SO intimidating! Your directions are clear and tips amazing- I thought I would need to take a class- but I feel like I just did!
Hi Marian-which brand meringue powder do u use. I know that Antonia’s recipe uses cream of tartar and I see that some meringue powders have cream of tatar in them. Does this matter???
Hi Danielle, I use Wilton as well as other meringue powders and they do have cream of tartar in the ingredient lists but still work with the Antonia74 recipe. (I do add more cream of tartar)
What a great site!! The cookies are beautiful. I’m new to this and decorated my first batch this morning. I have so many air bubbles that it would be impossible to pop them all. What could be the cause of so many bubbles?
Thanks Sue! Check out the tutorial section (top left button of the site), for two posts I have on air bubbles… “How to prevent air bubblies – part 1 and 2”
Great tips! Thanks for promoting my icing recipe too. I’m really blown away by your gorgeous cookies. You’ve got talent, girl! 😉
Thanks so much for an amazing recipe and for being so generous with it!
You’ve got the talent Helen! Thanks for visiting Sweetopia!
Thank you so much for these tips! Seriously, you have no idea how much it helps us noobs! 😀
Hi! I’m very excited to use this recipe and start decorating! However, I was wondering what food colorings are the best? I want a variety of color options and I want bright, vivacious colors. Suggestions? Thanks!
I like the AmeriColor soft gel paste food colors Hannah. A little goes a long way, and I find the colors tend to bleed less.
I’ve always wondered how cookies like yours were decorated. Thank you for sharing, you did a great job of explaining the basics. I will keep this in mind when I try some of my own.
Thanks!
I only wish I’d found this website about 4 months ago, i was making cookies for my daughter’s “look whoos 1” birthday party complete with pink and brown owls and i could not figure out how to make an owl without making it look like a deformed bear or something so i just did basic flowers or different sizes and a sweetly written “thank you” on it. they were party favors. That’s alright though, they worked out and everyone thought i had them made 😀 so that made me feel good. I will definitely be referring to your site for all of my future crafty baking inspirational needs!
Marian, I have been drooling over your blog for months! You definitely are an inspiration to all “wanna be” bakers 🙂 i am DETERMINED to master, well get better at decorating with royal icing!! I don’t have a paddle attachment on my mixer though. Is this a necessity? i need to break down and buy a kitchenaid, but just haven’t done so yet! There almost isn’t a day that goes by, that i don’t just stop by to look at all your pretty edible art, and i just wanted to thank you for putting a smile on my face every time i do!! my goal is to make creations that make people smile, and with your help, i just might do that!!
@ amber:
Thanks so much! I’m blushing!! =)
I DO like the paddle attachment (and of course the kitchen aide mixer), because I find that less air gets incorporated into the royal icing compared to a hand mixer. That being said it isn’t a necessity. If you really get into cookie decorating (esp. if you’re making lots of cookies), I would recommend investing in one though.
Have fun – I look forward to seeing your creations! Please feel free to share some pics on my fb page!
@ marian:
thank you! like i said, i owe all that i know to you, and i’ll share some pics with you, but they look like a kindergarden kid did them compared to yours 🙂 i just started a new page on fb “Fashionably Baked” I have been craving a red velvet cupcake, and wanted to see what your favorite recipe was? thanks again, and i can’t wait to see what you do next!
@ amber:
I’m glad you’re having fun decorating. If it helps you at all, the tips I give here and in my cookie decorating tutorial are the things which help me decorate cookies, but besides these, you will improve with practice! My favorite cupcake is actually carrot right now, and I’ll be posting the recipe in a few days.
Off to see your pics and fb page!
Wow!! Thank you so much for this in depth tutorial. I have to decorate nautical cookies for a babyshower next week and although I’m an experienced cook and bakier, I’ve NEVER decorated cookies before. But now, after reading this, I’m completely confident that I’ll do a good job! Thanx so much!
I love love love your cookies….Thanks for the lesson!
Marian,
When I use royal icing, the completed product appears more flat, while your icing appears more puffy. Is this because you add quite a bit of icing, or is it more about the consistency of icing? I noticed you said you add enough to where you don’t really have to drag it with a tooth pick to fill the area, which is what i do. Could this also contribute to the fact that you don’t always see the outline of the area?
Thanks! I hope this makes sense!
@ Kalee:
Try making it a little bit thicker, and also try using a larger piping tip so that more icing comes out. That should help make it look puffy.
My icing is thick enough that I can do the outline and then fill it in right away; that’s why you don’t see the outline, yes.
The 10 second rule (above) is great to figure out what consistency you need for your icing, and if you’d like more cookie decorating how-tos, check out my tutorial here:
https://sweetopia.net/2009/06/cookie-decorating-tutorial-general-tips-butterfly-cookies/
Hope that helps!
hi just found your site, and everything looks great! following you! 🙂
I usually use a squeeze bottle for my filling icing….what size tip do you use/recommend? I will definitely have to try the 10 second rule!
Thanks so much!
Kalee, for larger cookies a #3 or #4, for smaller cookies a #2. Have fun decorating!
Merci, ton post m’a vraiment aidé.
@ Marian: Just Beautiful Cookies! I was wondering since the icing hardens fast do you do all one type of cookie at once and do each color on the cookies in stages? Such as, Doing all the base color first on each one then do next part on each or do you switch off and work randomly on different ones? I am going to use RI for the First time tomorrow!! Very nervous! thank you! Kelly
Kelly, I would do all the bases first (i.e. all the brown owl ‘bodies’), let that dry, do all the blue tummies and the white eyes, let that dry, and then the finishing details. Wait at least 6 hours between stages. Don’t be nervous – Just have fun with it!
Hi Marian. I had a friend ask me to make owl cookies for her daughter and I think yours are beautiful. Although I’m sure I won’t be able to make mine as beautiful as yours I’m wondering if there is a book that you got your Kopy Kake Projector photo from or an internet image? I’d like to find the book or image to use myself. I really think these are cute.
Hi Kari,
Thanks! I used stickers but I did see them on HWTM’s site (Hostess with the Mostess); I think she found hers on istock.com
Have fun making them!
Marian,
Your site is precious. I love to decorate cookies as well and you are so inspiring!! I want to invest in plastic squeeze bottles that are able to attach and interchange decorating tips, where is a good place to purchase them? Also, your icing colors are wonderful, where do you purchase the different colorings or do you mix your own??
Thank you!
Stephanie, have you tried Global Sugar Art?
I use Americolor; most of the time I just use the colors which come in the bottles, but once in a while I need to mix colors to come up with a new one.
Happy decorating!