
This is my first tutorial on tips and tricks for decorating cookies with royal icing. I have to say first off, that I’ve learned many great tips from various sources on the internet, from books and from cookie decorating classes. If you’re interested in other sources here are the main ones I’ve learned from:
1. Internet:
http://cakecentral.com – Find forums to chat with others about cake decorating etc., photo galleries for inspiration, tutorials and more on this gold mine of a cake decorating (& more!) site.
http://www.cakejournal.com/ – A lovely site with beautiful work by the author, Louise. She’s so great you might want to just leave here and check out her tutorial on decorating cookies! Why am I even writing this?! =)
http://chiccookiekits.blogspot.com/ – Meaghan’s got a great site dedicated to all kinds of cookie decorating. In addition to publishing her own book, Cookie Sensations![]()
![]() , she writes for www.craftgossip.com edible crafts section.
, she writes for www.craftgossip.com edible crafts section.
http://www.youtube.com/watch?v=tZBXVveAEPE – Cat Cora from Iron Chef, shows how to decorate cookies on youtube.com. Hers is good for the beginner. There are lots of other video tutorials on youtube as well!
There are so many other great sites out there; have fun surfing!
*
2. Books:
Peggy Porschen’s books![]() have great recipes, easy to follow instructions, and beautiful cakes, cupcakes and cookies. She has a new book coming out in July, Cake Chic
have great recipes, easy to follow instructions, and beautiful cakes, cupcakes and cookies. She has a new book coming out in July, Cake Chic![]() . I can’t wait for it!
. I can’t wait for it!
Cookie Craft![]() by Valerie Peterson and Janice Fryer is another excellent resource. It covers all the practicals of cookie decorating… from making or freezing the dough to a myriad of fab cookie ideas.
by Valerie Peterson and Janice Fryer is another excellent resource. It covers all the practicals of cookie decorating… from making or freezing the dough to a myriad of fab cookie ideas.
Toba Garrett’s Creative Cookies![]() is one of the first decorating books I’ve bought. She covers many different techniques for decorating cookies, from piping royal icing, to covering them with fondant etc. For the beginner and advanced!
is one of the first decorating books I’ve bought. She covers many different techniques for decorating cookies, from piping royal icing, to covering them with fondant etc. For the beginner and advanced!
*
Classes:
Bonnie Gordon’s School of Cake Design (www.bonniegordoncakes.com) – Super if you live in the Toronto area! I enjoyed the cookie decorating class offered there and learned some helpful tips. There are many other great-looking decorating classes I’d like to try in the Toronto area, but haven’t taken the classes yet, so I can’t comment on them at this point in time.
*
Okay, here we go!
Decorating cookies is often called ‘flooding’ because you can essentially create a dam, wall or outline of icing on the edge of your cookie, and then ‘flood’ or ‘fill in’ that ‘dam’ with icing. There are those who like to decorate without using a dam by just applying the icing, but I find that I’m able to add more icing onto the cookie when the dam holds it in, therefore making the cookie surface look more thick and rich.

One of the most important components of decorating cookies is the royal icing itself. I have two favorite recipes; Antonia74’s (from cakecentral.com), and Peggy Porschen’s recipe from any of her books![]() . Here is Antonia74’s icing recipe for decorating cookies:
. Here is Antonia74’s icing recipe for decorating cookies:
Royal Icing Recipe
Ingredients:
6 oz (3/4 cup) of warm water
5 Tablespoons Meringue Powder![]()
1 teaspoon cream of tartar
1 kilogram (2.25 lbs.) powdered icing sugar
*** Note; if your meringue powder has no vanilla flavour (vanillin powder) in it, add a teaspoon of clear vanilla to this recipe.
Directions:
In mixer bowl, pour in the warm water and the meringue powder. Mix it with a whisk by hand until it is frothy and thickened…about 30 seconds.
Add the cream of tartar and mix for 30 seconds more.
Pour in all the icing sugar at once and place the bowl on the mixer.
Using the paddle attachment on the LOWEST speed, mix slowly for a full 10 minutes. Icing will get thick and creamy.
Cover the bowl with a dampened tea-towel to prevent crusting and drying.
Tint with food colourings or thin the icing with small amounts of warm water to reach the desired consistency.
*
Besides your cookies and the ingredients for the royal icing recipe, you’ll need your tools:
Cookie Decorating Tools:
1) piping bags![]()
3) piping tips![]() (at least #’s 1-5)
(at least #’s 1-5)
4) couplers![]()
5) coupler covers – these aren’t necessary; you can just rest your tips in a damp cloth
4) glasses – to stand your icing bags in
5) clean cloths – a few damp and dry ones nearby
6) toothpicks

Icing Tips and Tricks:
One of the most important things I’ve learned about cookie decorating is that if your icing isn’t at the right consistency or thickness, the experience can be very frustrating.
So, once you have made the icing, it ususally needs to be thinned a bit to create the best consistency for decorating. This means that it needs to be fluid enough so that it will flow just enough that it settles into your cookie dam, but not too much so that it runs over.
You may realize that that the icing was thinner before you whipped it for 10 minutes according to the recipe, but it does make a difference in the texture that you mix it that long. Do mix it for 10 minutes and then thin it out if you need to.
Add just drops of water at a time to make the icing runnier. If you add too much water at a time it’s more difficult to thicken it with icing sugar than it is to add water to it.
The trick I use to make sure my icing is at the right consistency, is called the “10 second rule“. Drag a butter knife through the surface of your royal icing and count to 10. If the icing surface becomes smooth in anywhere between 5-10 seconds, then your icing is ready to use. If it takes longer than approximately 10 seconds, the icing is too thick. Slowly add more water. If your icing surface smoothes over in less than 5-10 seconds, it is too runny. Mix your icing longer or slowly add more sifted icing sugar to thicken it.
I learned a slightly different ’10 second rule’, through Sarah Bell at Bonnie Gordon School of Cake Decorating… she likes to dip a spoon into the icing, lift it and let ribbons of icing drop back into the bowl, and count how many seconds it takes to make that surface flat again. (5-10 seconds).

Some people use a thicker consistency icing to outline their cookie shape and then a runnier one to fill it in. I have come to prefer using the same icing to outline and flood because it saves me time. (I don’t have to prepare two icings for each color, prepare two piping bags for each color etc.). That being said, the icing then can’t be too runny, because the outlines will not form properly.
Some decorators like to flood their cookies with a very runny icing, so if you are one of them, prepare two icing consistencies, one thicker, one runnier. The thicker icing should not be so thick that it is dry and curls when you try to pipe it. It should just hold it’s shape when you pipe it onto the cookie.

Coloring Icing:
Once you’ve managed to reach the desired icing consistency, add food paste coloring of your choice. I use a toothpick to slowly add color bit by bit. Because deep, dark colors such as red or black usually require a lot more food paste coloring, I’ll use the end of a butter knife to scoop out those colors if they’re in a tiny container. I should also add that I have come to prefer the Americolor brand for black especially. Americolor uses squeeze bottles which makes adding the color much easier, and it seems to bleed less into other colors.
Another tip when it comes to adding color to your icing; the colors usually deepen with time, so I try to color my icings 24 hours in advance to see if I’m happy with them.
Also, stirring your icing to add color will incorporate air into it, so if you leave the icing sitting for a while the air bubbles rise to the surface, where you can pop them by gently stirring just a little before you add the icing to the piping bags.
One more tip to help avoid air bubbles in your piping bag; massage the royal icing a bit before you twist the top end of the piping bag closed. Press the icing in the bag upwards, starting from the tip and working your way up, pushing out the air bubbles as you go. Then push it back down towards the piping tip.
*
Filling Piping Bags:
I have disposable and non-disposable piping bags for decorating. Either are fine, however, I tend to lean towards disposable because I can quickly see what color each bag has in it. Important when timing is key! That being said, you could color-code each with a matching elastic if you don’t like using disposable bags. I’ve also tried using squeeze bottles with my students at school, and they’re also great for being able to see the colors easily, they aren’t very messy, and the icing can be kept in them as they’re airtight with the wee little lids. Trying not to lose them with teenage students is a problem though! Sorry guys it’s true! 😉 For me, the bottles are really only good for filling in, or flooding, so I tend not to bother with them for the most part.
Cut off the ends of your disposable piping bags, insert the coupler, tip and close it off. I generally use a number 2 or 3 piping tip to outline my cookies and a number 2 – 5 to flood them. The larger the cookie, the larger the piping tip. There are some great tips for small details, such as 00 or even 000, however they clog very easily! I like to use tip #1-#1.5 for smaller details.
Get as many glasses as I have colors out, add a clean, damp cloth to the bottom of each, and set one empty piping bag into each as well, with the opening of the piping bag folded over the rim of the glass. Fill the piping bag with your royal icing. I find it easier to fill the bags with icing when I have two hands free.
Twist the openings of the piping bags closed, and tightly secure them with elastic bands. Work over your icing bowl so that the icing dripping out of the tips doesn’t go all over your work surface. Rest your finished decorating bags back in the glasses until you’re ready to use them.
*
Outlining Cookies/Piping Techniques:
Practice piping on your work surface so that your hand gets some practice before you begin the cookies. I usually find I need a few minutes to play around before my piping improves. I decorate my least favourite cookies, or my extra cookies first; that way if I make a mistake it won’t matter as much!
Outline the cookies first, and wait at least 15 minutes before you flood the inside of the ‘dam’. If the outline is a dark color such as brown or black, I wait 24 hours before flooding the cookie. It lessens the chance that the colors will seep into each other. If you live in a humid climate, air conditioning or a dehumidifier will help prevent color seepage as well.
I should also mention, that if you don’t like the look of the outline on the cookie, outline your cookie and fill it in right away. The icing needs to be at medium consistency for this… not too runny or it will just flow everywhere, and not too thick or it won’t settle smoothly.
To outline the cookies, hold the bag at a 45 degree angle and position the tip at a corner of the cookie. Put enough pressure on the bag so that the icing comes out and start moving towards the direction you’d like your icing to flow at the same time. About a centimeter after you’ve begun your outline, start lifting the piping bag away from the cookie, so that the icing just falls onto the cookie. Start coming back closer to the cookie when approaching another corner. If the cookie is more intricate, or has more corners, you may not be able to just let the icing fall as there won’t really be room to. Also start to apply less pressure as you approach the corners. While decorating, every once in a while I twist and tighten the top part of the bag to create pressure so that the icing flows well.

Flooding/Filling In Cookies:
When your cookies are ready to flood use a #3 – #5 sized piping tip. The larger the cookie the larger the tip. Start at one area and quickly zig zag back and forth until you’ve covered your cookie. Don’t worry if you haven’t filled in every little spot; speed is more important at this point. If there are a few spots that haven’t quite filled in once you’ve basically covered the whole cookie, use your piping bag, a toothpick or a paintbrush (used only for food), to push the icing around and fill in the gaps.

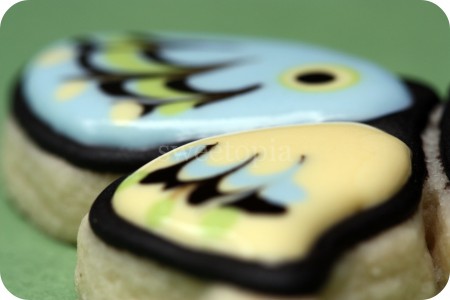
If you would like to add more icing colors to your cookie so that they ”meld’ into the base color, you need to add it right away. The base layer starts to dry quickly so you need to add your next colors as fast as possible. For example, I added these two black lines and one colorful line and then drag a toothpick through them.


The ‘eye’ of the butterfly is then made by layering a few colored dots on top of each other, with the white or light color second last and black last. Dots are easy to make; position your piping bag straight above the area you’d like to pipe and gently apply enough pressure so that just a dot comes out of the tip. Stop the pressure on the bag and lift it away. Take your next color and keep layering, making sure that your dots get smaller each time.


Fill in each wing or every two wings at a time.

Packaging and Storing Cookies:
Let the cookies dry for 24 hours before you package them.
If you’d like to store them in tupperware instead of packaging them, stack them with the largest cookies on the bottom and the smallest, most delicate ones near the top, and insert parchment paper between each layer. Store in a cool, dry area. I try to make mine no more than one week in advance, and advise people to eat them as soon as possible! They should be eaten within one month for sure. Some people claim they are fine even up to 3 months, however, I’m a firm believer in “the sooner, the better!”

I hope this tutorial has helped you! I welcome any questions or feedback… Have I forgotten to mention something? Do you need clarification on anything? Please ask or let me know!
If you like learning with video, you can also find me on YouTube, by clicking here.
Have fun creating!!
xo,
Marian

 For some other butterfly cookie examples see this older post here.


A couple times after the icing dries I have white spots on them. Do you know why this happens? They looked awesome the day before and it’s not every cookie.
Hi Renee, here is a post for you:
https://sweetopia.net/2011/07/how-to-avoid-spots-on-icing/
xo
sorry but this may seem like a silly question….is powdered icing sugar for this recipie the same as powdered confectioner’s sugar?
Hi Teresa,
Yes, that’s right, powdered icing sugar is confectioner’s sugar. Happy baking!
The recipe seems like it makes a lot of the icing. Once made, can I separate the full recipe amounts into bowls to make different colors and then put those amounts into bags and proceed? I only need 2 or 3 colors.
Or will the effort of getting the right consistency be lost if I divide it up and continue to stir it and add colors, etc?
I tried a different recipe last night and made super ugly discouraging practice cookies. I will try your recipe and instructions today for practice session 2.
Thank you!
Hope it goes well, happy decorating!
Dear Marian: I am new to cookie decorating and your websites and youtubes have been so helpful. Thank you for sharing! I have a question:
I am using a the meringue powder (Wilton Meringue Powder) that lists cream of tartar in its ingredients (potassium acid tartrate), although it doesn’t indicate the amount). Should I still add cream of tartar when I make your Royal Icing recipe posted on this blog?
Hi Deborah, I do, but I have also run out of cream of tartar in the past and made it without, which works too. So yes, you can make the icing without it. The cream of tartar helps stabilize/set the icing. Happy decorating!
Hi! Thank you so much for these tutorials. I am somewhat new to the fancy decorated sugar cookie game and was wondering how you dry the cookies for 24 hours prior to packaging? Do you store them in an airtight container (unstacked?) or have them sitting out flat to dry?
Hi Haley,
Here is a video for you:
https://sweetopia.net/2012/01/video-how-to-dry-cookies-decorated-with-royal-icing/
Happy decorating!
Hi Marian-
I am so enjoying your tutorials and recipes! Can you tell me what brand clear vanilla extract you use? I have read about all different brands but they all seem to have pros/cons. Thanks!
Hello!
I’m so thrilled that I’ve run across your blog. I have been commissioned to make lingerie cookies next month and couldn’t seem to find a place to ask this question and your butterfly tutorial seemed to present the exact situation that results in my question. So here goes!
Essentially, a heart shaped cookie will be used to imitate a set of bra and panties. I plan to make the “skin” portion of the heart skin colored. My question is… would you recommend outlining the “skin” and subsequently outlining the bra/panties, allowing that time to dry, and THEN flooding? Or do the outline and the flood at the same time?
From your super handy photos, it would appear that the outline of the butterfly has dried.
Warmest Regards,
Janie
Hi Janie, you can do it both ways. I’d recommend checking out my cookie decorating basics videos here; https://www.youtube.com/playlist?list=PLF8KHtSkZqH-45BbmJDxx57jn3fY7DCnE
Have fun decorating!
I love your tutorial. I’m new to this way of cookie decorating and it was very helpful. My question has to do with storing the finished cookies. I made some for my son-in-law’s birthday, but the weather isn’t cooperating for us to have the party. We’ve had to postpone for three weeks. Is it possible to store the finished cookies that long? Can they be frozen? Any help you can offer would be greatly appreciated. Thank you!
Hi Sheila,
I don’t freeze decorated cookies a lot, but it can be done. Here is a post I’ve shared about it:
https://sweetopia.net/2011/03/freezing-decorated-cookies/
This post on the shelf life of cookies might be helpful too:
https://sweetopia.net/2012/02/how-long-do-decorated-cookies-stay-fresh-what-is-the-shelf-life-of-decorated-cookies/
What is a good flavor of royal icing for pumpkin flavor cut out cookies?
Thank you
I just use vanilla. Have fun baking and decorating!
I was wondering how do you get the dark color not to bleed into the others-for example the designs on the butterflies wings. I get you need to let the outer edge set before flooding.
Second I’ve had instances where my cookies seem to crystallize after a few days-they look beautiful the first day or so but then I can see sugar crystals bursting here & there.
Hi Debbie,
Here are a few posts to help with the bleeding issue:
https://sweetopia.net/2009/10/how-to-prevent-your-icing-from-bleeding-7-tips/
https://sweetopia.net/2011/07/how-to-avoid-spots-on-icing/
Would you have a photo of the cookies with sugar crystals bursting here and there, somewhere online that you could link to please? It would be helpful for me to see exactly what you mean.
Thanks!
About how many cups does the royal icing recipe make? Do you have any recommendations for determining how much royal icing is needed for X number of cookies?
Love your site! This has been more help to me than anything else I’ve seen! I made icing on Monday night and on Tuesday, it was odd looking in the piping bags. It looked like it separated. How long can you keep icing; exactly how do you store it? I wanted to mix up several batches, color it and practice on wax paper. My lines are awful! HELP!!!
Hi Rosalee, thanks so much!
Here is a blog post for you on that question:
https://sweetopia.net/2011/01/how-do-you-store-royal-icing-and-how-long-can-you-keep-it/
Hope that helps!
Hi!
I was wondering what tip would be the best for writing on a cookie? I would like to try fancy calligraphy/lettering on my Christmas cookies. Since the writing will be the last thing I do, how long should I wait to do it after I decorated the cookies? Thank you!
Jen
This is my first time icing cookies, my wife found your tutorial and I have to say I really am impressed with your tutorial. It’s very thorough and easy to follow.
Im making one batch but have split them into different colors (but only when I need them otherwise I leave it all in the original batch. I haven’t had time to ice them all but I’ve really liked the ones I’ve done so far.
Thanks for the fantastic tutorial!
Thanks so much Jon, and Merry Christmas!
Is there a way to ensure that the Royal icing will dry shiny? My experience with your recommended recipe is that the icing dries dull.
Hi MaryJane,
I love the shiny look too and wrote a post about the issue… near bottom of post, here; https://sweetopia.net/2011/11/gluten-free-coconut-cupcakes-with-coconut-frosting-shiny-royal-icing/
So do you use the same ‘5 – 10 second’ icing for both piping and flooding?
Hi Cassandra,
I often do, yes, but if I need different looks/textures I change up the consistency. Thicker, for example, for more texture.
Hello,
How long does your recommended icing recipe last for?
How do you recommend storing it?
Thanks so much for your help and inspiration. Clever Lady!;)
Hi Adella,
Here is a post for you on exactly those questions. xo
https://sweetopia.net/2011/01/how-do-you-store-royal-icing-and-how-long-can-you-keep-it/#:~:text=Freshest%20is%20always%20best%20of,make%20sure%20it's%20perfectly%20smooth.
Hi Marian! I am a beginner and last night I made several different recipes for Peppermint sugar cookie cutouts. And omg it was deflating to say the least! I found this recipe however and the dough seemed to come together perfectly! They are chilling at the moment and then I will pop them in the oven! I will definitely let you know how it went and I may have found my favorite influencer! Thank you!
-Cassandra