
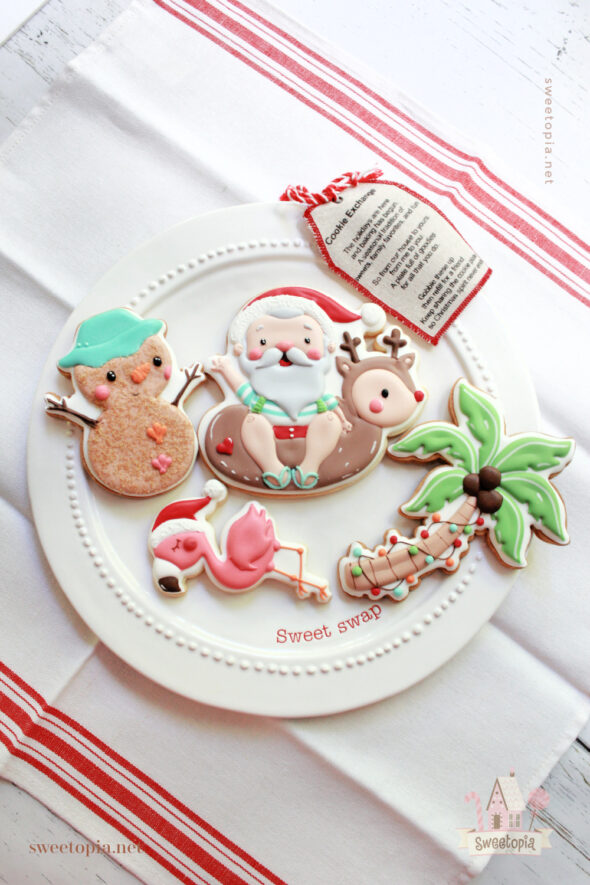
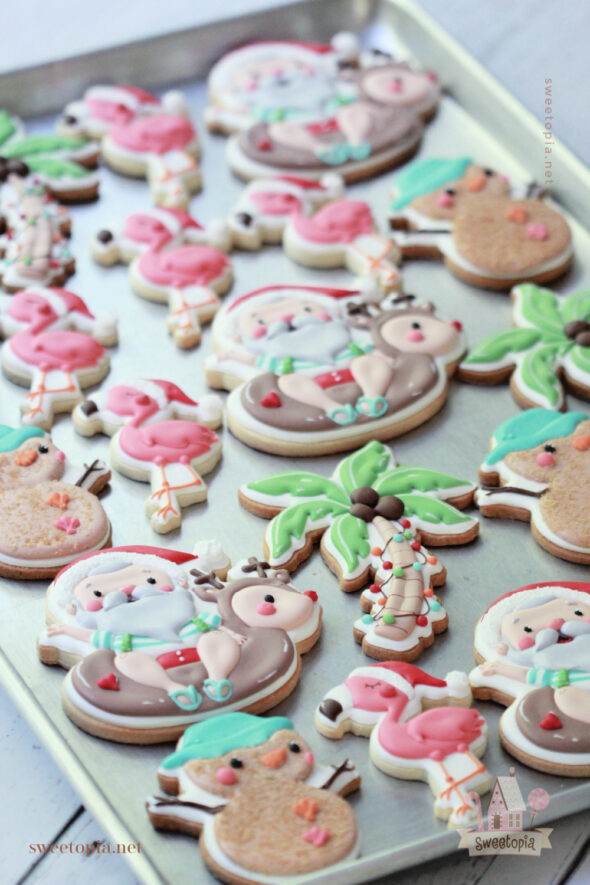
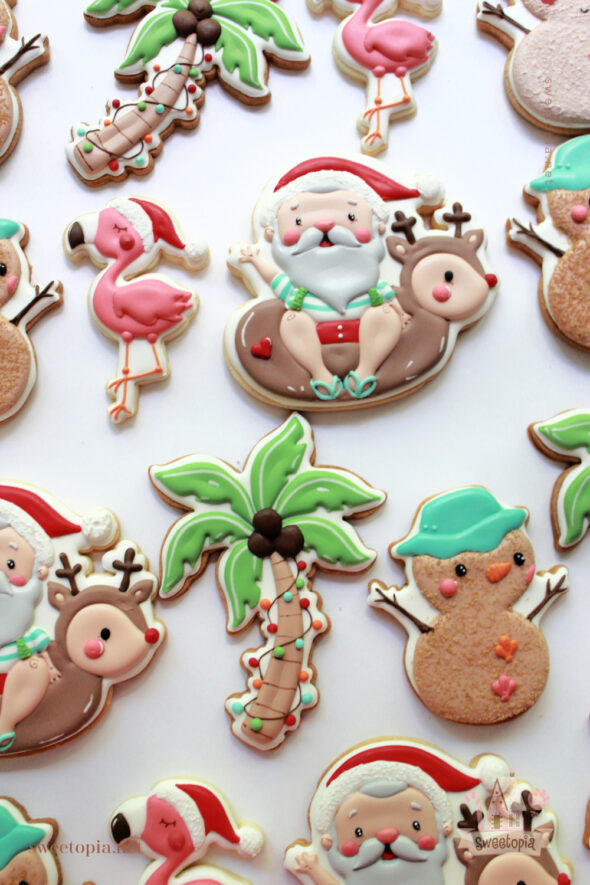
A little late for Christmas in July but perfect for a tropical Christmas! Whether you live in a warm climate during the holiday season, whether you plan to travel, or just for fun, these cookies would be a lovely way to celebrate.
I’ll be sharing a decorating video and tips on each cookie design below. Please feel free to ask questions in the comment section or on social media. Have fun decorating!
Video – Tropical Christmas Cookies
If you can’t see the video, click HERE.
If you enjoy watching the video on different platforms, I’ve listed the various places on social media you can find it:
YouTube (slower version)
Projector for Tracing on Cookies
The decorating techniques might be easy for those talented at drawing, but since I’m not the best at it, I like using a projector to help with the design. If you’d like to try the projector for this or other projects, my tutorial is HERE.
One thing I didn’t know about is that plugging my projector into my laptop would cause wavering rainbow-like lines in some of the video recording. I think the sun shining on the larger screen caused it. I couldn’t see it on my cookie, but the camera picked it up. You’ll see it here and there in the video – apologies!
Royal Icing Recipe and Icing Consistencies
You can find my favorite royal icing recipe here. The consistency of icing is key for easy decorating. Click here to see a YouTube video on finding the right icing thickness.
Complete Guide to Royal Icing PDF
You can find my Complete Guide to Royal Icing Consistency here.

Cookie Recipe
I used my Cream Cheese Rollout Sugar Cookie Recipe for these. If you’d like to try a different cookie base, other recipes can be found here.

Cookie Design Icing Consistencies
All the icing consistencies are medium, unless mentioned otherwise. You can find my Complete Guide to Royal Icing Consistency here.
Cookie Cutters and Designs
The cookie designs are not my own, they are from licensed clip art made by one of my favorite artists on Etsy, MyCuteDoodles. She doesn’t have the files available right now but they will be very soon. You can also find the art with your purchase of the matching cookie cutters, from Tracy of Wella Cookie Cutter Co., HERE. Tracy makes beautiful cutters and does custom orders as well.
Cookie Decorating Basics
Here are some posts which take you through cookie decorating basics. If you’re a beginner, you can use these videos as a guide to basic decorating. I’ll mention details unique to each cookie in each cookie section below:{Video} Cookie Decorating Tools & How to Fill a Piping Bag
{Video} How to Outline and Flood Cookies with Royal Icing
{Video} How to Dry Cookies Decorated with Royal Icing
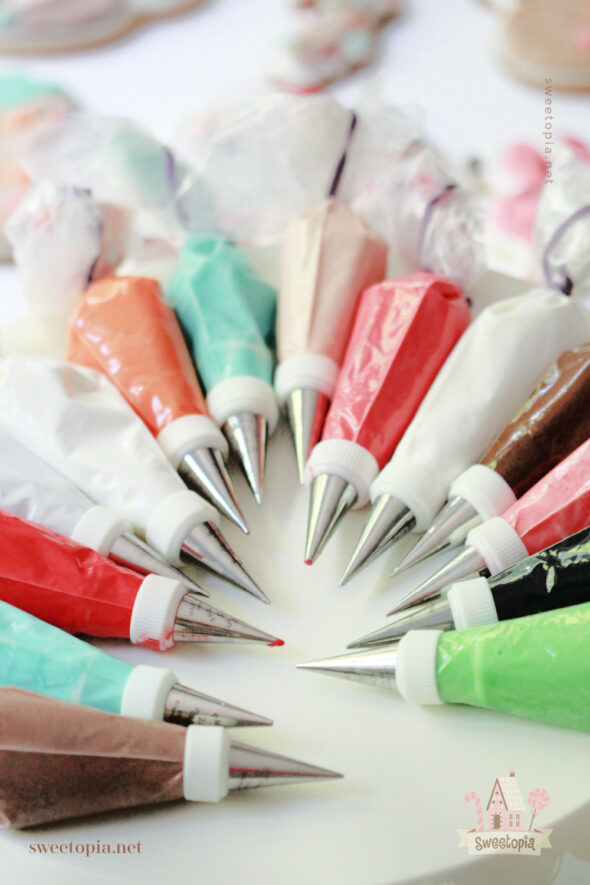
Decorating Tools
What you’ll need (The Amazon links are affiliate links):
Piping Tips 1.5
Piping Tips 4-6
Piping Bags
Tipless Piping Bags
Couplers
Americolor Gel Colors; Avocado, Espresso, Forest Green, Aqua
Wilton Gel Colors; Pink, Brown, White
Rainbow Dust ProGel Colors; Pink, Cream, Poppy, Lemon, Sunflower, Strawberry, Ice Blue
Scribe Tool or ToothpicksRainbow Dust Edible Ink Food Coloring Pens
Pico Projector or Magnasonic Projector
Arkon Remarkable Creators Phone and Tablet Stand (20% off with coupon code sweetopia)
Piping Bags
In terms of piping bags, I mainly used tipless piping bags for very fine details and PME 1.5 piping tips for most piping, and larger piping tips such as 4 to 6 to flood larger surfaces.
Puffy Royal Icing
If you’d like some tips and tricks on how to get that puffy royal icing look, I have a Digital Download Tutorial in my shop.
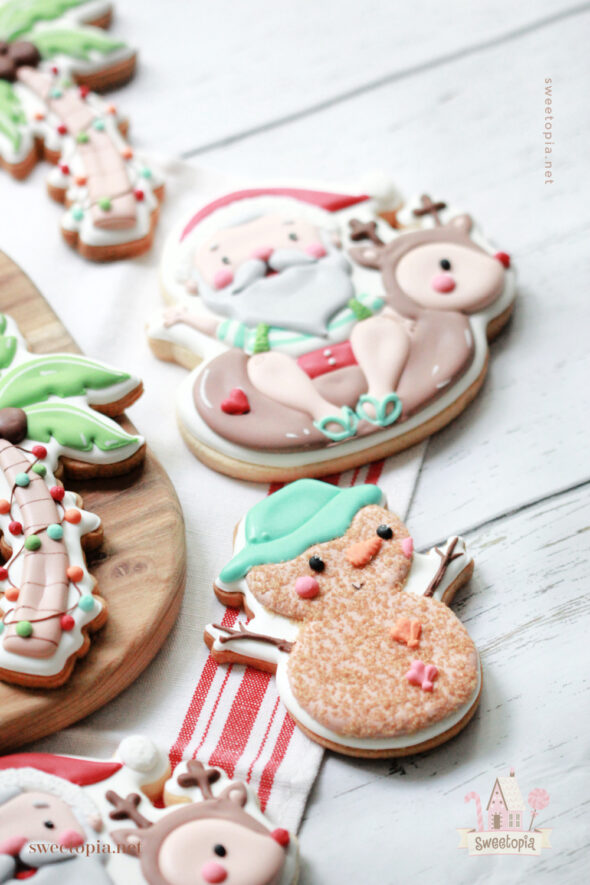
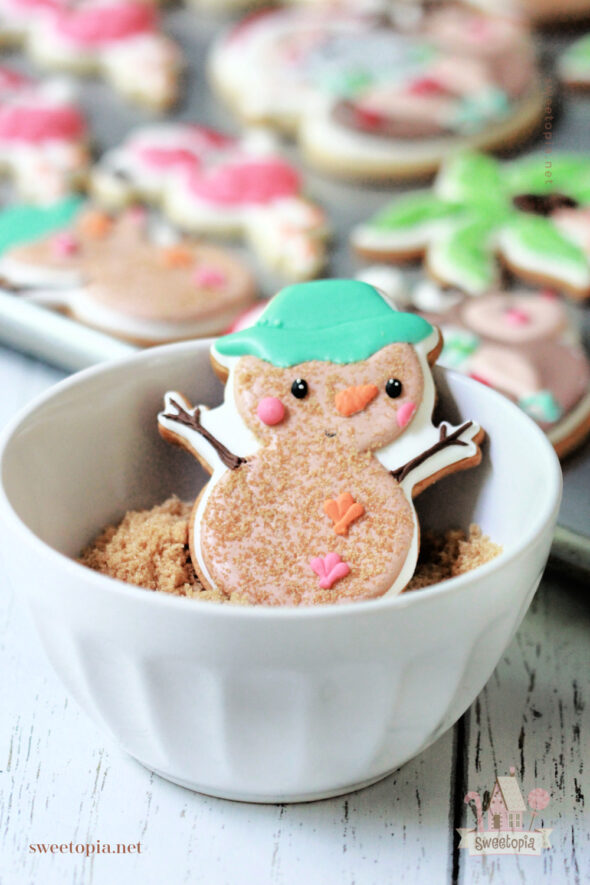
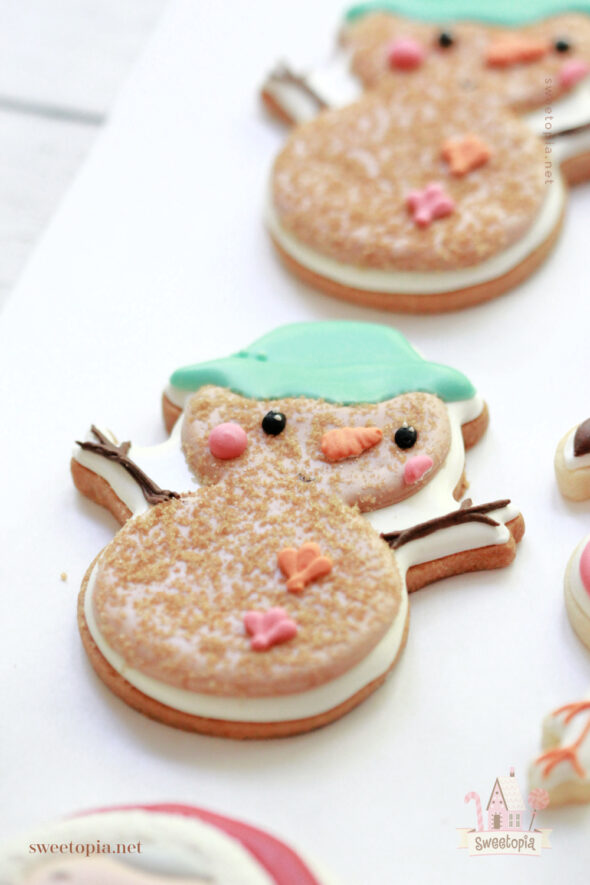
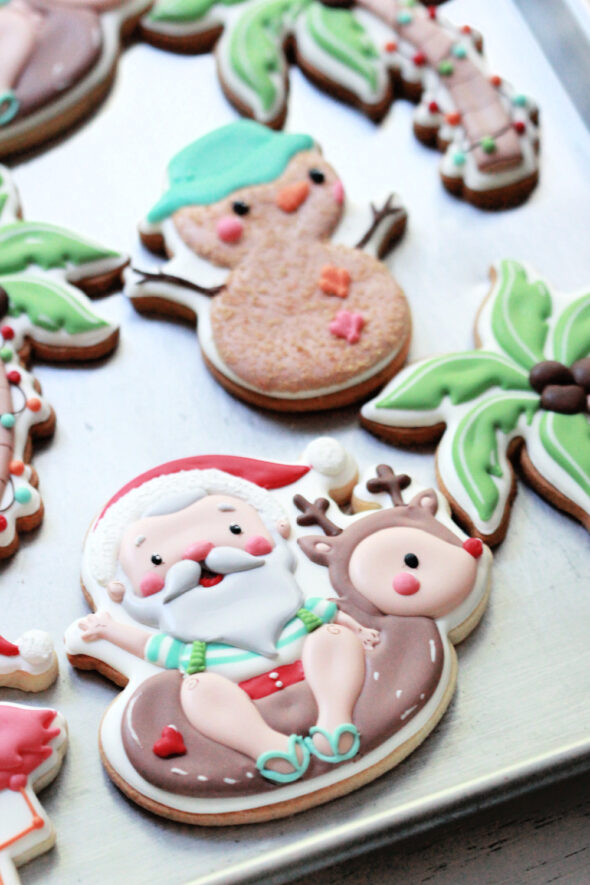
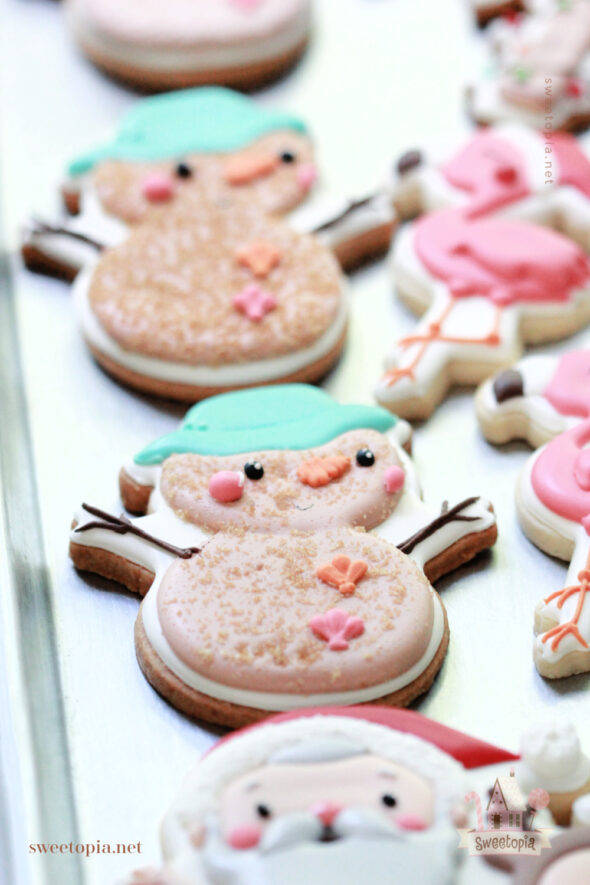
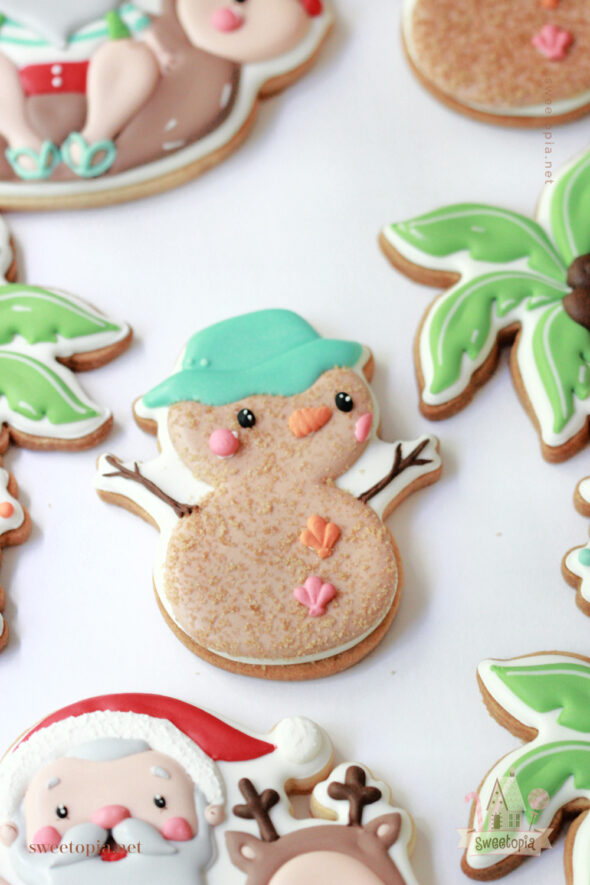
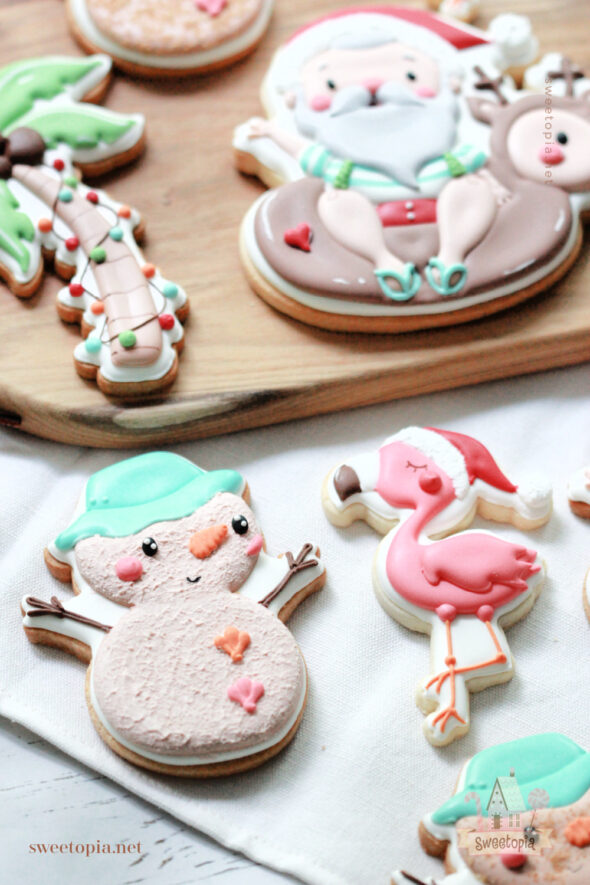
Sand Snowman Cookie Decorating Notes
I tried a few techniques to create the sand look on the sand “snowman”. Just a little bit of brown sugar, more brown sugar, and an icing stippling technique which I’ll explain shortly.

On the photo above, the sandman on the top left and bottom have brown sugar on them in varying amounts. Easy to add when the icing is wet. The sand snowman pictured top right and in the photo below, was also easily created, it just took a little waiting time. Once the flooded base is dry, pipe some icing on the sandman’s surface and dab at it with a dry paintbrush, until you get that stippled look.
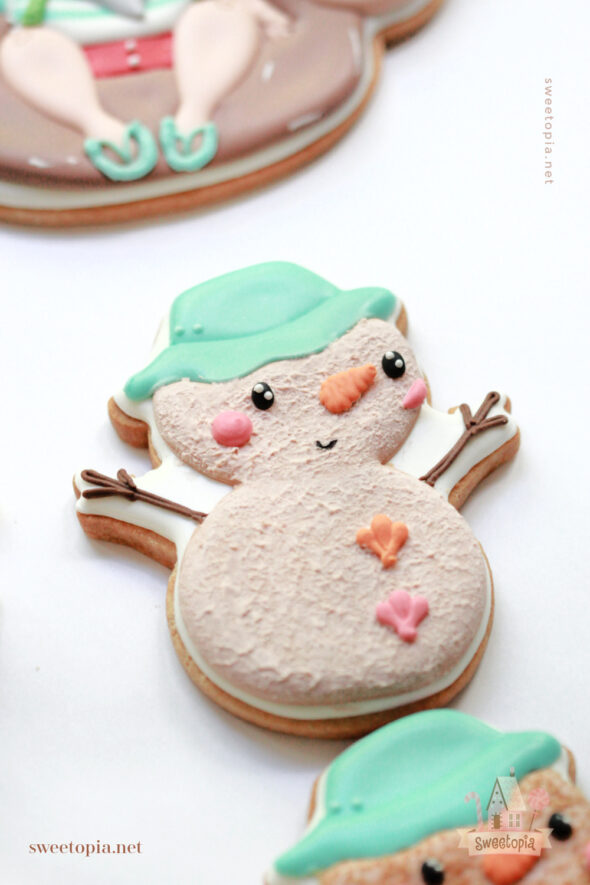
Because I knew the surface of the snowman would be bumpy and harder to pipe directly on, I made royal icing transfers of his face and shell buttons.
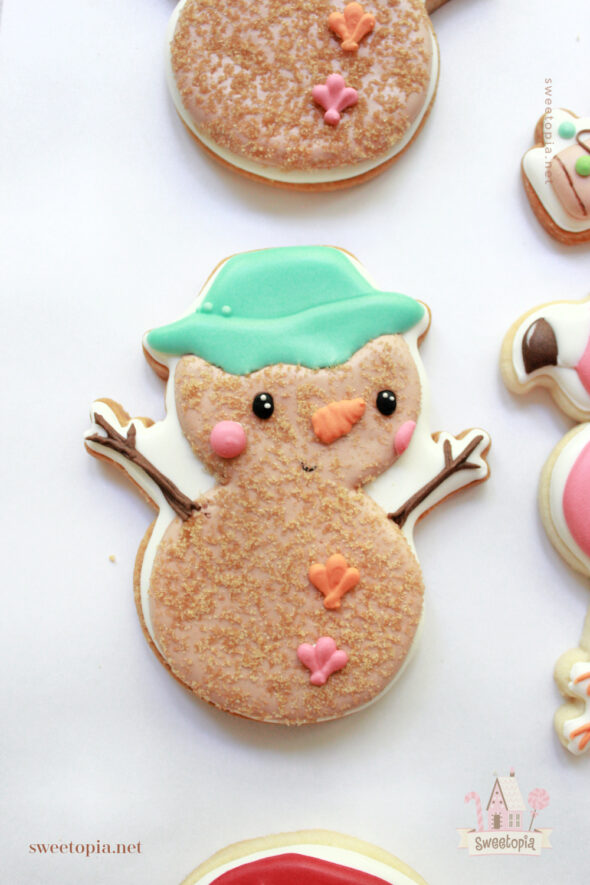
To make the royal icing transfers, simply pipe royal icing onto a transparency sheet (or parchment paper), lightly greased with shortening, and let the icing dry for 6-24 hours. Peel away carefully and you have a royal icing decoration.
Here are a few videos & tutorials where I’ve shown how to make royal icing transfers:
{Video} How to Make Daisy Cookies
How to Do Royal Icing Floodwork or Runouts
The icing for the dark brown arms and orange carrot nose was medium thick so that a detail more 3D detail could be seen.

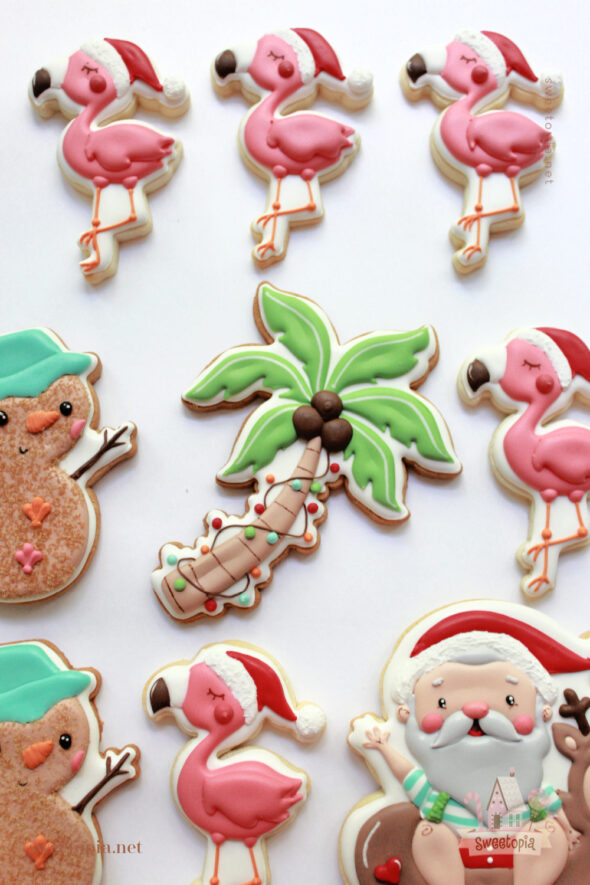
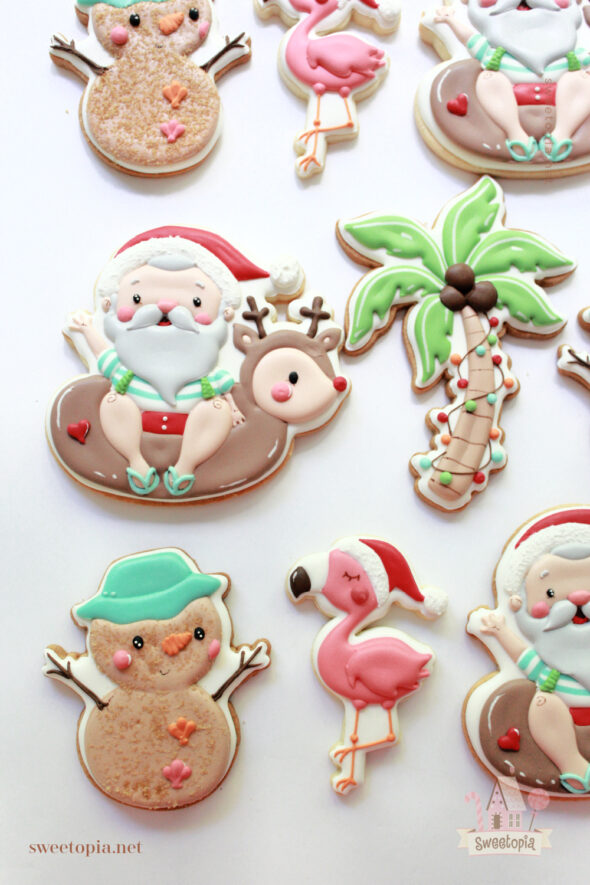
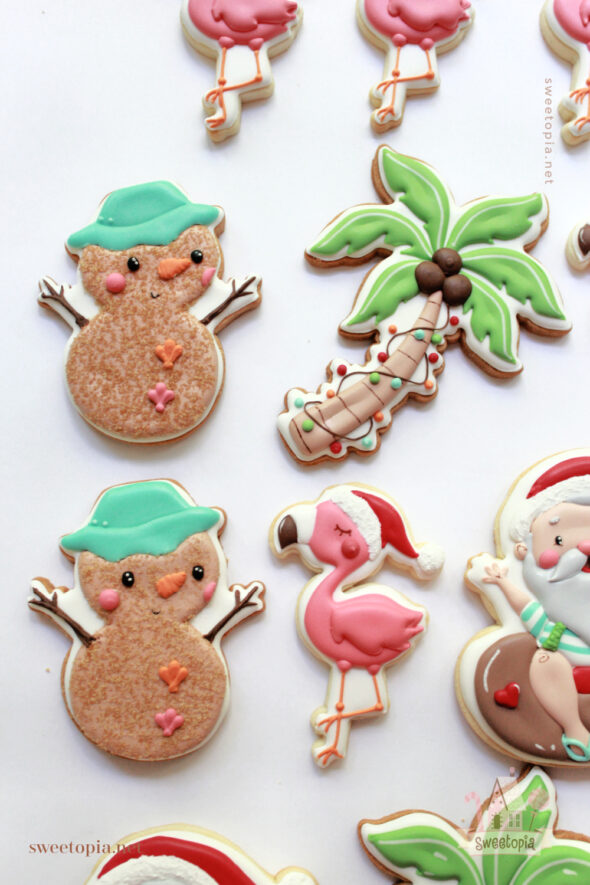
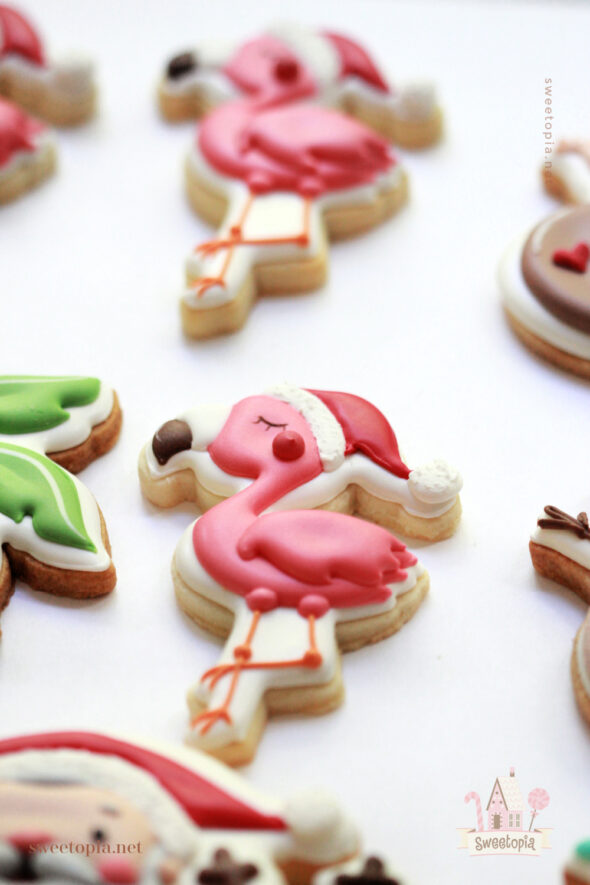
Flamingo Cookie Note
This one was pretty straightforward and easy to decorate. One little note… Wait for the base body to set a few minutes before piping the wing.

Humidity Note
It’s a very humid time of the year where I live, so I took a few cautionary steps to ensure my colors didn’t bleed together, especially for this flamingo. (Deep red and pink right beside white tends to bleed easily). Here is a post for you on that:
How to Prevent Your Icing From Bleeding
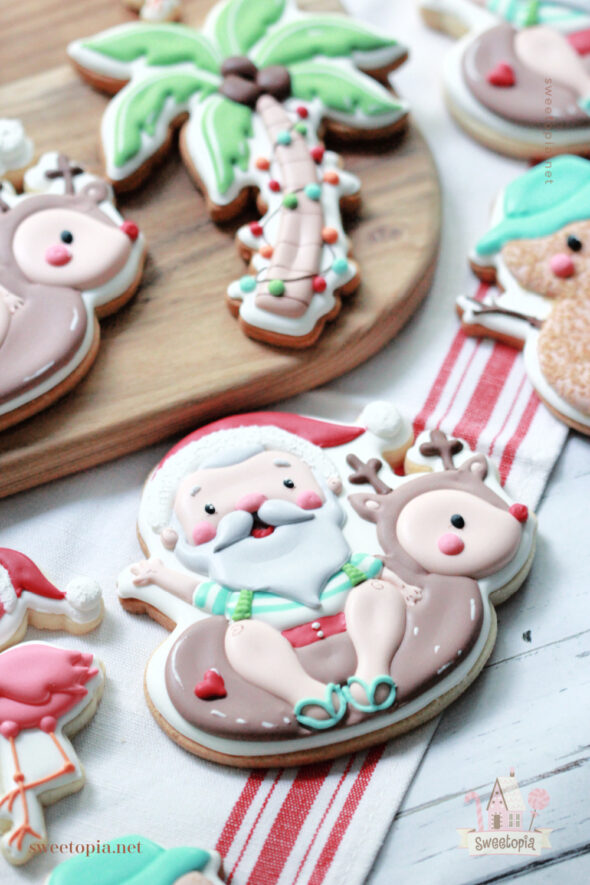
Palm Tree Decorated Cookie Notes

This cookie was straightforward as well, although an area I could have improved on is the thickness of the icing for the tree trunk and coconuts. Both were a little too runny, so the middle sunk in a little.

Use thick brown icing for the string of lights for finer detail.

I waited a few minutes between piping each coconut so that they’d hold their shape better.
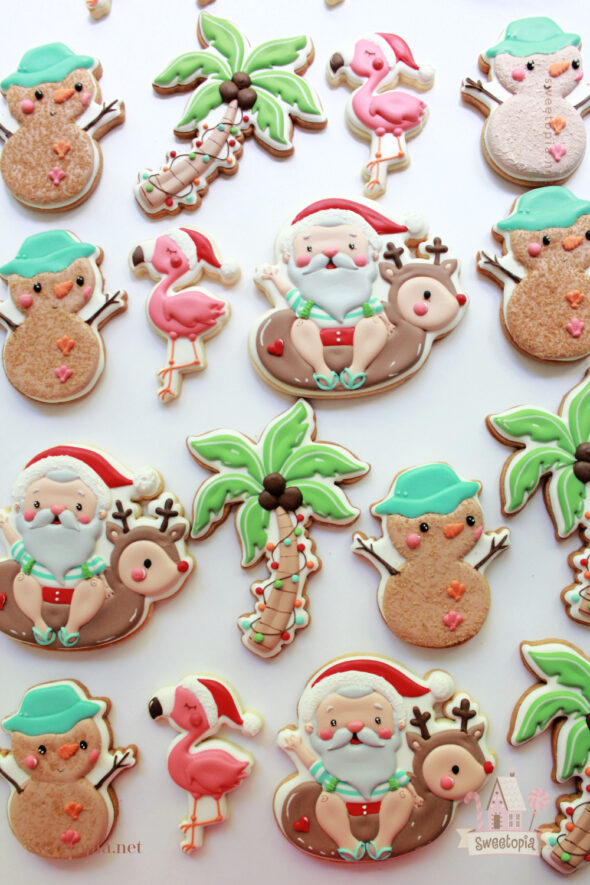
Santa Claus Cookie Notes
This cookie took longer than the others due to the amount of layering. The order of colors piped, along with drying time in between, were key factors in preventing bleeding colors. Check out my notes on humidity above in case you missed it.
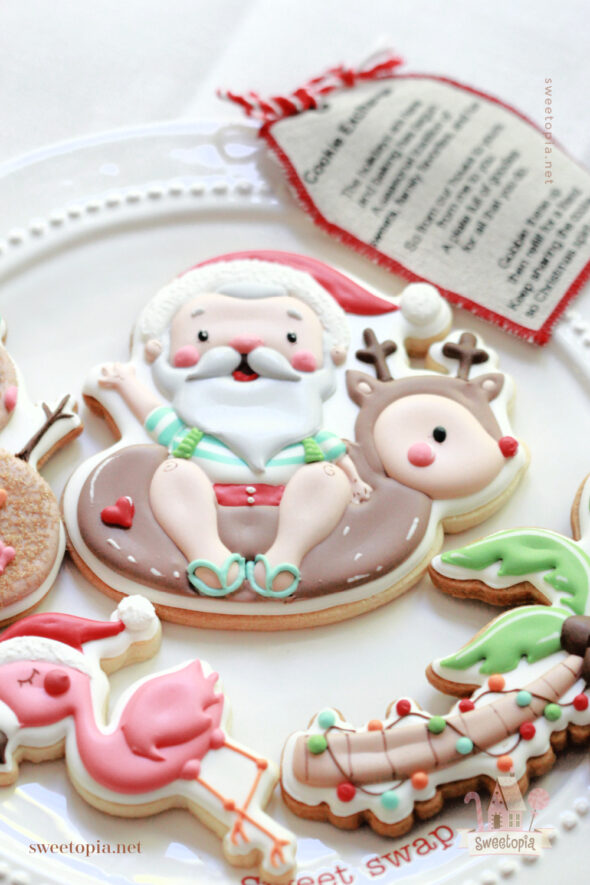
The brown of the reindeer floaty could have been a little thicker. The icing sunk and a few craters formed during drying as a result. I patched the craters with a little bit of icing, but it’s noticeable if you look closely.

Other than that, the Santa is actually pretty straightforward in technique.
I think those are all the basics! Please feel free to ask me any questions in the comment section or on social media. You can find me on Facebook, Instagram, Pinterest, Twitter and YouTube.
Happy decorating!
xo,
Marian


As usual, your cookies are stunning! My son lives in L.A., so I may send him some palm tree ones. Thanks again for sharing, Marian!
Thank you very much Marguerite! Have fun making them!
I tried this recipe and it turned out really good. Thanks for the recipe.
Thanks Rosse, I’m so glad you liked it!