
Little craters in royal icing have always been a bit problematic for me. There doesn’t seem to be a whole lot of information on them out there.

It’s been a bit of an experimental journey, but my main theory was that air in the royal icing was causing the indents.
When it began to dry the icing would settle and air trapped underneath would ‘pop’ open, leaving a little crater.


On the off chance you hadn’t noticed them:

Before I go on, I have to mention that following the tips to avoiding air bubbles is good practice when decorating cookies with royal icing (for tips click here).
There might be something more to these little indents in the icing though. The only thing I can’t figure out is why it usually happens in smaller flooded areas. I’m no scientist, but guess there must be some physical/chemical reason behind it.
*
I emailed the extremely talented Cookie Swap![]() author Julia Usher, just before I posted my Valentine cookies, in the hopes of finding the definitive answer. Here is her reply:
author Julia Usher, just before I posted my Valentine cookies, in the hopes of finding the definitive answer. Here is her reply:
… Funny you should ask about the crater issue – that’s one problem with icing that I haven’t figured out how to reliably correct. I have most trouble with it when, as you said, trying to flood a particularly small area. I actually don’t think it’s an issue of air bubbles, though, but one of surface tension. When wet, the icing looks fine; but as it dries, more surface tension and pressure on the drying skin causes the icing to sort of collapse into itself. The smaller the area, the more concentrated the surface tension – if you will – and the more likely the icing is to collapse. That’s my theory anyway. I can sometimes minimize the cratering effect by thinning the icing and applying less – using a toothpick to spread a smaller amount within the same area. The more I heavily flood a small area, the more it seems to collapse. If you come up with a better solution, let me know!!
*
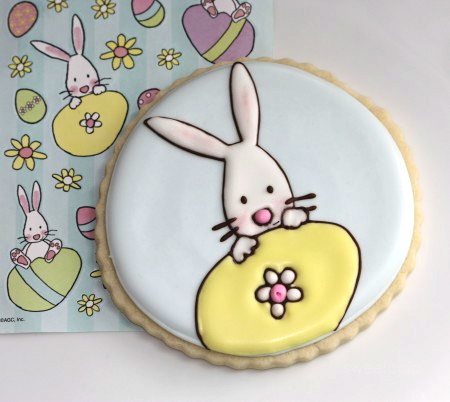
So, to experiment, when making these decorated Easter cookies I filled many areas with a little less icing.

The beak, because of its small size, would be a typical place where a hole might occur.

No craters! Hurray! Thank you Julia!
This is going to sound ungrateful, and I don’t mean it to be! I’m just thinking more experimentation might be in order because I still prefer the look of a ‘full’ flooded cookie.
*
Since I last posted about how to prevent air bubbles some feedback was also provided by Noelle and Nancy in the comment section of the Valentine post, who seem to be thinking somewhat along the same lines as Julia.
Besides using less icing to fill in an area here’s what Noelle offered as a solution:
… My mentor finally decided that it helped to use a hand mixer on the royal icing that was being used in the small space. She would whip it for 5-10 minutes and use it immediately. She swore that it cuts down on the holes but I could never really tell a difference.
I recently tried a royal icing recipe out of one of the Cookie Craft books and it used lemon juice for the flavoring. I did not get any bubbles like these when I used it. It had a really nice flavor too, but I noticed that it separates much more quickly than traditional royal icing. I wonder if there’s something with the lemon juice that reduced the incidence of bubbles? Anyone else have a similar experience with that?
Interesting! In my response I wondered if the acidity of the lemon and/or the amount of liquid in the icing had anything to do with it.
*
I’d also like to know why the craters occcur in some areas covered with a thick layer of royal icing and not others?

*
Lots of ideas and questions. It would be great to hear your feedback on this issue. What do you think? Has anyone else tried the tips mentioned here with success? Any new ideas, theories or information to build on what we have here? Would love to hear from you in the comment section!
*
Just a side note for you too… I’m happy to share with you that Julia Usher of Cookie Swap![]() will be sponsoring a giveaway for her book on Sweetopia! That’s coming soon. 🙂
will be sponsoring a giveaway for her book on Sweetopia! That’s coming soon. 🙂
*
I usually get emails regarding how to make cookies I post (if I haven’t explained it), so for anyone interested in a visual guide on making these Easter cookies, below are some step-by-step pictures:
*
Easter Cookies – Decorating Steps
If you’d like to make these, you’ll need:
4. Decorating Bag/Piping Bag![]() – (I use disposables
– (I use disposables![]() which can be washed and re-used)
which can be washed and re-used)
5. Couplers![]()
6. Decorating Tips![]() (#’s 1
(#’s 1![]() –4)
–4)
*
For an in-depth Cookie Decorating Tutorial see here, and for my Top 10 Decorating Tips see here.
*
This is the order in which I piped the details of each cookie:
1. Base of Royal Icing

*
2. Outline Shapes
Of course I made these using a Kopykake Projector![]() and some cute Easter stickers. You can freehand if you’re able to.
and some cute Easter stickers. You can freehand if you’re able to.


3. Flood Cookie


*

**
4. Bag and ribbon

*

*

*
Hoppy decorating!
xo,
Marian
p.s. Thank you for your emails; I love hearing from you! I’m a little behind though; if you’re waiting for a response I haven’t forgotten you and will reply soon.
p.s.s. I dusted the Easter bunny ears and cheeks using a paintbrush and pink luster dust


I have to say that I have this problem too. It only occurs in very small spaces and I don’t think it’s air bubbles.
My theory is that the icing puffs a bit while drying, the space is so small it has nowhere to go, so it bottoms out. I try to not fill with so much icing. Which stinks because you don’t get as nice a puff, but you also don’t get the craters.
Good luck!
L
Ok so I commented too soon. You already found my answer!!
Lovely as always:)
Marian….I’ve always thought it was “just me.” It always happens to me on small areas, too. Or, I’m left with an indentation….thicker icing near the outlines and a dent in the middle.
One thing I’ve been trying…and I’m not even sure it works, is: once I’ve filled the area completely, spread it to the corners with the toothpick, etc, I swirl the toothpick around the area in a figure 8 pattern. I *think* it is helping. I need to do a comparison next time I fill small areas. And you’re right…why does it happen in some and not in others?
LOVE your posts….SO want a KopyKake!!!
I am DEFINITELY no expert (Ive only done royal icing cookies about twice in my life :P)
But maybe if you do that same thinned out version that you did above would work…but since you want it thicker maybe letting it dry completely and doing ANOTHER thin layer on top? that way 2 thin layers = 1 thick layer?
lol dunno just my two cents 🙂
Marian, BRILLIANT post! You got to the bottom of the ‘implosion’ problem.
Julia Usher is correct. It’s all about expansion and contraction. There are two ways to prevent this: (1) as you stated, fill the teensy-weensy area with less royal, (2) add the color to the teensy-weensy area, let dry, and then add the outlining (or as I call it ‘overpiping’) later. #2 is definitely more challenging, because it changes the entire way your cookie might look. But, it’s better than those craters, which infuriate and sadden me at the same time.
Lemon juice: I always use it in my royal because I have a theory that because it’s an acid, helps accelerate drying, and diminishes the chances of bleeding. That said, it also accelerates the breakdown of the egg white’s protein structure.
Sheesh…this answer was practically a blogpost unto itself!
Those Easter cookies are beyond precious. You have such a good eye for sophisticated, yet adorable images! LOVE IT!
YOu totally need to end that with “Hoppy Decorating” to match your ribbon!
This was a WEALTH of info… fantastic job Marion!! Has anyone told you today how awesome you are?? Cause you are!! I think of you as like a Cookie Doctor. And not only do you try to prevent “illness” (bubble) you help cure it when bad stuff (BUBBLES!!!) happen!!
Rock on girl.
Blessings!
Amanda
I love your cookies! I have a question for you. For the bunny cookies, do you use an edible ink pen to do the light pink bunny cheeks and ears or just very light pink icing? The cheeks look so naturally flushed and cute!
thank you thank you marian…great, great tutorial…excellent…if i could decorate like you i would take the craters!!!
your easter cookies are delightful, whimsical, lovely & charming!
enjoy the day…. 🙂
Hmmm…such an annoying problem. I don’t typically outline mine to the extent that you do and hence I am not flooding as many small areas as you are. Usually when I am doing finer details, I flood the base of the cookie first then pipe on the details once the base is dry. It does, as Gail said, change the look of your design, but it is better than bubbles.
As for bubble prevention in general, I do similar to what Bridget said which is swirl a toothpick around and around to break anything up that may be in there. I spend about a minute per cookie searching for these little guys!
Your cookies are of course adorable as usual, and a great inspiration! Happy bubble hunting!
Marian,
I too have this problem with the crater in a small flooded area. I’m going to try what you suggest about only flooding with a small amount of icing. It drives me crazy when this happens. Thanks for addressing it! Your cookies are spectacular. I want that kopykake projector too! (how many times have I said this to you??). Maybe next year!
Marian, you always have the most informative and useful posts. I think I can safely say we’ve all been there with air bubbles and those pesky craters. You are a brilliant cookie artist and I am in awe of your Easter cookies (as usual)!
I will continue to be amazed by your work and your wonderful blogging :). Oh happy day and congratualtions on all your deserved successes!
Renee of Kudos Kookies
Sorry I can’t advise on this isuue…But I just wanted to say what great posts you have! I think YOU should write a decorating book 🙂
Laura C; So glad you stopped by to comment, and I’m SO glad I happened to check my spam folder (weird… I actually never check it and I just had the urge to a minute ago and your comments were in there).
I totally agree with you on the ‘solution’. Wouldn’t it be nice if we could actually know for sure what was happening!? Know any food scientists? ha ha ha
Anyways, thanks for dropping by and happy decorating!
Thanks Pehrnilla from Sweden!
Bridget; That’s so true about the sides too. I sometimes think it’s the way I’m piping… more icing pools at the ends because my piping bag covers that area more. Maybe? That deserves a post too I think. Thanks for the figure 8 pattern idea; I will try it!
Zahra, great idea!! Who knows – it might work! Thanks for the input!
Gail, thank you for your brilliant answer! Answer #2 sounds like a good alternative; will try that out for sure! Interesting info. about the lemon juice too. I appreciate the detailed comment as will other readers I’m sure!
Amanda, well Hoppy Decorating to you! I changed it right away LOL… love it!! Thanks for the laugh!
Amanda #2 🙂 There’s a link for you under my p.s.s. as to what I use for the ‘blush’. Sorry it was probably a bad spot to put it… easy to miss.
Susan, I hope you get your wish soon!
Thanks Linda, Linzy and Jaime as well!
ít´s amazing.No tengo palabras contus galletas y tu blog
Marian, as you know I’m a total newbie to cookie decorating and had great success with your recipes. I googled and noticed this comment. I do use a paddle on my kitchen aide and had no bubble issues and I really flooded my cookies and had some small areas as well. Don’t know if this is the answer but I figured it’s worth a shot:
? What causes air bubbles in my icing?
Air. Are you mixing your icing with an electric mixer? If you have a free standing mixer use the paddle, not the whip. When your icing is mixed, tip the bowl to a 45 degree angle, take a large spatula and stir it slowly in a back and forth motion. This should eliminate most of the bubbles. When you add the liquid to create your flow consistency icing let the icing sit, well sealed, for an hour or so. If a pesky bubble shows up on your cookie, take a tooth pick and pop it.
Hi,
Your Easter sugar cookies look amazing. Not only are the bunnies so cute, but the chicks, eggs, and flowers are so adorable. Do you sell your cookies or other baked items? I’d love to possibly buy some cute iced cookies, because any cookie I ice definitely doesn’t turn out like that!
You never cease to amaze me with your talent. The cookies are so cute. Wow is Easter coming that quickly….
Hi Marian,
I always put lemon juice in my icing so I don’t feel that is the solution to preventing craters. I always use a hand mixer so not a solution either ;o(. I have found only 1 thing that seems to work I make the icing leave it over night remix before using. Note be careful when using lemon juice in RI it actually changes the color of your food color particularly pink, solution add color mix well before adding the lemon juice.
As always great work, Marlyn
Brilliant, as usual! I just had a cookie order this weekend that looked great when I went to bed, then when I woke up, those small flooded spots had all the little craters. So frustrating! I will try these ideas as well.
The Easter cookies are fabulous. I love how you find cookie ideas in different places than we might think to look.
I love having cookie mentors.
🙂
I love your blog and have learned soooo much! Thanks.
I am wondering if this is a job for Alton Brown? Isn’t he a “food scientist”? I bet he would take this on 😉
Thanks again.
Such beautiful cookies!!! thanks for going into so much detail to solve this cookie mystery. It’s a quite frustrating experience when that happens on my cookies. I will try your tips and I’m sure they will help me out too.
Keep the excellent work!
You are very creative!
quiero felicitarte por tu pagina y por las cosas ricas que haces.
Soy una principiante y estoy aprendiando mucho de los tutoriales.
Gracias por compartir todo lo que sabes.
Un beso grande desde la Argentina Patzi
I love your blog, it is amazing!
I was doing a research on What causes air bubbles in my icing? I found this question on:
http://www.kitchengifts.com/faq.html#? How do I know my royal icing is the right consistency?
Air. Are you mixing your icing with an electric mixer? If you have a free standing mixer use the paddle, not the whip. When your icing is mixed, tip the bowl to a 45 degree angle, take a large spatula and stir it slowly in a back and forth motion. This should eliminate most of the bubbles. When you add the liquid to create your flow consistency icing let the icing sit, well sealed, for an hour or so. If a pesky bubble shows up on your cookie, take a tooth pick and pop it.
oh how cute and beautiful! 🙂 Lovely lovely lovely! 🙂
I am so thrilled you have shared with us how to ice cookies. It is skill I have just recently learned thanks to you and Annie from Annie’s Eats. I do have a question about storing the cookies as you ice them. As is takes many days to get each layer of icing dry and set you must store the cookies, do you wrap them up in plastic or in tupperware? I can’t imagine leaving them out on the counter wouldn’t do any good for the cookies. Thanks for everything. Thanks Kate
Oh my God!!!! I am not alone!!! I thought it was only me….
Yes the tiny holes happen when you decorate on top of a thin layer of icing. At first I though it was that the bottom icing was not properly dried….
In my experience, these holes can also be caused by the day old icing… I mean, you have made the icing beforehand to cover the bottom, left it to dry, and then use this icing for the second outline and second flood icing… I find that I can never get the consistency of this leftover icing right. Never.
When I have cookie orders, and I have to fill in a second layer, I always use fresh icing (just made) ( I mean, I do not reuse the left over icing)…try to get a thicker consistency than usual on the flood icing, and make sure with a toothpick ( as Bridget said) that you swirl it completely to avoid any air bubbles trapped between the botom and the top layer…..And it seems to work
I never use lemon on the icing.. only trasparent Wilton extract… which dries quite well..
Your cookies are amazing!!!
Thanks for sharing!!!
B
I hate those pesky air bubbles, thanks for the tips!
Maybe you’ve answered this somewhere and I missed it but what do you do with all the cookies you make?
Thank you Migue, Kimberly, Michelle, Rossana, Olga, Patzi, Maria, and Heba!
Thanks Rose and Rowaida for your air bubble information! If you’d like to check out some more info. I also have a section on How to Prevent Air Bubbles in Your Royal Icing.
Amy and Lisa, I don’t do orders but thank you for asking!
Marlyn, thanks for the air bubble and lemon juice info.!
Lisa, fantastic idea to ask Alton Brown! Hmmm… I wonder if he would consider figuring out the dilemma? Or maybe he already knows. I’ll see if I can find out!
Kate, yes I do actually leave them out for 24 hours to dry. You might be able to get away with 5-12 hours, depending on how humid the environment you work in, is. I don’t because I want to make sure that my icing colors don’t bleed into eachother and I don’t have a temperature controlled environment.
You could actually keep a cookie ready just for experimentation purposes and cut a piece off to see if the icing is dry inside. (Or maybe even taste test 🙂
If you leave the cookies in a container to dry, even a little moisture in there or in the icing can affect the drying time or make colors bleed.
I find the icing on the cookie actually acts as a sealant so that the cookie doesn’t dry out. Of course I’m a little biased, but try it out and see what you think!
Bea thanks for the tips! They sound great!
Have you triede drying the iced cookies under a hot lamp? It might do the trick with the craks.
Lisa, I usually give them away to friends, family, neighbours, give them as thank-yous to people who’ve helped me out in some way or another. These Easter ones I gave away to my high school students in class… they were prizes for getting some answers right in a verbal quiz about Safety & Sanitation in the kitchen.
Thanks for the input PiaMarianne! Something to try!
You are crazy talented…seriously, I’m in awe.
And you just convinced me to buy a KopyKake Projector.
Thanks for your great tutorials!! :o)
wow I love the cookies you make! They’re really really really cute!! I have to find out what the KopyKake Projector is now..
Marian,
I just recently came across your webiste and I love, love, love your cookies. Thanks to you I just used disco dust for the first time and I just love the way it changes the whole look of the cookie.
Like everyone else, I fight the “air bubbles” too. I make my royal icing with the liquid egg whites and lemon juice (Joy of Cooking Royal Icing recipte). I always use a hand mixer (easier for me to judge the consistency), and if I let the icing sit for even 15 minutes, the bubbles come to the top and then like you I stir the frosting gently before putting it in bags. It hasn’t completely omitted the bubbles, but letting it “rest” definately has cut down on the amount of bubbles by 75%.
Until reading this post, I didn’t know that the lemon juice speeds the drying but one of the reasons I don’t used the powdered egg whites is because the drying takes so long, and always stays a little soft.
Thanks for all your tutorials.
Once again, this post is amazing! It really is making me want to try it out :} One step at a time, but you’re an inspiration!
Hi Marian,
just a quick note:
Have you ever tried to dry your icing cookies in the oven? – very low temperature, obviously.
I did r.i. cookies just once but I put them in the oves at 30°C with the door of the oven a bit opened: I’ve read that the surface of the icing has to crust as quickly as possible to avoid sinking in the middle and to have a nice shiny surface.
Just a thought…
Thanks for sharing your tips with us,
Donatella
Wow! They are very cute! I am always amazed by your piping skills and fantastic designs!!
I love your Easter cookies! They turned out wondeful, great job 🙂
you are an amazing cookie artist! Love the cute bunny cookies!
Would love to add this to my Easter Carnival.
Thanks, Lori
I really love your blog and your cookies!!
The designs are great and a real inspiration.
I followed a workshop Royal Icing last week and learned that a teaspoon of cream of tartar in the icing helps to prevent air bubbles…
Thanks everyone!
Marielle de Vroome, the recipe I use (see Cookie Decorating Tutorial in the Tutorial section), actually has cream of tartar in it. Maybe I’ll try more and see what happens. Thanks for the tip and compliments!
Love all your cookies Marian!! You are beyond amazing! Thanks for taking the time to put together these tutorials! Sooo helpful! 🙂
I always use a Heat Lamp to dry my icing for a number of reasons – No colour bleeding; quick drying time means I can proceed with each step/layer faster cutting down the decorating time; heat lamps are Awesome in humid weather when cookies can take forever to dry; and….. I (almost) never have Craters! 🙂
That’s so interesting! Thanks for the info; I’m going to have to try that!
I was just surfing the web and have an interest is cookie decorating. I stumbled across this discussion of using royal icing to flood areas with color, and the air bubbles, or indents that occur, especially in small areas. Interestingly enough, I’m also a jewelry maker, and I was just watching a video of an artist using doming expoxy resin to fill an enclosed area which is is the same concept as your overfilling to get a puffy look. The artist commented that while drying for 24 hours(expoxy dries slower than frosting I would assume), he said that air bubbles would sometimes appear and suggested you check often and pop them. He also mentioned something about surface tension, that you shouldn’t force-spread the expoxy to the edges, that it is better to let the epoxy flow naturally to the edge. This helps the surface tension stay intact and gives it the puffy surface.
This, in my opinion, would be a good thing to do while frosting cookies, because if you move the tip all around the cookie to fill it, there is a larger chance that, even though minute, you are probably cathing small bubbles of air that rise to the surface once they sit for a bit. This may be an even bigger problem towards the edges where the outline piping undercuts, being a round little string of icing, and could be why the tinier areas are the worst for bubbles. In these areas the icing has the least amount of room and time to flow on the surface before hitting the mid-point of the round edge, catching the tiny amount of air under the edge. The surface tension on the thicker icing causes the edge of the flowing icing to curve under itself. The curve on the piped edge meets the curve on the flowing icing, trapping air.
I think the suggestion of using thinner icing is a good fix because it flows across the cookie better. But DON’T fill with this completely. I would suggest to make some of the icing very thin, thinner than you want for the finished cookie. This thin frosting will more easily get into that little crevace around the edge. Fill in the area (or possibly just around the edges of each section) with a thin coating, especially letting it flow under the curve of the piped edge, (potentially use a pin or a thin toothpick point to help get the icing under it). Try to fill halfway up the line of piping to the widest part, not trapping any air. Once that is done, and while it is still wet, you can take the thicker frosting and fill in section to the level you desire. I would make two other suggestions…
First, after mixing the frosting, let it sit, covered for 5 minutes to let the air bubbles rise to the surface and pop. You may even want to tap the bowl on the countertop to help force them to rise (like burping a baby). When filling the piping bag, try to add little to no air back into it. You may even want to let the piping bag sit for a few minutes, tip down, to again let the bubbles rise (to the farthest point from where the icing comes out).
Secondly, let the icing flow by itself to the edges, slowly filling from the center point of the section, only adding frosting into that single pool you’ve created. This will trap as little air as possible as it covers. If you do need to move to fill an area in the same section, that has a narrow area which the icing won’t flow through, (like the bunny ears), start a second pool, but watch when the 2 pools meet, and take a pin and gently stir the two areas together, popping any air bubbles. The thick icing should flow fine into thinner icing, covering it, and not creating air pockets. If left to flow on it’s own to the edge, the surface tension will give you the nice puffy effect.
I hope this helps. These cookies are just the cutest! I’m going to try this one of these days.
Cheers, and happy baking!
Cara
Cara,
THANK YOU so much for your in-depth reply! The time and consideration you’ve given
replying is impressive! I really appreciate and look forward to trying out your
suggestions.
Please let me know when you try cookie decorating, and/or feel free to post you pictures
in my facebook group.
Happy decorating,
Marian
Surface tension strikes again!!! Those implosions are not air bubbles, but, rather sink holes. In this case, those implosions occurred because the royal you used wasn’t stiff enough. It hit the already dried royal, wanted to spread out and puff up at the same time. Hence, it imploded.
Remedy: Whenever you want to pipe details on top of a flooded cookie, use more of a stiff consistency. It will hold its shape better, and dry faster without any heartbreaking potholes.
And, please refer to an earlier reply I posted about filling small piped areas w/ royal. I agree w/Julia Usher….fill piped smaller areas w/ less royal and you’ll diminsh the odds of implosions.
Thanks so much Gail!!
Hey marian remember me?I’m hanady I live in
saudi Arabia I asked you about the amazon anyway I love your cookies very much usually I use a hand mixer to do royal icing and it works very well sure I have air bubbles but not that much and I also use a toothpick to reach edges of the small area so I don’t have to use too much royal icing and it works
Thanks so much Hanady!