
These ideas aren’t ones that necessarily help the actual decorating of cookies; they’re the practical tips that make the preparation and overall experience faster and easier. Hope you find them helpful!
If you’re interested in tips on the decorating process itself, I’ve got an in-depth tutorial here and my top 10 decorating tips here.
*
Practical Ideas for Decorating Cookies – Top 10 Easy Tips
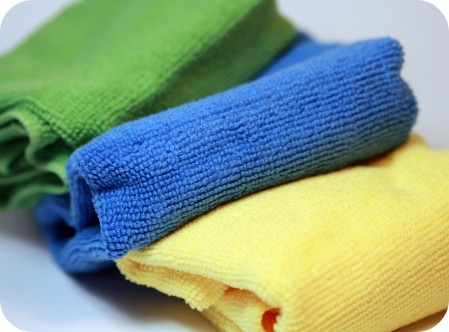
1. *Cloth – Keep a damp cloth nearby to wipe royal icing off your piping tip. The key for me is to use a microfibre or lint-free cloth, otherwise little teensy fibres from other types of cloth get into the icing or onto my decorated cookie.
I found these at the dollar store!

2. **Clear beading containers – I use these storage stacking containers to store my piping tips. Originally used for beads, they’re great for all sorts of small objects. The only drawback is that they can sometimes be finicky to close.

You can find them online or at any craft store (usually in the beading aisle).

3. **Piping tips and couplers – Having lots of piping tips and couplers available makes the decorating experience much easier because you can prepare many bags of icing at once and change tips easily without having to stop and wash them.

I keep my couplers in a box also found at the dollar store.

4. **Elastic bands – Have them handy to tie off the ends of your piping bags so that icing doesn’t escape when you aren’t paying attention!

5. **Clear disposable piping/pastry bags (See a few pics above) – Although they might not be as strong as polyeurthane piping bags, disposable ones are my favorite. They’re clear so you can easily pick out the color you need and they’re washable and re-usable. If you’re wondering about using parchment triangles
; some people do swear by them, I however, am useless at shaping them and feel dread whenever we have to use them in a cake class. 😉
The squeeze bottles are another option, especially great for kids. I find piping bags easier to fill so use those instead.

6. 88Toothpicks or pins – Always keep a toothpick or pin nearby; they’re great for popping air bubbles in piped icing, unclogging tips and marbling your icing. (If you’re not sure what marbling is there’s a definition in this glossary).
*
7. **Glass of water – Keep a glass of water near your sink so that you can drop piping tips in there to soak a bit until you’re ready to clean them.
*
8. **Place for piping bags – Arrange as many glasses as you have piping bags with a damp paper towel or cloth at the bottom of each. Rest your piping bags in them between uses. Wilton has a special stand for this purpose but I still prefer using the glasses.

9. **Spatulas only for royal icing – Grease (fat), from buttercream for example, can affect the texture of royal icing, so the spatulas I use with it are designated only for royal icing. I also keep piping tips used for buttercream separate as well. No worries if you can’t do this (I’m playing it extra safe); just wash utensils well with vinegar and then soap and water.

10. **Tip cleaning brush – The purchase of this tiny brush, specifically designed to clean out your tips, is one you won’t regret. Cleaning tips kind of drives me crazy for some reason, and this little brush makes the job so much easier!
*
Hopefully these tips help you. I’d love to hear more ideas! If you’d like to share, you’re welcome to leave a comment below.
xo,
Marian


I think our cookie decorating areas must be identical! I will second every single tip above!. I also use a tumbler for filling bags, and I only fill bags half way (much easier to decorate with a less full bag). I have a yellow tool, a “boo boo stick” with a point on one end (unclogging) and a small scraper on the other, but have had a hard time finding it retail. But having a small knife or spatula handy for scraping mistakes is useful, too.
thanks for these great tips! I’ll be sure to post a link to your site (again) on my column (ediblecrafts.craftgossip.com)
Thanks so much Meaghan for the tips and the link to my site!! I’m flattered to be picked for your ediblecrafts.craftgossip.com column!!
Marian – you are the best for adding this post. Now I have the tools to get me started – I certain if you hadn’t shared my experience wouldn’t have had the same outcome…I love your blog and your cookies too! Once my blog is finished – I’ll email you.
Oh Marion… how you make my life easier!! I LOVE these tips and just crave more of your insights and wisdom!! Thanks for sharing all this! You are the best.
Blessings-
Amanda
GREAT tips!!! Thanks for posting this!
great, great post!
while obvious & simple to you these “tips” are invaluable…
please keep them coming….THANK YOU!
Found your blog from the Half Baked cake blog…and I love it! Can’t wait to read more!
These are such great tips. I couldn’t think of what to store those decorating tips other than a ziploc baggie. I can’t wait to use some of these great ideas. Thank you!
Your blog gets better everytime you post something new 🙂
I too use all of the tips above. You got me all excited when I saw the Wilton icing bag holder, until I realized that my fill icing will leak everywhere! I’ll stick to my method of folding the bag in half and standing it tip up in a plastic cup. Oh well.
Thanks for the comments!!
Noelle; agreed! I thought I should mention it as an option but find it a hassle to put the Wilton stand on top of layers of cloths to stop the leaking. Glasses are still my favorite!
Thanks so very much for visiting my blog and commenting! Great minds think alike I suppose!!!! 🙂
Oh and if you need any cake tips…feel free to email me…but You are so talente, I am sure you would have no trouble at all jumping into cakes!
I meant..you are so “talented”
what an organization ! I am fan !
Thanks for your marvellous tips.
I am getting ready to start and I know I will find here everything I need to know.
Regarding to disposable icing bags, do you really use a new one every time or is it possible to wash them and reuse ???
thanks
Thanks for coming by and commenting!
Andrea, you can wash the disposable icing bags many times!
I must not be eco-friendly! I never thought about reusing the disposable icing bags, I keep buying them in bulk!
Me too then! 🙁 I don’t always wash them; it depends on how busy I am. The ones I do wash last quite a long time though… Throw them out usually because a seam has popped. (Happens with thicker icing more, not so much flood icing).
GREAT tips, Marian. You’re such an inspiring nstructor. I always use plastic squeeze bottles for flooding, as I find them easier for larger projects. And, they’re reusable.
I have been dying to try frosting cookies with royal icing. Thanks for the tips!
I just found your site via Little Birdie Secrets, and OH. MY. WORD. You are amazingly talented!!!! I’m adding you to my Reader (and BFF list. and Want to Be Like Her list!) =)
Marian…this post is THE best!!! Great tips! I want some of those cute containers for my tips…mine are not so cute on a baggie! 😉
I had never thought about microfiber cloths. That is so smart!
You’ve left nothing out. Everything anyone ever needs to know about equiptment and tips for storage. Great post!
I’m so tired of sifting through my tips! What a great idea! I’d love to hear more about your cookie supply organization – like how do you store/organize your sanding sugar/sprinkles/dragees/discodust/coloring gel? Seems like mine are spread throughout my entire house! Also, what type of lens are you using on your camera? The detail in your photos is AMAZING. YOU are AMAZING!!
I worked at a bakery and we used the little sets of drawers found at home improvement shops that most people use for nails and screws. We had two of them… they held all of our tips. We labeled them by size, of course. We even had the larger drawers for those really big tips. 🙂
BTW, I finally broke down and bought PME tips. They’re stainless steel and they clean up in a breeze. Worth the money, if you’re a serious decorator. Now, I have to buy those clever stacking clear containers for the tips! Why didn’t I think of that??????
I have two tools that I think you will be happy to know about! I just love getting and passing tips along…
The first one is a blue plastic tray with a spout on it. It is used by scrapbookers when pouring embossing powder on their work. The spout has a cork that pops out to make pouring the waste back in the bottle nice and convenient. Works amazingly for sprinkles ;)http://cgi.ebay.com/ws/eBayISAPI.dll?ViewItem&item=390059512692 I’ve seen them at Michael’s.
http://www.fantes.com/images/7283seafood.jpg This is the link for my favorite tool of all. It is originally made for eating crab meat, but it is perfect for spreading icing, popping bubbles, correcting mistakes, scooping food coloring, and removing icing from bottles. It is better than any toothpick I’ve used!
I hope that you pass the word along. You’ll be so happy with these products. And thanks for an amazing blog!
Thanks for the kind comments everyone!
Lisa, what AWESOME tips! Thanks so much!!
these are great tips – never thought about the microfibre cloth – but great idea!
You’re a great coach! Thanks for sharing what you know, your cookies are beautiful.
I’ll also add, for those like me who have to fail to learn….make sure your tips are DRY before packing away. I use a hairdryer sometimes to finish them off. I had to toss some rusty tips once and swore to be more careful. For cutters…wash and put in the still warm oven to dry completely.
Thanks again!
Super tips Anne, thank you!!
I read that you hate cleaning your decorating tips. I got a hint to cleaning them. Put all your dirty tips in a plastic food storage container like gladware. Fill it with hot soapy water and shake back and forth for several minutes. Empty, rinse and do it again. Let it set over night and the next day, drain and rinse again. It has cleaned my tips each and every time.
I will be reading your blog now that I have found you. Thanks for the great ideas!
Hi Heather,
I don’t like cleaning them – so true! I have tried the method you mentioned but found they didn’t always get 100% clean. Maybe because I didn’t leave them over night though! Thanks so much for sharing!!
To an amazing lady, I need help. I have been working with royal icing ( I also use fondant) to decorate my cookies, however I am having trouble writing. Even if I make a piping mixture consistency and a #2 tip, the icing is always too runny to write. I have just tried the icing recipe with the light corn starch but found that even though it was a lovely shiny consistency, I still cannot pipe with it. Marian, help, the delightful pictures you show above with the little girl, what mix did you use to pipe this outline, I am desperate.
Sue, I use Peggy Porschen’s or this recipe here.
Try this recipe the way you usually do your icing consistency, and if that doesn’t work, you just need to make your icing a little less runny.
I have a cookie decorating tutorial here with many of my favorite hints and tips.
Let me know how it goes and hope that helps!
The easiest way to clean tips is to put them in a small glass bowl COVER with water add a few drops of liquid soap and put them in the microwave for 3-5 minutes. They come out spotlessly clean and shining bright.
Where did you get those cute spatulas?? I want one!
@ Nikki:
It’s been a long time, so I can’t remember this one for sure, but I think I bought them at Williams-Sonoma.
I am a cookie decorating “newbie” – enjoyed reading your tips!
My decorating sessions (cookie, piping, and flooding) however, are taking me up to 4 hours!
Any tips on speeding up the icing process?
Krista, there’s no question that decorating cookies take time! There isn’t a whole lot you can do to speed up the icing process besides things like:
-do many of one kind/design and follow a type of assembly line process. (i.e. Pipe all the bases first, pipe all of the next color/design next etc.)
-in terms of drying time, some people put their cookies in an oven with just the lights on or under really low heat, and let them dry there. I’ve also heard of using a het lamp to dry them under.
-do simple designs and/or use only 3 colors to decorate
-practice also helps with speed
Have fun decorating!
Marion, I’m a newbie and I love your tips! I have a questions though, I found some squeeze bottles at the craft store for the flood icing, but where can I find the couplers to use my tips with the bottles like in your picture?
@ CathyN:
Here’s the link to where i found mine:
squeeze bottles
@ Marian (Sweetopia):
Marian: Thanks so much for the link. Love your blog!
Hola Marian, soy asidua lectora de tu blog desde hace ya un buen tiempo, admito que gracias a tus creaciones nacio mi amor por las galletas decoradas, y aunque he intentado hacer algo parecido a lo que tu haces, de ninguna manera se iguala!! gracias por todas las sugerencias y tips que nos compartes, han sido de mucha ayuda. me encanta tu blog, gracias por todo y esperamos nuevas ideas pronto. saludos desde Chihuahua, México.
Hola Elizabeth,
Estoy usando Google Translate, así que espero que esto funciona!
Gracias por leer el blog y contento de que te gusta decorar galletas! Los consejos más un poco de práctica le llevarán hasta allí!
Feliz decoración!
Marian
Hey Marian!
I was wondering if you can help me out. Normally when I flood my cookies, the royal icing is usually pretty much dry by the next day. But this time, for some reason it won’t seem to set! When I touch it it’s still tacky and leaves a mark and it kind of has a “marshmallowy” feel to it. I made it the same as usual – although I mixed it longer than I normally do so it kind of had a “meringue” consistency when it was done. Could this have been the problem? Will it ever dry or should I start anew? Thanks! -Amber
@ Amber:
It sounds over-mixed, although you didn’t over-mix so far as to make it dry into a crumbly texture when touched (which happens eventually). You can see an example of it in #3 here:
https://sweetopia.net/2010/12/10-keys-to-cookie-decorating-success-or-10-mistakes-to-avoid/
It should dry, even though it may be over-mixed, so I’m wondering if it’s very humid where you are?
When I make cookies at this time of the year (I’m near Toronto, Canada), I work in a room which has an air-conditioner *and* a dehumidifier… that ensure no bleeding, no grease splotches, and normal drying time.
If you don’t have an air-conditioner or dehumidifier, I have heard that people will put their cookies in an oven on a VERY low setting (some even put them in with just the light on). I don’t do that, so personally can’t say how successful it is.
The other thing I’m wondering; did you add any clear corn syrup or glycerine (for shine), to this batch of icing? Both of those never fully dry, so if you add it to icing, it’ll make the icing a bit tacky too.
Hopefully this feedback helps!
Hi Marian! It was really interesting and useful video, that you have posted. Yesterday I had my first experience with icing cookies to decorate a cake for my granny. You can see the result here – http://anandamoments.blogspot.com/2011/10/blog-post_09.html#more
It’s far from being satisfying, but it’s a try. And I’ll keep going. 🙂
Thank you for shearing!
@ Svetleto: I beg to differ; you did a wonderful job on them! Beautiful work and beautiful photos!