
As decorators, we know how frustrating bleeding icing can be… I remember it being one of my biggest pet peeves when I first began. It turns out that learning some tips and tricks on piping is only one step to having an enjoyable cookie decorating experience. If you don’t know the following 7 tips already, I hope they help you eliminate bleeding icing on your cookies.
First, what exactly is bleeding when it comes to decorating cookies?
Basically, it’s when one icing runs or spreads into another. Take a look at these flood work butterflies as an example here; you can see the brown starting to diffuse into the light yellow.
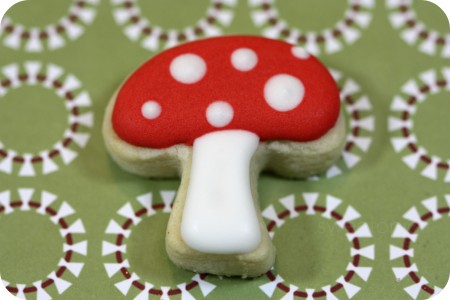
Whenever an intense color such as red or black is beside a light one, such as white or yellow, bleeding seems to happen more. The red and white mushroom cookie above has none happening though. Here’s how you can do it too:

How to stop your colors from bleeding into each other:
1. The consistency of your icing is key – If it’s too runny, your colors will tend to seep more. Especially if you’re layering a dark color onto a light one. A good rule of thumb is to follow the ‘10 second rule’. See #2 of Top 10 Decorating Tips or detailed info. at the cookie tutorial here. To be safest, your icing should gloss over closer to 10 seconds than to 5. Icing that is 15-20 seconds is even better!
2. The icing recipe is also important. I use this one. It seems to have good ‘body’. Some royal icings which are more like a glacé or glaze don’t work as well because they tend to be thinner.
3. Americolor![]() soft gel pastes seem to have better results than other brands of paste colorings, specifically with intense colors such as black, brown and red.
soft gel pastes seem to have better results than other brands of paste colorings, specifically with intense colors such as black, brown and red.
4. Tint your icing at least a few hours in advance as the colors usually deepen with time. That way you’re not necessarily adding as much food paste coloring as you can adjust your color later.
5. Let your outline or first layer of icing dry for 12-24 hours; again especially if your two colors are a stark contrast between light and dark. You can try less time depending on the humidity… Maybe 4-5 hours for a first layer, and 15 minutes to an hour for an outline, however, it is riskier.
I have to say; I usually err on the safe side. Preferably 24 hours for me!
If you have a few extra cookies, you can test if it’s dry by touching the surface (does it make a dent?), or even by biting into a test cookie.
Putting your cookies in an oven with the light on can help dry them faster, according to Colette Peter’s in her book, Colette’s Birthday Cakes![]() (p. 170). I have also heard that some people actually put the oven on extremely low and leave their cookies in for a few minutes, or some use a heat lamp and others a fan on low air.
(p. 170). I have also heard that some people actually put the oven on extremely low and leave their cookies in for a few minutes, or some use a heat lamp and others a fan on low air. I still need to experiment with that, so I can’t really comment at this point. Another future post! Update – the fan does help speed up the drying process, as does a dehydrator.

6. Never store your decorated cookies in the fridge or freezer as they can absorb moisture there. Some people say they have luck with it – If you have I’d love to hear from you in an email or a comment at the bottom of this post. Maybe the cookies are exceptionally well sealed?
7. If it’s really humid outside, use a dehumidifier in the room you’re decorating in. A climate controlled or air-conditioned room works too! Too much humidity can make the colors bleed, no matter how hard you’ve tried to do everything else right. Here’s a post with a little more information on it.
These have worked for me so far but I’m always happy to learn more; if you have any tips which you’d like to share you’re welcome to leave a comment below.
Happy cookie decorating!
xo,
Marian
p.s. Here are the rest of the fall cookies I made along with ones above. They’re sugar cookies decorated with royal icing and edged with copper-colored disco dust.


p.s.s. Since I’ve posted this I’ve had a few emails about the leaf and acorn cookie cutters. They’re from a Wilton Leaves and Acorn Cookie Cutter set.![]()


Thank you so much for the fabulous hints! I haven’t tried my hand at iced cookies but I definately want to try now that I’ve been following your blog! Gorgeous, gorgeous cookies!!
Ohhhh!! THanks for the tips… I just had this problem last weekend, and my cookies were very “bleedy”, I am sure it was because of the humidity.
Thank again, and congrats of your georgeous cookies, as usual!!!
B
Hi Marian,
thanks for the tips, I’ll definitely will try this because I have that problem a lot.
What I was wondering about: I would like to try the Antonia74 recipe for a change, but I don’t know what cream of tartar is. I looked it up but there doesn’t seem to be a translation for it in dutch. Could you try to explain what it should look like and where it comes from?
thanks!
Evelyn
This is a great post! I’ve found that consistency is the key for me, too, but I’ve never tried the 10-second rule. Thanks!
I have had luck with freezing cookies. Here’s how I do it:
Let the cookies dry overnight,
Individually bag them,
Stack in freezer baggies,
Put freezer baggies in a freezer safe plastic container to avoid crushing,
Let thaw at room temp, IN THE BAGS, for a few hours.
Oh my!!! Just fabulously amazing!
m ^..^
Marian,
this is a FABULOUS tutorial!
thanks for taking the time to post the information!
The cookies are just beautiful!!
They look awesome! I love the outline with the disco dust, what a nice added touch. They loved the cookies here too! Cory took a bunch for his friends in res. See you Wednesday. Happy Thanksgiving Marian.
As always the cookies are just beautiful! Thanks so much for the icing tips!
Absolutely beautiful workmanship! Just lovely.
Hi Marion,
Your cookies are so beautiful and I love your blog! You have inspired me to take a course at Bonnie Gordon’s school and I have done the first week and have been really happy with the results! I wanted to know how long you wait before adding a second colour directly onto another colour. For example, did you wait 24 hours prior to adding the white dots onto the red caps of the mushroom cookies? TIA!
Your cookies are absolutely beautiful!!!
Thanks for taking the time to do this post! I’m continually learning about iced cookies and experienced some “bleeding” issues just this week. I’ll be posting my fall cookies this weekend-not as gorgeous as yours, but I’m learning. 🙂
Thanks so much for the kind comments everyone!!
Evelyn, it seems to be really difficult to find out what ‘cream of tartar’ is in Dutch. I searched with the translators and on google, but the best information I’ve found so far is here: http://www.toytowngermany.com/lofi/index.php/t16812.html
It’s not even about Holland or the Dutch language; it’s about the German translation of cream of tartar. I hoped it would help as the two languages have some similarities and are geographically close, so the supermarket shelves must be similar. It looks like you can’t find it easily, but this info. might be helpful:
Cream of Tartar
Same places as baking soda and powder, as well as in regular grocery stores under the name “Weinstein”. You can use it to substitute for Baking Powder too: 1/2 tsp cream of tartar and 1/4 tsp each baking soda and cornstarch.
Bridget; thank you for the ‘freezing cookies’ tips!! I’m going to try it now!
Kim; I’m glad to hear they liked the cookies! Happy Thanksgiving to you, your Mom and the boys!
Michelle; I’ll be at Bonnie’s tomorrow! I’m so glad you were inspired to take some classes.
I added the white dots to the red right away so that the white icing sinks right into the red. If you wait 24 hours and add the white dots, they will look raised.
Christy; can’t wait to see your cookies!
Marian, I have just started emailing and visiting your site this past week…..already gained a trememdous amount of knowledge…….feel blessed to have found you on cake central. I am going to try to do the owl cookie for our fall party……will send you a photo (only if it is a success)….Happy baking, and sweeet blessings. Linda
Awww, thanks Linda R! I’m sure your cookies will be a success! Don’t hesitate to email me if you have a question. Happy cookie decorating!
Oh.my.goodness. Beagle sent me over and oh how glad I am! These cookies are amazing!! I am in total awe. And also excited at having found your page as I plan to make hampers for Christmas gifts this year including cookies. It is lovely to meet you. x
The most gorgeous cookies I have ever seen.
Absolutely adorable cookies!!! I am madly in love with the mushrooms!!! : )
~ Wendy
http://Crickleberrycottage.blogspot.com/
Thank you for posting you tips, happy cookie decorating 😉
Love, love, love your leaves! Just beautiful.
You guys really are the sweetest! Thanks so much for the kind comments. 🙂
Thanks for the tutorial! I’m not very good with royal icing, but I’m willing to give it another shot now!
I’ve named Sweetopia for the “One Lovely Blog” award!
http://fuzzykoalacakecompany.blogspot.com/2009/10/feeling-and-sharing-love.html
Can you tell me if Peggy’s recipe uses fresh egg whites or meringue powder?
All great tips! I’ve had so many problems over the years with icing.
Here’s our secret, I have a special room that fits up to 3 cooling racks (each holding 20 full sheet pans). The room is always monitored for humidity. My dehumidifier is running 24 hours a day, and we have a fan on top of that to speed up the drying. This also helps to keep the cookies dry and crunchy.
When looking at other cookies online, it seems that consistency is the biggest problem for cookie decorators.
I’m switching to Ateco colors in the near future. I’ll let you know how that works out!!
Thank you for the award Dorothy!! I’m flattered you chose Sweetopia!
Cat, Peggy provides both options; using meringue OR egg whites. I always use meringue when I make her recipe.
Laura C; thanks for the tips! That rooms sounds perfect!
oh marian, your fall cookies are just too gorgeous for words!! 🙂 your work is always so inspiring! i would love to try to make cookies sometime.
hope all is well with you! 🙂
thies are the most colourful fall cookies,beautiful work…
ML
Can you explain what the cream of tarter does for the icing? I’ve never used it in my Royal Icing and wonder how it might improve my icing. I usually add glycerine. Have you used that? Thanks for sharing!
Cream of tartar adds stability to the egg white. (Egg white powder is in meringue powder). I remember reading somewhere that it also helps add volume… to help the egg white whip up.
I know when I make my gingerbread royal icing, I make it with real egg whites, and I add a lot of cream of tartar.
I’ve never tried glycerine in my royal icing. I’ve heard it acts similarly to clear corn syrup in the icing… helps add sheen but is somewhat harder to work with. (?) Both glycerine and corn syrup are on my ‘to try’ list! If you’ve played around with it I’d love to hear what you thought if you don’t mind emailing me or leaving a comment here.
Thanks Marian for giving such an in-depth reply to my query about icing cookies! You rock!!
I am a huge fan of Peggy Porschen and did follow her royal icing recipe to the tee. Shall definitely give it another go or two or three to get it right : )
It certainly is SO deceiving how much time goes into these pretty cookies, isn’t it? And they are all about the look too, not the taste!! LOL
@ Marian:
hi Marian;
thanks for the cream of tartar info. I’m going to try it with a big cookie order I have this week. As for the glycerine, I add it because I read somewhere that it would help with sheen and consistency. Never quite sure if I put enough in though. I’ll use both this time and see what happens!
this info is awesome! your cookies are beautiful! i’m going to try the 10 second rule, and hopefully now that the humidity is down in my neck of the woods my colors won’t bleed as much…thanks so much!!
Carol; they do take some time, don’t they! Would love to see some of your cookie results if you’d like to send some pics.
Kelley; I’d love to hear how the glycerine works out for you!
Kristen; The humidity is down here too… Really helps with cookie decorating!
Have fun decorating!
Marian wrote:
Hi Marian,
Thanks to your description, I found out what cream of tartar is. It is called ‘wijnsteenzuur’ in Dutch. In Belgium you can only by it at the farmacy (my farmacist wanted to know how many people I intended to kill with it… 😉 ). It seems to be similar to citric acid and is also used in french macarons.
Thanks for explaining it to me!
Evelyn
Your rule of thumb is to let the icing dry for at least 24 hours. I worry that my cookies or brownies will spoil if left out too long. Do you have any thoughts as to how long I can leave the cookies out? I live in Hawaii so it’s pretty hot and can get very humid. I don’t have an air conditioned house. I’m planning to ice brownies for my daughter’s Halloween class party. I’m thinking of making the brownies the day before, but if it needs to dry for at least 24 hours then I need to make it at least 2 days in advance. I’m sure the brownies won’t spoil, but I have this fear of food poisoning or God forbid stale desserts!
Evelyn,
I learned something new today… Thanks for coming back and filling us in!
Carrie J,
First of all, lucky girl! Hawaii… ahhh.
You had a question about how long cookies and brownies could actually stay out before they spoil…
It’s not 100% predictable as to how long. 24 hours should be fine, but a good comparison would be to see how long your bread lasts out at room temperature in Hawaii. Your baked goods will last about the same time.
For drying time, 24 hours is a good rule of thumb if you’re planning on adding another layer of icing (for the design), and you don’t want the colors to bleed into each other.
It’s also good if you want to package your cookies in bags.
How do you plan to decorate the top of your brownies exactly? If you’d just like the one layer of icing then you don’t need to let them dry for 24 hours.
As for the cookies, because whole purpose of letting them dry for 24 hours is so that the icing colors won’t bleed into each other when you add more layers, as well as to have the icing hard enough to put into bags, I wouldn’t worry about letting them dry that long either. (Unless you ARE planning to bag them).
Especially since you’re in a humid environment. The moisture in the air will usually cause the icing to bleed anyways.
Hope that helps!
I can’t seem to get the royal icing dry without my cookies softening.I start with a really crispy gingerbread but they end up soggy and break when packaged. How do you dry them quickly? HELP!!!!
Jeanie; Do you live in a humid climate? Either way, my first suggestion would be to put a fan (on the gentle setting) near them to help them dry faster. You can also try putting them in the oven for a few minutes… either just with the oven light on for heat, or with the temperature at a really low setting. I haven’t had problems with that yet though, so I’d love to hear if those suggestions help.
Marian:
Thanks for doing these nice tutorials for those of us that are “learning”. As I was deocrating today, I had this page on my computer all day…going back and forth…..
Your mushrooms don’t look outlined and flooded…neither does your acorn. You have mentioned merely skipping the outlining process before..can you tell us if this is what you did and how you did it?
thanks
Thanks Vicki!
You’re right, for the acorn and mushroom I decided not to outline them.
For the mushroom I piped the red cap by doing the outline first and then filling it in right away. I then quickly put white dots on so that they would sink right in.
I let that dry and then added the white stem.
For the acorn I piped the bottom part first; again by outlining and filling in right away. I let that dry, piped the top and added the disco dust.
Hope that helps!
Marian
For outlining, flooding and adding adding another layer of the cookie design, how many hours do we have to dry it for every step? Or is it 24 hrs. total for the finish product?
Hi Ram,
It does depend on the climate you live in or whether or not you have a de-humidifier or air-conditioning. If you have either of the latter two, you can usually wait only hours before adding the next layer etc.
I don’t have a de-humidifier or air-conditioner and like to err on the safe side, so I wait 12-24 hours for EACH layer.
Where did you happen to find the mushroom cutter? I’ve looked everywhere for one, and while i can find some, they aren’t as cute.
These cookies are so lovely though.
Thanks Sugardrive! The mushroom cookie cutter is a copper cutter from here .
.
Marion,
Would you explain me to how you do the disco dust on your cookies? I’ve got an order for fall leaf cookies coming up for Thanksgiving, and I’d like to give it a try. Yours are so beautiful! 🙂 Thank you so much! It’s very appreciated!
Marion, I meant explain TO me! Sorry….little mix up there!
Hi Christy,
No problemo… Once my outline of my cookie has dried I cut out a piece of parchment paper just larger than the cookie (at least two inches larger all around), and then cut a hole in the center, about the size of the area you want to cover with disco dust.
Flood your cookie with royal icing.
Hold the parchment above the cookie, with the hole over the area you want to cover with disco dust. Shake it gently over the area. The parchment catches the excess. Keep recycling the disco dust.
For smaller areas I dip a paintbrush only used for food, into the disco dust, and then lightly onto the icing.
I have to say, sometimes I’m lazy and I don’t bother cutting out the parchment paper. (Actuuually, most of the time I don’t lol). So here’s an easier, yet a bit more wasteful, way:
Flood your cookie with icing.
With your cookie on a piece of clean parchment paper, gently shake your disco dust from the container onto the cookie.
Wait for the cookie to dry, tap the excess off onto the parchment.
Use a paintbrush to brush the excess somewhat ‘stuck’ to the cookie (not the incing) off.
It’s a tad more wasteful because more disco dust falls onto the cookie edge and sticks to it. I don’t always re-use that disco dust because cookie crumbs can mix in with it.
Hope that helps and happy creating!
Your cookies are the prettiest I have seen on any web-site! Absolulety spectacular! LOL May I ask what cookie recipe you use, and how thick are you rolling the dough? I have a couple of recipes for sugar cookies, but I am not happy with them. Thank you so much for posting your information! I have so enjoyed reading and learning from you!
You’re so sweet Faricha!
I’m using Peggy Porschen’s recipe, and I usually roll the dough out approximately 0.75cm. Sometimes I go thicker, sometimes thinner! (depends on my mood)
Has anyone tried the edible Laquer spray to keep them from bleeding? Just curious. Thanks!