
I’ve been asked quite often about how to make these gum paste daisies. People seem to think that they’d be challenging, but the things is, they’re ridiculously easy to make. I wish I could say I had amazing talent and that I hand-crafted each and every petal, but the truth is, it doesn’t take much to whip up some cupcakes and a few of these flowers.
Once you know a few handy tips and have the right equipment, you can easily make these whimsical edible decorations, and with the same tools the experienced cake decorator can create other variations. (I’ll mention some options later).

To begin, I usually create mine with gum paste rather than fondant for two reasons; they hold their shape better, and the detail is highlighted. That being said, since gum paste is more expensive than fondant, another option is to use half of each as a mixture. It is an excellent cost saving technique if you’re making a large amount of these daisies. One thing to note is that gum paste, although edible, really doesn’t taste good. Let the people you serve these to know that it’s best if the flower is removed before eating the cupcake. That being said, my husband and his friends devour everything and still love the taste. 😉

- shortening
- decorating gloves

- gum paste
- cornstarch
- small rolling pin
- daisy center mould
- palette knife
- Americolor soft gel paste
- daisy plunger cutter
- edible glue (tylose powder & water – tutorial found here)
- small fine paintbrush
- flower formers (examples below)

Flower Formers:
-
Egg cartons
You can use any type of former to dry your daisies in. I prefer Wilton’s![]() shape for this particular flower. A painter’s palette also works, as well as other inexpensive options such as egg cartons, egg create foam, aluminum foil and manicotti noodle trays.
shape for this particular flower. A painter’s palette also works, as well as other inexpensive options such as egg cartons, egg create foam, aluminum foil and manicotti noodle trays.
Coloring the gum paste:
Massage a small amount of food gel coloring into your gum paste at a time. It’s easier to add coloring bit by bit, rather than trying to correct or lighten the color by adding more paste. I wear decorator gloves with a bit of shortening on them so that my hands stay color-free, and the gum doesn’t stick to them.
Colors in gum paste tend to fade, especially blues, purples, blacks – deep colors essentially. It’s best to tint your paste and let it sit for 24 hours, so that you can see if you’re happy with how the color turns out.
How to make daisy petals:
Dust your work surface with cornstarch. It does look a bit strange; but I like to fill a clean, new nylon stocking with cornstarch until it is about tennis-ball size, tie the end into a knot, and store it in a plastic container. It’s easy to use just the right amount of cornstarch by lightly dabbing the nylon onto the work surface.

Roll the gum paste out to about 3mm or 1/8 of an inch thick, using your small rolling pin.

Press your daisy cutter into the gum paste, just as you would a cookie cutter into cookie dough. Before you lift the cutter away, press the plunger a few times to create the petal embossing. Making sure you have enough cornstarch under the gum paste, move the daisy cutter in a circular motion on your work surface to help create a cleaner cut. Lift the daisy cutter from the surface.

You will notice that the edges of some petals need to be smoothed. Gently press each petal deeper into the daisy cutter and run your palette knife or fingers along each edge to wipe away the excess gum paste. Turn the daisy cutter over, hovering over the flower former, press the plunger and your gum paste daisy should release and fall onto the former. If it needs a bit of coaxing, gently pry the petals away from the cutter with your palette knife.


For a different look, you could layer more than one daisy on top of each other and depending on what type of center you make, this cutter can be used as gerbera flowers or sunflowers as well. You can also obtain a finer finish by using a ball tool to soften the edge of the petals.
How to make daisy centers:
Besides the JEM daisy center I used here, the same centers can be found in silicon form. They are easier to remove from the mould because they’re bendable, but the JEM version is simple too! (I used the JEM version today as it’s easier to see in pics). If you’re looking for a homemade version, form the paste into a button shape and texture using a piece of tulle or net.
The first step is to dust your center mould with a light coating of cornstarch.

Roll a small amount of gum paste into a ball; enough to approximately fill the daisy center. Press the gum paste into the mould. Turn your mould over and press it into a cornstarch dusted work surface while moving in a circular motion. The excess gum paste will squeeze out the sides and sever from the edges.

It’s now ready to be removed.

If the gum paste doesn’t fall out of the mould immediately after turning it over, you may need to gently insert your palette knife and pull. You can also use other sharp, small objects such as a pin or toothpick.
Another tip that works is to lightly dampen your finger with water and press it onto the unmoving paste. The gum paste will stick to your finger and slide right out of the mould.

Fasten the daisy center to your dry petals using edible glue. A tutorial for how to make your own glue can be found here.

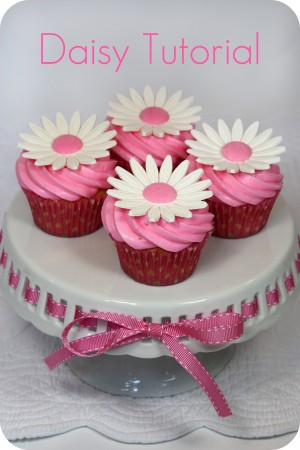
That’s it! Easy gum paste flowers to dress up your cake, cupcakes or other confections.

Some other examples of these daisies I’ve made in older posts are here and here. As you’ll see, I tend to like making white petals and colored centers!
By the way, these are straightforward vanilla cupcakes with vanilla buttercream. I used my go-to recipes from Peggy Porschen’s book Pretty Party Cakes![]() , and matched the pink Americolor soft gel paste
, and matched the pink Americolor soft gel paste![]() with these pink polka dot cupcake liners
with these pink polka dot cupcake liners![]() .
.
The buttercream was piped with a large star tip![]() .
.
Thanks for stopping by; If you have any questions, comments or if I can be of any further assistance please don’t hesitate to email me or drop me a line below!
Have fun creating!!
Marian


great tutorial! and beautiful photography! (I posted a link on my edible crafts column at ediblecrafts.craftgossip.com) thank you!!
wonderful tutorial and pictures! and those cupcakes marian, gooooorgeous! talk about perfect swirls!! love those cute polka dot liners too!
Sorry… forgot to say great post – can’t wait to read your next one!
This was so nice of you to share! My mother, daughter and I all love daisies and I am teaching my daughter how to bake. We will put this on the ‘to try’ list. Thanks, again!
Meaghan: Thank you for feauturing me on ediblecrafts.craftgossip.com! I love your site and am honored to be mentioned!
Asa: Thank you so much for your sweet compliments!
Tracy: I’m so glad you and your daughter will be trying these!
Wow, these are so pretty and fun! I’m loving all these gum paste how-to’s. I’ll be linking.
I will try my hand at fondant and gumpaste one of these days! Just waiting for the kids to go back to school. I’m glad I have your tutorial for reference!
Rachel: Thanks for the compliments! I’ve linked to your site as well. =)
Deanna: Just a few more days… Have fun playing around!
Marian, those cupcakes look so adorable and the icing looks so creamy. I LOVE LOVE LOVE LOVE LOVE LOVE LOVE IT!
Thanks Rylan!
I can’t begin to tell you how much I LOVE LOVE LOVE this tutorial!!!! Daisies are my absolute favorite and, when I saw the cupcakes on the pedestal I lost my breath for a second!! : ) Thanks so much for posting this and I look forward to catching up on old posts since I just found your blog. : )
~ Wendy
http://Crickleberrycottage.blogspot.com/
Wendy, thanks so much for your enthusiastic response! I’m positively glowing over here (or getting a really big head lol) Love your blog as well – so cute and interesting!!
These are just soooo pretty. I love them. I can’t wait to explore the rest of this site! :oD Please could you tell me what tube you used to pipe the buttercream swirls? :o)
Oops… sorry about the incorrect smileys in my last post. They were supposed to be 😀 and 🙂
Oops, I forgot to include the piping tip I used for the buttercream swirls; I’ll add it into the post and you can also click here .
.
Thanks Relznik!
Love your blog! I just bought some gum paste to try on Friday. Looks pretty easy! Such a pretty cupcake!
Thanks Spruce Hill! These are pretty easy! Have fun playing around with your gum paste. 🙂
Hey Marian
At the cost of sounding super dumb (I am very new and this kind of amazing stuff is unheard of in my part of the world, may I just ask… if these daises are edible? What exactly is gum paste?
Hi Sharmishtha,
No problem – I should have explained it! These daisies are edible.
Gum paste is a sugar paste often made of powdered sugar, starch or gelatin and something called gum tragacanth. It doesn’t taste the best, but is great for making flowers etc. because it dries hard and holds it’s shape well.
It’s much easier to make delicate, detailed flowers etc. with gum paste than with fondant.
You can use fondant instead though. Some people say it tastes better, but I find it doesn’t dry thoroughly or hold it’s shape as well.
Hope that helps!
I have to say welcome to the wonderful world of decorating – there are endless possibilities… it’s so exciting and fun! (and can become obsessive lol)
xo,
Marian
I just love your website. I’ve been asked, by a friend, to make approx. 200 cupcakes for her wedding in July. While I have a bit of experience with making decorated cupcakes, I have never used gum paste. If I made the flowers in advance of the wedding, how long will they keep for? Will the gum paste flowers be affected by humidity? Thank you.
Hi Claudia,
I have heard that gum paste flowers are affected by extreme humidity. They apparently get sticky and droopy (if they’re thinner).
I live in a fairly humid climate in July/August and I made these in August and they were fine. I didn’t make the petals very thin though.
If you’re storing the flowers in a humid climate, put some rice, silica pouches (you know the little bags that come in shoe boxes), or silica gel in the container, making sure none gets on the flowers. It helps aborb any humidity.
It’s best to store them in a dry, cool place. Also place them on paper towel or bubble wrap to prevent breakage.
As for how long, I’ve kept mine for over 3 months and they’ve been fine. I’m sure they’d be fine even longer. The only thing I noticed about some blue and purple ones I had, was that they seemed to fade over time. Add lots of blue or purple to your paste if you’re coloring it with those colors!
Hope that helps!
Marian
Hi, I am in Australia and am wondering what ‘gum paste’is and what we might have that is equivalent. We do have marzipan paste and roll icing – but not sure that they go so hard as this ‘gum paste’… very inspiring tutorial and am keen to try my hand at a simpler version sometime;)
Sharon
Hi Sharon,
Here is a link to my glossary which defines gum paste:
https://www.sweetopia.net/glossary/
You can get to the glossary from the home page as well.
I don’t usually make my own, but here is a recipe I found. Haven’t tried it out yet though.
http://www.cake-decorating-corner.com/gum-paste-recipe.html
How many daisy’s do you get out of a pound of gumpaste?
Emma, it does of course depend on how thick you make the petals but my gumpaste daisies are on average half an ounce (on the generous side).
Since one pound of gumpaste = 16 ounces I would get 32 daisies out of it.
Marian, I can see you have answered the question about humidity regarding the flower paste, but my problem occurs when I place the flower on top of the buttercream. Within a few hours the flower has drooped and gone like chewing gum. I have been told this is due to humidity but the flowers have been made weeks in advance most times so how do I prevent this? If I am setting the cakes up in the morning for an evening event, I am worried that by the evening the problem will have ruined the whole thing. Any suggestions please?
Hi Karen; have you tried drying your gumpaste flowers in the oven? (No heat on; just the light). Maybe they needed to dry a bit more thoroughly?
How about trying a different brand or recipe? The Nicholas Lodge gumpaste recipe is supposed to be good. (I haven’t tried it unfortunately). I’ve used Wilton and do like it.
Since I don’t have experience with this problem (my gumpaste has never wilted in the humidity), maybe you could go on this forum and post the question:
http://www.cakecentral.com
Waouh!!!! thank you for the tutorial! I bought a flower cutter last Saturday and I will definitely use it very soon! the icing looks just PERFECT
wow, these are beautiful! i am incredibly impressed.
Hi,
My favourite shop is http://www.bakingfrenzy.com. All their cake decorating products are substantially cheaper than other shops. Now i am eying the daisy plunger cutters, will order some very soon. By the way, how to prevent gum paste stick to the plunger cutter? DO you have any tricks?
Lisa
If you dip the plunger cutter in a little bit of cornstarch or icing sugar first, it will help with that issue. =)
Thanks for your input. Have a nice day!
I love your site. You daisies are beautiful! Thank you for sharing.
Morgan
Wow these Daisys are absolutely gorgeous!
I’m from Switzerland and I’ve never seen something like your equipment to shape the daisys around here, where do you get all that cool stuff? 🙂
Hi Nicole,
My mom is from Switzerland – I love it there!
If you click on the words which are pink in the ‘You’ll Need List’, they will take you to where I got items from.
Hi!!!! i’m Alex,12 yrs. old….and i LOVE this site… i’ve been reading all of your posts about making cookies,and so on… i just want to know if i can ask questions…..
Hi Alex,
Thanks so much! I’m impressed that you’re so young (in my opinion 😉 and already baking! Please feel free to ask questions!
Great, and so easy, didn’t see that 😀
Thank you!
what beautiful community to come in contact with, especialy all the way fro, abuja nigeria. My wife and i are comercial cake makers and i must say i gained from ur info.
The daisies are beautiful and the cupcakes are stunning. What a great job you did and the tutorial is excellent to follow. Thank you for sharing. One more thing the buttercream frosting looks wonderful. Would you share the frosting recipe and show a tutorial on how you made them look so wonderful with the star tip. Keep up the great work. Keep teaching us beginners the tips and tricks of how to do the same. Thank you so much!
I made some daisies recently using your tutorial as a guide. I do appreciate that you had your tutorial as a guide, and want to thank you for having it available. I do have a question. I placed one of the dried daisies on a cupcake covered w ganache just to see how it would look. I just happened to have the cupcake on hand. It was in a covered container. I noticed after a day, when opening the container, that the gumpaste daisy had pretty much melted over the cupcake. the daisies that I made are for a wedding in a couple of weeks, so I was hoping you might have some advice on how to keep this from happening.
Thank you @ austine archibong!
Hi @ Cheryl: I have a video on YouTube now on how I did the swirl, and there’s a frosting recipe if you like. (in a blog post… you can check the cupcake recipe section).
HI @ Sandra Nelson: No problem, all you need to do is not store them in an airtight container. The moisture in the container made the flower droop. I would advise storing only the cupcakes themselves in an airtight container and when you’re ready to serve them, then place the flower decorations on top. Hope that helps!
@ Marian (Sweetopia): thanks for the advise on placement of the daisies on the cupcakes just before serving.
Now I have another question. I was looking at Peggy Porschen’s Pretty Party Cakes, on page 62. I was thinking of using the fondant icing on pages 20-23. She adds sugar syrup in the icing, and she coats the cupcakes w strained apricot jam. Have you made this icing? If you did, what flavor of sugar syrup did you make? Regarding apricot jam, can you strain it? What do you think of using fondant icing?
HI @ Sandra Nelson: I’m sorry, I haven’t made it, but have been meaning to for so long! I can’t wait to try it and would love to hear how it goes for you, if you’d like to come back and share. xo
バッグ財布
I have to thank you for the efforts you’ve put in penning this blog.
I really hope to see the same high-grade content from you in the future as
well. In truth, your creative writing abilities has inspired me to get my own, personal bblog now 😉