
Hello sweet friends!

With Father’s Day just around the corner, I’m ready to share a little toolbox project of the cookie sort with you. Thanks to my husband for designing the toolbox and my friend Niner of Niner Bakes & Blends for putting it into a pretty pdf template I’m sharing with you here.

Before I jump into the tutorial, there are a few important points to know about before beginning the project. First off, it’s important that the cut-out cookie recipe you use as the base for the tool and toolbox hold their shape well. The key to these cookies keeping their shape lies not only in the combination of ingredients (exact measurement in baking is important) and omission of the leavening agent (i.e. baking powder), but in some crucial points in the process. You can find a whole post dedicated to cookies keeping their shape here.

If you’re making these at a time when the humidity in your area is high, having a de-humidifier on in the room you’re working in will help the cookie dry well and prevent icing from bleeding. (You can see mine in the top left of the photo below).

You can find more information on drying cookies here, a post on preventing cookies from bleeding here, and spotting here.

How to Make a Cookie Toolbox
If you’ve ever made a gingerbread house, the process to putting together this cookie toolbox is the same. As with a gingerbread house, the recipe for the base and the icing make a huge difference. You can find the recipes below, as well as a video on how to put a gingerbread house together here. I’ll also share the basics below.
Cookie Recipe
I used gingerbread as the base for my cookies. You can find the recipe for the dough here. If you’d like to try a different cookie base, other recipes can be found here.

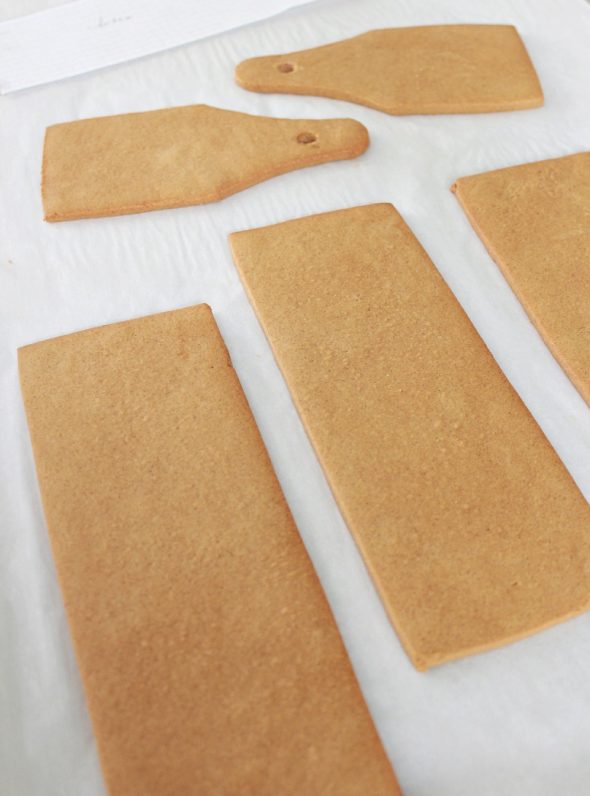
Instead of making the handle edible, I found it easier to use a plastic straw. The dimensions of this one are 23 cm long by 0.8 cm wide.
Make sure to make your gingerbread pieces quite thin. Mine are 0.5 cm, but I’d go even a bit thinner next time.
The FULL TEMPLATE for the TOOLBOX can be found by clicking HERE.

Don’t forget to cut holes in the end pieces for the straw or whatever you decide to use as a toolbox handle.
*
Royal Icing for the Toolbox
You can find my favorite royal icing recipe here. The consistency of icing is key for easy decorating. Click here to see a YouTube video on finding the right icing thickness.
Decorating Steps
What you’ll need if you’re flooding the toolbox walls:
- Piping Tip #3

- Piping Bag
- Coupler
- Red Food Gel Coloring
Step 1: If you’d like to flood the walls of the toolbox, outline with a #3 piping tip. I usually flood or fill in my cookies immediately, but for such a large surface area to flood, I let the outline sit for about 5 minutes and then fill in the middle. For detailed decorating tips, this tutorial may be helpful for you.

When you flood the area around the hole for the handle, make sure the icing doesn’t cover the hole at all. Mine did a little bit and I couldn’t push one end of the straw all the way through. Let your pieces dry for 24 hours.

Step 2: The icing used to glue the toolbox pieces together needs to be quite thick. Here’s a video on how to make royal icing for gingerbread houses (same idea as putting together the toolbox). If you have leftover flood icing and you don’t want to make a new batch of icing specifically to put together the toolbox, add enough icing sugar to the flood icing, mix well, and when the icing stands straight up when you dip and pull a spoon out of it (stiff peak), it’s ready to use.
Tint the icing to adhere the cookie pieces together, a similar shade to the cookie color.

Step 3: Adhere the pieces of the cookie toolbox together. See here for a video on how to put a gingerbread house together and follow the same procedure for the four sides. You’ll need to have the straw (or your handle pieces), inserted during assembly. Let the pieces dry and you’re done!
One thing I noticed; next time I’ll use a microplane rasp zester![]() to file down the edges of a cookie if the edges aren’t fully straight, especially for sides sitting on the bottom piece.
to file down the edges of a cookie if the edges aren’t fully straight, especially for sides sitting on the bottom piece.

How to Decorate Tool Cookies
You can find the recipe for the dough here. If you’d like to try a different cookie base, other recipes can be found here. The tool cookie cutters can be found here![]() .
.

Royal Icing
You can find my favorite royal icing recipe here. The consistency of icing is key for easy decorating. Click here to see a YouTube video on finding the right icing thickness for cookie flooding.
Decorating Steps
What you’ll need:

Step One: Using a #2 tip, outline the tool shape with royal icing. For detailed decorating tips, this tutorial may be helpful for you.

Step Two: With the same icing, flood, or fill in your shape. If you notice a bit of bump between sections on a tool, it means that I’ve outlined and flooded in sections, waiting 5 minutes to let one section set before going on to the next.

Thank you to Oh Sugar Events for the drill design!

Step Three: Using a piping tip #1.5, pipe white lines on the wet icing base for accents. Let the base dry for at least 6-12 hours.

Step Four: Using a piping tip #1.5, add the finishing line details such as outlines, or dots (on saws, pliers and a small section on the hammer and drill).

Once the cookies have dried for 24 hours (see here for a post on drying), dust some edible luster dust![]() on the grey sections of the cookies for a little sheen.
on the grey sections of the cookies for a little sheen.

I noticed after I photographed the tool cookies, that the yellow wasn’t as bright as I’d like it to be, so I just added a little yellow luster dust to deepen the color.

This Cookie Decorating Schedule free printable may also be helpful for you if you’re new to cookie decorating. Spreading the steps out makes the decorating process easier.

If you have any questions or comments please feel free to drop me a line below in the comment section or on social media. You can find me on Facebook, Google+, Instagram, Pinterest, Twitter and YouTube.
Happy early Father’s Day to all the father’s out there, and Mom, please don’t tell Dad about this post – the toolbox is my gift to him. ;-D
xo,
Marian


Where did you get those cookie cutters?
Hi Silvia,
The link is in the post above – in the small paragraph under the title “How to Decorate Tool Cookies”.
Happy decorating!
Wow, Marian, these cookies are so beautiful!! Amazing. I loved them since I saw some of them on IG a few days ago ^^ The toolbox is super cute! Such a great cookie work.
xoxo
What an amazing idea! Love every part of this project!!!
Wow! Amazing as always.
Wow! that’s amazing… it will sure bring a smile on any Dad
Hi Mariam
These tool box cookies are amazing. Can you let me know where you bought the cookie cutters from.
Thanks
Possibility these? https://www.amazon.com/gp/aw/d/B002VBNV5C/ref=yo_ii_img
Hi Christine,
The link is in the post above – in the small paragraph under the title “How to Decorate Tool Cookies”.
Happy decorating!
I found these cookie cutters on Amazon, they are about 5″ tall each. It seems like these might be the same ones she used. I could be wrong though. https://www.amazon.com/gp/aw/d/B002VBNV5C/ref=yo_ii_img
Another home run Marian!
Wow wow wow wooooow!
I am simply amazed by your post, Marian.
You always make me go WOW haha..even though I know all of your creations but you always amaze me with your talent.
I bet your dad will absolutely LOVE this toolbox.
HOW AWESOME is such a gift. He won’t expect this (even better) 🙂
Can’t wait to hear about his reaction. Such a detailed post which took a lot of effort. We all appreciate the hard work you put into this. God bless and speak later hihi 🙂
Niner <3
Thanks so much for your comments everyone! xo
Oh…what a wonderful idea! Can’t wait to see your Dad’s face. Beautiful work again. Love it!
ML
Thanks so much Mom! I hope he loves it too. 🙂
Thanks so much for this template. I am having a bit of difficulty with measuring out the end pieces. What did you use to make the curve top so even on them??? Thanks!
Hi Cindi,
Use an exacto knife (never been used for purposes other than food), and cut in on a 45 degree angle instead of straight up and down. Make little cuts and then pat the jagged edges down with your finger (if there are any. There were with mine). Hope that helps!
Thank you Marian 🙂
Sorry, but I forgot to ask; is the template meant to be printed and cut as is or do I have to make adjustments before printing.
Hi Cindi,
Just printing regularly should be enough.
Love this tool box. Thank you for the detailed tutorial.
This is a work of art. Thank you so much for sharing.
Thanks so much for the tutorial. I was going to do something identical to this for Father’s day and never got to it because of other orders so you just saved me having to make my own template when I do decide to do it. Totally adorable, as are all of your cookies. Thanks for being such an inspiration!
Yay! Glad you like the tutorial!
These are absolutely amaaaaazing!! I would love to give them a go! But do they taste as good as they look?
How do you make the perfect gray icing color? I can’t find gray food coloring, can you mix black & white?
Hi Katie,
Yes I simply mixed a little bit of black into white icing.
As always perfection. I love it! Such a cute idea!
WOW is not enough! Magnificent and Brilliant are the two words that come to mind… OH SO VERY COOL. I am going to try and make these. I work in a maintenance shop for my day job and the guys will flip for these. You are an inspiration!
Oh they will likely get a kick out of it! Have fun!
Where can I find the tool boX and tools ? do you make them ?
I need them for Grandpa’s birthday Dec.28th
Thanks Jo Ann
Hi JoAnn,
This post is about how to make the toolbox and cookies, and all the links as to how to make them are in the post.
I’m sorry, I don’t sell my cookies but I’m sure you could find a local cookie baker who does.
xo,
Marian
Oh my…you are truly amazing Marian! I saw you repost this on Instagram and just fell in love with it. I am going to bake this just as is and will be using it as my June giveaway. Because to bake and sell these….just way too much time and I would have to charge $$$$. Thank you for always giving great ideas and inspiration when I thought I just couldn’t anymore. <3
Oh what a nice comment, Mercedes, thank you so much! Please tag me if you post on Insta, would love to see!
This is so AMAZING! I want to try and make it to give to my dad for Father’s Day. Do you have to use a gingerbread recipe for the tool box or can a regular cut out sugar cookie dough recipe will do?
Hi Janette,
Yes, you can use sugar cookies! You might want to bake the pieces a bit longer so they’re sturdier. (The longer you bake the crisper, harder a cookie will get).
This is such a great idea – thank you so much for sharing this. I would love to try to make this for my husband and FIL for Father’s Day. Do the white details on the drill and all the final details need to be added once the cookie is fully dry?
Thanks Angela! Yes, I like to add the final details once the base is dry. If you’re really in a rush you can wait until it’s at least set though. Have fun!