
Something you’ve asked for – finally ready! If you follow me on Instagram, you’ll see that my stream has been peppered with them lately… KitchenAid mixer cookies in a rainbow of happy colors. 120 of them to be exact. Details on the scheduling of making them as well photos to come in a later post, but for now, a little step by step on how to make these stand mixer cookies.

At first glance, the cookies may seem complicated to make, but I can honestly say they’re one of the easiest ones I’ve made to date, in terms of technique. Time-wise there was more effort involved because of the added details, the wide variety of colors (wouldn’t have it any other way – love those charming Artisan stand mixers), and because I made so many for this past weekend. (More on that later).
As the piping essentially involves just following the lines of the cutter, no Kopykake projector was needed, and I used this tool to help me get a straighter, more even line for the detail on the head of the mixer, it really was just a matter of putting all the steps together.

So if you’d like to make them too, the step by step is below, and (this is an update), I now have a video. (Click here to see the video post and I’ve also shared the video below too). Have fun decorating!
Stand Mixer Cookie Tutorial
You’ll Need:
- Gingerbread Cookie Recipe (or cookie recipe of your choice).
- Royal Icing
- Gel Colors
of your choice (I used Americolor white, electric orange, mint green, lemon yellow, sky blue, soft pink, black and Wilton (no-taste) red
).
- Stand mixer cutter
- Small fondant rolling pin
- PME Pearl Lustre Spray
or silver luster dust
- Piping bags
, couplers
, #1
, #2
piping tips
- Gum paste
- JEM Strip Cutter – 7 mm
(*Optional – can be cut by hand).
Instructions:
Step One: Make your gingerbread dough.
*Note that the color of brown sugar and the type of molasses makes a difference in the outcome of your gingerbread cookie color. More experimentation and explanations on that coming in an upcoming post.

Step Two: Once you have cut out your gingerbread cookies, make sure you chill them for at least a few hours before you bake them. I’ve mentioned it in the gingerbread cookie recipe, but thought it was worth pointing out again. These tips on preventing your dough from spreading will also help if you’re new to baking cookies for decorating.
Step Three: Make and adjust the icing consistency. For a video on how to find consistency, click here. Tint your icing using gel paste colouring.
Step Four: Time to flood the cookies! The basics on how to outline and flood with royal icing can be found here. Using piping tip #1, outline the mixer bowl with light grey icing. You can pipe the base of the bowl as a separate section, as in the photo below, or keep it as one simple outline. (See collage below).

Step Five: Fill or flood the bowl in right away.

Step Six: Give your cookie a gentle shake so that the icing settles.

Step Seven: Go ahead and flood all the bowls and then come back to the bowl bases and fill them in. The separate sections will give a little added dimension to the bowl.

If you prefer, you you can outline and flood the bowls in one shot, as pictured in this collage:

In the photo below, the top two bowls on the right are flooded separately, while the rest have been done all at once. It’s all personal preference, and if you’re concerned about speed, the second option is faster.

Let the bowls set for at least 15 minutes. Depending on how many cookies you’re making, by the time you pipe the last bowl, the first ones you piped may be ready for the next step.

Step Eight: Using a #2 piping tip, and your icing color of choice, outline and flood the head of the mixer.

Next, flood the neck and base.

If you work fairly quickly, you’ll just barely be able to see the two separate flooded sections.

Let your icing bases dry for at least 6-12 hours. How long they take to dry depends on the humidity in your area. See here for a video on drying royal icing.

Step Nine: Using a #1 tip, pipe a small band of light grey icing below the head of the mixer, as pictured below:

By the time you pipe your last cookie, the first one should be ready for the next detail. (Sorry about poor photo quality in this post).

Add the next strip of grey icing to all your cookies, and repeat, until you have three bands of icing, each one progressively becoming smaller. Connect the grey bands and the top of the mixer bowl with a thin grey line of icing.

Step 10: Using a #1 tip, pipe a line of icing around the perimeter of the mixer body and where the head and neck of the mixer connect, using the matching icing color.

Step 11: Using a Jem strip cutter, make thin strips of grey gum paste
, cut them to the desired length with a sharp knife, and gently adhere to your cookie with small dabs of royal icing. You can find a more detailed explanation of how to make the gum paste strips here. Note: For taste preferences, you can use a 50/50 gum paste fondant mix, or add tylose powder
to your fondant to make it sturdier.

Step Twelve: Pipe the remaining lined details, connecting the left side of the gum paste strip to the top and bottom of the stand mixer head.

Step Thirteen: Pipe three grey dots, using a #1 piping tip.

The varying sizes can be created simply by pressing more or less icing out of your piping bag, depending on the size you’d like to achieve.

Let the icing details dry for about an hour or so… Enough time so that they’re hard to the touch so that if you handle them by accident, they won’t break.

Step Fourteen: To add a little sheen to the bowls, either spray them with a little PME pearl lustre spray, as I’ve done here, or brush a little silver luster dust
on with a dry paint brush. If you like, add a little to the strip of gum paste and icing dots as well.

Serve as is, or package in cellophane bags and tie with a pretty ribbon, like these ones I made for KitchenAid Canada.
 *
*
A big thank you to them for sponsoring me to go to Canada’s first Food Blogger’s Conference this past weekend – it was an amazing experience on so many levels and I was thrilled to have the opportunity to go!
*
Notes:
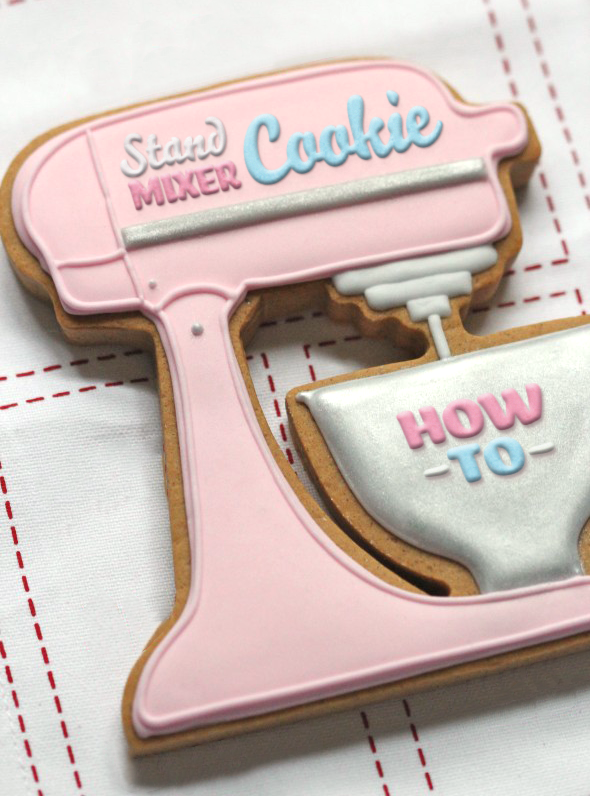
- The size of this stand mixer cookie is approximately 14cm by 12.75cm or 5.5 inches by 5 inches (Height by width, from tip to tip).
- The graphics on the first photo of this post aren’t really icing. Thank you to my talented web designer, Arthur, for creating the typography on the photo!
- I’ll be doing a how-to video on how to make these as soon as our home renovation is done.
- In case you’re wondering, I don’t normally do cookie orders, however, I have a directory of cookie decorators who do. Click here if you’d like to order cookies, and here if you’d like to be on the directory.
Thank you for helping me chose kitchen appliances btw – I’m fairly sure which ones I’ll go with, but if you missed my last post and would like to add your input, please do!
Until next time, happy decorating!
xo,
Marian
p.s. For pics between posts, join me on Google+, Facebook, Twitter or Instagram.


Hi Marion. Where does one get this cookie cutter?
Thanks a lot for sharing!! Im gonna try these for sure!! Hugs from El Salvador!!
FINALLY, Marian, finally! 😉
When I have gotten your Feedburner Email this morning, I did not think about work, went straight to the post and read it.
Thanks for such a detailled tutorial, my dear. I know it is work but that’s the best way to explain it to people and to actually make them try it out, right.
Absolutely stunning cookies, KitchenAid is my favourite and to see those little mixers in a cookie version makes me happy! Thanks for making my day, love.
Much love as usual,
xoxo..niner 🙂
p.s. Arthur is the man still! 🙂
Your cookies are amazing, as always! I love what your web designer did to the first photo. It looks so real! I’ve put those cookies and the typography on my To Do list :).
Marian I am so happy I have one of these in my possession 🙂 I don’t know I will eat mine now I have seen all the work that goes into them! Thank you for these – they were such a treat. Lovely to see you again at FBC2013!
These cookies are absolutely gorgeous! I can’t wait to see what you will come up with next!
This is such a fun cookie set, so pretty with all the different colors. Thank you for the great tutorial, Marian! I was wondering what made you decide to use gum paste for the stripe instead of piping it with icing?
Btw, I love the graphic Arthur created for the post title!
The graphic is KILLING ME, Marian, it’s so realistic!
Where DID you get that incredible cutter?
This post is a real beauty, Marian!
XOXO
Hi Marian,
Fantastic work! You are a cookie genius!
Just stunning, wish I was at the FBC#2013 to get one!
Will you be at the CBSS this year?
Beautiful! I love all of the details you put into these.
Absolutely stunning, Marian!!
I’m just in LOVE with these cookies! And I MUST get my hands on one of those cutters!!!
WOW. These are incredibly beautiful.
Trisha
oh my goodness i would just love to have one of these cookies to hang on my car’s dashboard so i can keep staring at it! heehee
So cute!! I am in love!! So cute!
Marian: It’s amazing how each mixer matches the original colors exactly! Thanks for sharing.
Those look amazing! Love all of the detail!
Such an excellent tutorial & these cookies are adorable!
These are really cool cupcakes. I don’t really get the stand mixer love, I guess because I only have a hand mixer.
these are so cute! I made them once, but what a difference that cutter would make! I just a new KA this week, the 7qt….it is so quiet!
the visual impact of all of these cookies laid out on the table when we walked into the ballroom/movie theatre was incredible. i had a hard time choosing which colour i wanted and settled on bright green!
These cookies are simply adorable!
Wonderful post!!! Can’t wait to make these for Mother’s Day. And are they little oven cookies I see in the 2nd to last photo? Would love to see those cookies too!
wow these are beyond stunning, Marian. you’re SO great at this! they always look so so perfect!!
How to you get the lettering on the cookies to be so perfect??
I can’t even get over these. Coolest cookies EVER!!!
These are TOO cute!
Thanks for the tutorial!! Ever since I saw them on your Instagram feed I was hoping you will post a how-to! They are beyond adorable 🙂
Very cute cookies. Can you tell me please where did you get the cutter? Thank you.
Wow Marian these are amazing cookies. Love love
Best wishes xoxo
The only disappointment from the entire FBC Conference was that I was ill on the first evening and missed these cookies. When I heard there was not one, but TWO Sweetopia cookies for each of us, I was dumbfounded. I would have drug myself to the table in my jammies just to take mine. 🙂 Eating one would not even cross my mind… well, it would. But I wouldn’t eat it. I would place it on my mantel to simply enjoy. What a labour of love, Marian! Even if you were sponsored by Kitchen Aide (and lucky you!), this was an extra-ordinary pleasure. I am grateful to have just seen one “in real life”!
Big hug,
Valerie
Absolutely my favorite sugar cookie yet! Your talent is unbelievable, LOVE! xoxo
Hi Marian, I couldn’t wait any longer… so last week I did try to make your KitchenAid Stand Mixers ! For my first time, there were quite ok but next time thanks to your tutorial, I’m gonna improve myself and make them nicer !!! Thank you for sharing all your good tips 🙂 Fabienne (from France)
Fantastic!!! As always!
I would love to know how you piped the words on your mixer cookie in the header photo.
Many thanks!
xo
Janet
Marian, I’ve been ogling these cookies for a while and LOVE that you did a tutorial! Your attention to detail and your clear directions and photos are fantastic. I’m be sharing this post with my Facebook fans at Just a Bite Desserts!
I got this cutter from Kitchen Collectables and I am so glad I did…now that you have put up the tutorial, I am most definitely going to make these very soon!!! Thank you for the awesome step by step tutorial on this. I also was wondering why you chose to use gumpaste instead of piping the trim on the mixer. I was under the impression that gumpaste is not edible.
These are perfect. I want to know how you got the writing on your featured image so perfect. You must have hands steady doctor hands 🙂 Feel free to post these on my blog linky party going on today. These would be an amazing addition.
Hi. I love these cookies. I can’t wait to make them. However, Ecrandal doesn’t have them on their website right now. I am going to make a template and see how that comes out. Looking forward to your video. Thanks.
Those cookies are so adorable! I love them, but doubt I could ever make them as pretty as yours. Frosting just isn’t my thing. But thanks for the awesome idea!
Oh wow, these are the most amazing looking cookies!
In the words of Rachel Zoe ….. “I die”
These are the coolest ever Marian.
Thanks for sharing.
Xx
These are beautiful! Definitely on the list of cookies I need to try.
amazing tutorial,exellent hard work… You did a beautiful job.Like always!
I’m glad you had a great time on the conference.
ML
Oh Marian, I have to tell you the story. So I am sitting right here, and am eating a piece of the oven cookie, reading this post. Husband, daughter and I shared the stand mixer cookie yesterday. As daughter and I were eating the oven cookie, she wandered to my computer… and she was just like ‘LOOK, MOM! Its the cookie we ate yesterday’ And she was so excited and we had to scroll back up the post and look for every single one of the pink ones 🙂 You’ve made someone very happy 🙂 Thank you!
Wow! You make it look so easy. These cookies look incredible!
OMG, Marian! The cuteness is way too much!! 🙂 Amazing job on these cookies!
Just saw these at Pinterest in David Lebovitz’s feed. They are the cutest EVER in the decorated cookies world! Thank you for sharing your detailed tutorial, Marian. I bet the recipients at the conference were elated with their KitchenAid® Mixer Cookies as gifts! xo
I could not believe it when I saw the cookies at the conference. This tutorial is such a big help if I ever want to try decorating cookies. Next on my list is to move next door to you 🙂
These are the cutest! Adding to my “to-bake” list!