
Something you’ve asked for – finally ready! If you follow me on Instagram, you’ll see that my stream has been peppered with them lately… KitchenAid mixer cookies in a rainbow of happy colors. 120 of them to be exact. Details on the scheduling of making them as well photos to come in a later post, but for now, a little step by step on how to make these stand mixer cookies.

At first glance, the cookies may seem complicated to make, but I can honestly say they’re one of the easiest ones I’ve made to date, in terms of technique. Time-wise there was more effort involved because of the added details, the wide variety of colors (wouldn’t have it any other way – love those charming Artisan stand mixers), and because I made so many for this past weekend. (More on that later).
As the piping essentially involves just following the lines of the cutter, no Kopykake projector was needed, and I used this tool to help me get a straighter, more even line for the detail on the head of the mixer, it really was just a matter of putting all the steps together.

So if you’d like to make them too, the step by step is below, and (this is an update), I now have a video. (Click here to see the video post and I’ve also shared the video below too). Have fun decorating!
Stand Mixer Cookie Tutorial
You’ll Need:
- Gingerbread Cookie Recipe (or cookie recipe of your choice).
- Royal Icing
- Gel Colors
of your choice (I used Americolor white, electric orange, mint green, lemon yellow, sky blue, soft pink, black and Wilton (no-taste) red
).
- Stand mixer cutter
- Small fondant rolling pin
- PME Pearl Lustre Spray
or silver luster dust
- Piping bags
, couplers
, #1
, #2
piping tips
- Gum paste
- JEM Strip Cutter – 7 mm
(*Optional – can be cut by hand).
Instructions:
Step One: Make your gingerbread dough.
*Note that the color of brown sugar and the type of molasses makes a difference in the outcome of your gingerbread cookie color. More experimentation and explanations on that coming in an upcoming post.

Step Two: Once you have cut out your gingerbread cookies, make sure you chill them for at least a few hours before you bake them. I’ve mentioned it in the gingerbread cookie recipe, but thought it was worth pointing out again. These tips on preventing your dough from spreading will also help if you’re new to baking cookies for decorating.
Step Three: Make and adjust the icing consistency. For a video on how to find consistency, click here. Tint your icing using gel paste colouring.
Step Four: Time to flood the cookies! The basics on how to outline and flood with royal icing can be found here. Using piping tip #1, outline the mixer bowl with light grey icing. You can pipe the base of the bowl as a separate section, as in the photo below, or keep it as one simple outline. (See collage below).

Step Five: Fill or flood the bowl in right away.

Step Six: Give your cookie a gentle shake so that the icing settles.

Step Seven: Go ahead and flood all the bowls and then come back to the bowl bases and fill them in. The separate sections will give a little added dimension to the bowl.

If you prefer, you you can outline and flood the bowls in one shot, as pictured in this collage:

In the photo below, the top two bowls on the right are flooded separately, while the rest have been done all at once. It’s all personal preference, and if you’re concerned about speed, the second option is faster.

Let the bowls set for at least 15 minutes. Depending on how many cookies you’re making, by the time you pipe the last bowl, the first ones you piped may be ready for the next step.

Step Eight: Using a #2 piping tip, and your icing color of choice, outline and flood the head of the mixer.

Next, flood the neck and base.

If you work fairly quickly, you’ll just barely be able to see the two separate flooded sections.

Let your icing bases dry for at least 6-12 hours. How long they take to dry depends on the humidity in your area. See here for a video on drying royal icing.

Step Nine: Using a #1 tip, pipe a small band of light grey icing below the head of the mixer, as pictured below:

By the time you pipe your last cookie, the first one should be ready for the next detail. (Sorry about poor photo quality in this post).

Add the next strip of grey icing to all your cookies, and repeat, until you have three bands of icing, each one progressively becoming smaller. Connect the grey bands and the top of the mixer bowl with a thin grey line of icing.

Step 10: Using a #1 tip, pipe a line of icing around the perimeter of the mixer body and where the head and neck of the mixer connect, using the matching icing color.

Step 11: Using a Jem strip cutter, make thin strips of grey gum paste
, cut them to the desired length with a sharp knife, and gently adhere to your cookie with small dabs of royal icing. You can find a more detailed explanation of how to make the gum paste strips here. Note: For taste preferences, you can use a 50/50 gum paste fondant mix, or add tylose powder
to your fondant to make it sturdier.

Step Twelve: Pipe the remaining lined details, connecting the left side of the gum paste strip to the top and bottom of the stand mixer head.

Step Thirteen: Pipe three grey dots, using a #1 piping tip.

The varying sizes can be created simply by pressing more or less icing out of your piping bag, depending on the size you’d like to achieve.

Let the icing details dry for about an hour or so… Enough time so that they’re hard to the touch so that if you handle them by accident, they won’t break.

Step Fourteen: To add a little sheen to the bowls, either spray them with a little PME pearl lustre spray, as I’ve done here, or brush a little silver luster dust
on with a dry paint brush. If you like, add a little to the strip of gum paste and icing dots as well.

Serve as is, or package in cellophane bags and tie with a pretty ribbon, like these ones I made for KitchenAid Canada.
 *
*
A big thank you to them for sponsoring me to go to Canada’s first Food Blogger’s Conference this past weekend – it was an amazing experience on so many levels and I was thrilled to have the opportunity to go!
*
Notes:
- The size of this stand mixer cookie is approximately 14cm by 12.75cm or 5.5 inches by 5 inches (Height by width, from tip to tip).
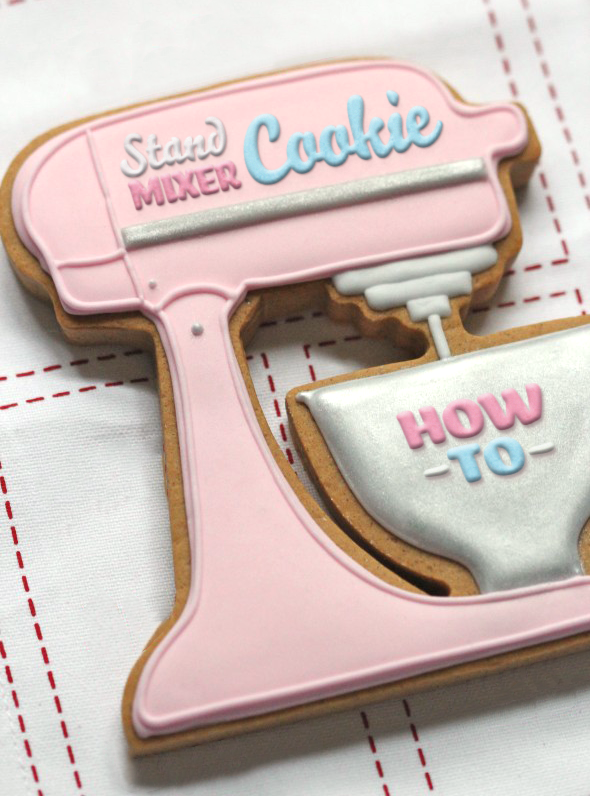
- The graphics on the first photo of this post aren’t really icing. Thank you to my talented web designer, Arthur, for creating the typography on the photo!
- I’ll be doing a how-to video on how to make these as soon as our home renovation is done.
- In case you’re wondering, I don’t normally do cookie orders, however, I have a directory of cookie decorators who do. Click here if you’d like to order cookies, and here if you’d like to be on the directory.
Thank you for helping me chose kitchen appliances btw – I’m fairly sure which ones I’ll go with, but if you missed my last post and would like to add your input, please do!
Until next time, happy decorating!
xo,
Marian
p.s. For pics between posts, join me on Google+, Facebook, Twitter or Instagram.


Oh my word! These are just amazing!!! So perfect 🙂
LOVE THESE!
Such lovely cookies, Marian! Congrats 🙂
I’ve recently discovered your blog and absolutely love it. I am trying to send my DH cookies overseas and want to decorate them with royal icing. I have seen many people use sugar cookies or gingerbread cookies for this. I’m assuming because they’re sturdy, but my DH isn’t a fan of either of those. Are there any other types of cookies good for royal icing and mailing?
I am in awe of you! :-0
These are absolutely the coolest cookies Marian. I just about squeeled seeing the Ice Blue mixer cookie – since I have that one on my counter right now 🙂
Absolutely amazing!
These are absolutely darling! Beautiful cookies, beautiful photos, fantastic idea.
These are amazing; you are just way too clever! My KitchenAid is 27 years old and white…maybe that needs to change!
Hi @ Robin: Sorry it’s taken me a while to answer! These comments got lost in my email inbox!
Honestly the best to decorate and ship are sugar cookies. (sorry!)
Hi @ Donna Armstrong: The company link is in the post. xo
@ Janine – sugarkissed.net: I used the gumpaste and cutter because it was a foolproof way of getting absolutely straight lines… to look more like the metal strip on the real mixer.
@ Marisa: Sorry, my reply is so late! No, I won’t be there this year.
Yes, they are ovens, @ lisa (sugarlily cookie), and the post is coming soon, thanks for asking! 🙂
@ Adina Berkowitz, @ Janet,@ buttercream bakehouse:: I mention it in the post, but the lettering is photoshop. The first and only photoshop used on my cookies!
Hi @ Salpie: The link to the company is in the post.
@ Roxanne: Gumpaste is edible, but doesn’t taste wonderful (imagine gum and sugar paste). I used the gumpaste and cutter because it was a foolproof way of getting absolutely straight lines… to look more like the metal strip on the real mixer. There wasn’t a lot of it on the cookie, so the taste wouldn’t be noticed with the royal icing mixed in.
@ Kathy: Try emailing them to ask.
Awww, @ Michelle: So sweet, thank you for sharing!!
Is there anywhere to get this cutter? I love these cookies. I have a white, red, boysenberry and apple green mixers
Hi Maria,
There’s a link to the site in the post (under list of items you’ll need). If they’re out, CheapCookieCutters.com also has a version.
hello
your work is awesome really it’s wonderful
i just want to know if i can use any cookies’s receipe ?
thanks .see you ;
http://maissoutaloumkilsafoufa.wordpress.com/
Hi Maissou,
I use recipes which hold their shape well when baked, so yes, the cookie recipe does make a difference. Hope that helps!
Where can I purchase this cutter?
Thank You Sandra
Hi Sandra,
Here is the link; https://amzn.to/2BG5HvQ
Happy baking!