
Simple Baby Shower Cookie Favors
Congratulations to Jenny of Picky Palate who is expecting a baby boy soon!

It’s a very exciting time for her, and thoughtful Marla {Family Fresh Cooking} and Amanda {Kevin and Amanda} wanted to make it extra special with a surprise virtual baby shower! They organized a host of wonderful food bloggers (see list below), to come together and surpise Jenny with online sweets, savouries, libations and crafts.

Surprise!

Jenny, hope you like these cookies I made for you and your soon-to-arrive bundle of joy. I’m so happy for you and send you well wishes and hugs.


Recipe Boy: Chocolate Dipped Peanut Butter Cup Stuffed Oreos
With this virtual shower may you and your new baby feel the warm welcome that is being expressed by all of us in celebration of his arrival!

If you’d like to make the baby shower cookie favors here’s a basic how to:*
 *
*
Gingerbread Cookie Dough and Cookie Cutters
You can find the recipe for the dough here.
The cookie cutters can be found by clicking on each link below:
- small teddy bear cookie cutter
- bigger teddy bear cookie cutter
- whale cookie cutter
- squirrel cutter (Ikea)
- moon cookie cutter
- star cookie cutter

Royal Icing
You can find my favorite royal icing recipe here. The consistency of icing is key for easy decorating. Click here to see a YouTube video on finding the right icing thickness for cookie flooding.

For the bear cookies the icing needs to be thicker. Click here to see a YouTube video on finding the thicker icing consistency. (Same icing used to stencil).
*
Decorating the Cookies ~ What You’ll Need
*Check each cookie below for what you need, if you only want to make certain cookies
- piping tip 233
, #1.5, #2,
- piping bags
- couplers
- fondant rolling pin
- gum paste
and small ivy leaf plunger cutter
- Gel paste colors; orange, black, white, sky blue, yellow, brown, green
- pink edible pearls
- sanding sugar
- dogwood center (on squirrel)
- pearl lustre dust spray
- gingham bows (Martha Stewart Crafts)
- baby blue bows (Michael’s Craft Store)
- gingerbread man silicon mold (Mold Muse on Etsy)
Decorating Steps
For all of the cookies besides the teddy bear, you’ll need to outline and flood your cookie with the icing. Here is a video on how to do that. For detailed decorating tips, this tutorial may be helpful for you.

Squirrel Cookie:
Besides the following instructions, you may want to add a deeper color stripe on the squirrel’s tail, change his color to brown (I was having fun with the colors), or anything else you can think of to make him more squirrel-like. I thought mine ended up looking a bit like a kangaroo! Or like a squirrel-a-roo. Thanks to @poodlesandpearls on Instagram here for that, it made me giggle. Anyways, here we go:
1. Using a #2 piping tip, outline and flood your cookie with icing.
2. Let the base dry for at least 6-12 hours.
3. Add a black icing dot for the eye, using a #1.5 tip, and a light orange dot for the nose. Adhere the edible pink pearl with a small dab of icing. You can stop at this point if you like… Here’s what he looks like so far:

4. If you’d like to add the ‘leafy’ details, press a small amount of green gumpaste into the dogwood center mold. Scrape the excess off the back with a palette knife. Using the same gumpaste or a slighty darker green, roll it about 2-3mm thick. Punch out the leaf shape and adhere to cookie with icing.

5. Add some lines on his tail and for his leg, using a #1.5 piping tip. If you’d like, add sanding sugar while the icing is wet.

(Hubbers liked it better without the sanding sugar, I liked it better with). Let your cookies dry and you’re done!

Star Cookie:
1. Using a #2 piping tip, outline and flood your cookie with icing.
2. Let the base dry for at least 6-12 hours. {Instagram pic below~ Rise filter and Lenslight App}

3. Add some lines using a #1.5 piping tip.
4. Let the icing dry.
5. Spray a little pearl luster dust on the cookie and you’re done!

Moon Cookie:
1. Using a #2 piping tip, outline and flood your cookie with white icing.
2. Immediately after, pipe a small dot of blue on the white icing, for the eye of the moon. (I would make my blue darker next time. It’s difficult to see his eye).

3. Let the base dry for at least 6-12 hours.
4. Spray a little pearl luster dust on the cookie and you’re done!

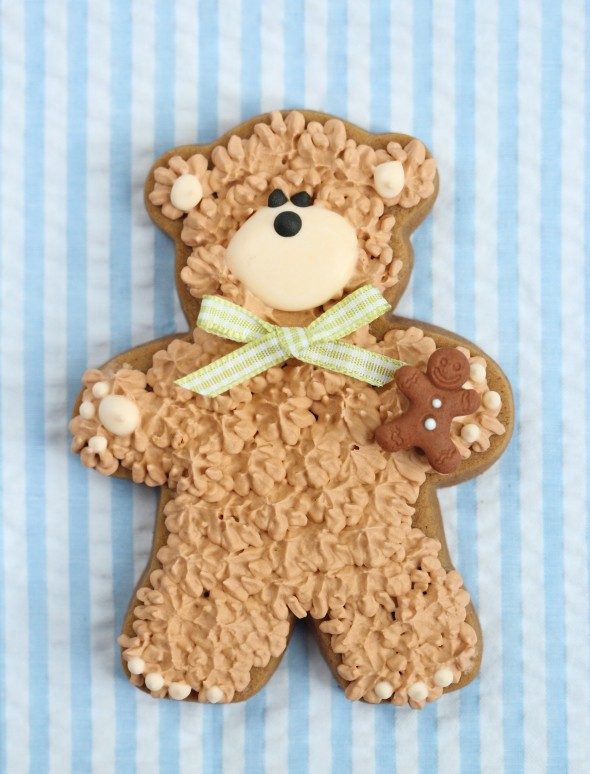
Teddy Bear Cookies:
1. Using grass piping tip 233, pipe short lines of light brown icing fur all over the surface of the teddy bear. Again, the icing needs to be thicker than flooding consistency for the ‘fur’ on this cookie. Click here to see a YouTube video on finding the thicker icing consistency. (Same icing used to stencil).

2. Use a very light shade of brown flood consistency icing and a #2 tip to pipe circles for the teddy bear’s ears, snout, paws and feet. I was a little distracted when I did his feet. Can you see why?
3. Let the base dry for at least 6-12 hours.
4. Add black flood consistency icing eyes and nose using a #1.5 piping tip.
5. Adhere the gingham ribbon with a small dab of royal icing.
6. Press a small amount of brown gum paste or fondant into the gingerbread man mold. Scrape the excess off the back with a palatte knife. If the gum paste or fondant is too soft and isn’t coming off cleanly, place the mold in the freezer for 5 minutes and try again.

7. Add tiny dots of icing for the buttons and for the eyes (Looking back, I should have done the eyes too!). Adhere the gingerbread man with a small dab of royal icing.
Done!


Baby Whale Cookie:
1. Using a #2 piping tip, outline and flood your cookie with icing.
2. Immediately after, pipe a small dot of icing for the eye. (I would make my blue darker next time, like the gift bag I got the inspiration from below. It’s difficult to see his eye).

3. Let the base dry for at least 6-12 hours.
4. If you like, add a little ribbon embellishment by adhering with a small dab of royal icing. Finished!


And if you haven’t had the pleasure of viewing the delicious food and recipes on Picky Palate, head on over and enjoy.
Have fun!
xo,
Marian


Click on the following links if you’d like some more baby shower ideas:
- Elephant Baby Shower Cookies
- Baby Shower Cookies
- Bath Theme Baby Shower Cookies
- Lamb or Bunny Baby Shower Ideas
- Baby Shower Cupcakes


The teddy near is beyond adorable! It’s amazing how a little bit of texture to the icing makes such a big difference! I also really love how pretty just a rich of sparkling sugar is on the squirrel!
Wonderful!!!
This is an adorable collection of baby shower cookies. Your little bear is almost hugable and I love all the little details you added to the squirrel and the whales.
Beautiful job!!
So delicate and cute!!!
Those are so precious – I love the bear holding a bear!
Quick question regarding the bears – does the fur need to dry before I add the face/paw flooding ?
Thanks
Cutest baby shower cookies ever!
I’d just love to take one of these adorable cookies home as a favor!
Fabulous tutorial!
So happy for Jenny and her family!
Hugs sweet girl!
xo
Love your sweet happy blog!
Those are so cute! You have so much talent. You have been an inspiration to me. Thanks for all your great ideas! Be blessed.
Ha ha, @ shelly (cookies and cups), not at all. 🙂
@ Jenny Flake: So happy to be able to celebrate with you Jenny! xo
Hi @ kelley {mountain mama cooks}: Hope you’re well too; Love seeing your pics on instagram.
Hi @ DiAnne: I didn’t wait to let the fur dry, no.
THANK YOU to all of you who left me a comment here – so many lovely ones, I really appreciate it! xo
All I need to do is to frame the cookies up if I ever receive beautiful pieces like this. Such a shame that I don’t see any cute decorative cookies like this in my country 🙁
These are just to sweet to eat. Love it.
Your cookies are precious works of art!
These are cutest cookies ever! I am just amazed they are cookies! That are beautiful!
Oh, these are the most adorable baby shower cookies! Love those teddy bears. And the little gingerbread man accent is just brilliant!
really cute I’ll keep them in mind for pregnant friends <3
Hello
I always follow your posts. They are really interesing!
At this moment, I’m starting a new blog of cookies and other sweets. If someone wants to look it, this is the web:
http://sweeteningtheworld.wordpress.com/
Thank you!
love all kinds of teddy bear products.
Hiya – I have the piping tip 233, but when I’ve tried to do the “grass” or “fur” effect the royal icing is too thick to come out of the holes or to thin and loses its shape – any tips? 🙂
@ Shannon: Absolutely, you need to find the middle ground between too thick and too thin. If it’s too thin, add icing sugar until it works. And if it’s too thick, add small amounts of water until it works. xo
Love the way you packaged/display the cookies. I’ve been searching for this type of basket for ages in blue/pink precisely for my baby shower cookies! Could you please let me know where you purchased, cost, and measurements? Thanks! BTW, LOVE your website! You are the queen of royal icing!
Thanks, @ s! I’m sorry, I gave away the basket so don’t have the measurements, but I can tell you that I bought it at Michael’s Craft Store. It was pricey from what I remember (btw $20-$30), but I used my 40% off coupon.
Hi
Sweetopia i really really like your cookies very much , i hope that u will make a YouTube video on how to make royal icing your way , you are really gifted ,love your cookies decorating.
HI,
I just love your blog. I was wondering if you have any cookies in the shape of an onesie, shoes, blocks or maybe a bib
HI @ Roshonna: Here they are:
https://sweetopia.net/2009/06/baby-shower-cookies/
https://sweetopia.net/2011/08/elephant-baby-shower-cookies/
https://sweetopia.net/2011/06/baby-shower-decorated-cookies/
https://sweetopia.net/2009/06/baby-shower-cupcakes-bows-happy-flowers/
https://sweetopia.net/2010/09/first-birthday-decorated-cookies/
Hi Marian! I would like to know how did you accomplished the color for the little stars. Is just yellow or yellow with a touch of black, green or brown?
thank you do much!!
I totally love your work!!
best regards!
Mery.
Thank you for posting how to do fur on the
Teddy Bear. This gives another dimension .