
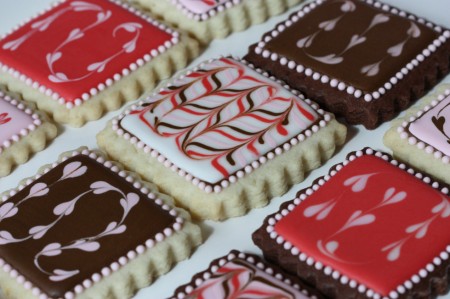
If you’ve tried cookies like these before you know how simple they are to make, and if you haven’t, you’re about to find out just how easy they are to create.

It’s called marbling, feathering or swirling, which is basically when one or more colors of icing are applied to a base coat of icing, and then a toothpick, cake tester, pin or skewer is dragged through the icing to create a marbled or swirly effect.

Each combination of colors creates another look.

Just by changing the way you set up your lines and drag the toothpick, completely different designs emerge.

You can incorporate the swirled icing into your design, like these feathered cookie friends:


*
How to Make Marbled, Swirled or Feathered Decorated Cookies
If you’d like to try the marbled effect, the most important thing for your success is the consistency of the icing. To help you with that, my cookie decorating tutorial goes over some tips and the 10-second rule here.

Once you have your cookies baked and icing made, it’s time to begin by piping your outline. I like to use a piping bag fitted with a coupler and #2 tip.
Fill or flood your cookie with royal icing right away. You could leave the outline to set to create a solid dam, but you’ll be able to see the border when the icing dries.

Once you’ve filled the whole cookie in, shake it gently left to right on your work surface, to help smooth the icing out.

Add your second (or more), layers or colors of icing. Work as quickly as you can before the icing sets.

Take a toothpick, pin, skewer or dough tester (hey, whatever works!), and drag it through the icing. In this case I drew S-like shapes. The image below shows which direction I dragged the toothpick in.


Finish off the edges with dots or another design of your choice and you’re done!

The hearts are made by piping dots and dragging the toothpick through the center of each dot.


Let your cookies dry, package and ribbon.

Simple, easy, fun and impressive!
If you prefer video, I’ve got a video tutorial on marbling here for you to watch.
*
I’d also like to send out a big thanks agian to Bridget at Bake at 350 for having me as a guest contributor for her blog a few weeks ago. In case you didn’t see the post, it’s what I’ve shared with you here today, and if you haven’t seen Bridget’s eye-candy cookies and baked goods of all kinds yet, check them out by clicking here!
*
Happy marbling!
xo,
Marian
p.s. Update – I’ve received so many emails asking where I got my square, fluted cookie cutter, so here’s the link for you.


Great tutorial as usual. Love the pink and brown together.
Absolutely gorgeous. Thanks for sharing your techniques. Just makes me want to get baking!
absolutely wonderful!
Great tutorial! I really appreciate the tip about flooding the cookie right away. It makes a big difference to the look in the end!
GREAT tutorial! I love this effect…the cookies are just beautiful, as usual!
Love! You make it seem so easy. I’m going to have to start practicing!
I tried this after I saw your guest post and it was super easy thanks to your great tutorial. Thanks!
I saw this at Bake at 350 and spent all day yesterday trying to make these cookies! It was my second attempt with royal icing and I’m so happy with the results. Thank for such a great tutorial!
I love the marble effect. it always makes the cookies prettier. thanks for the tutorial darling
I love the marble effect. it makes the cookies look prettier. thanks for the tutorial darling
Love love your blog Marian, so informative and amazing tutorials. Thank you
Regards,
Rowaida
Now i read the exact directions, i will try them my own!
Marian,
That was another awesome tutorial. Thanks so much for sharing how you make such beautiful cookies! 🙂
Perfect Marian! I love your tutorials!
Thanks so much for the shout-out, Marian! I love this post!
Love it. Love it all. Your work is flawless and stunning!! Go girl!
Outstanding Marian,I’m always so excited when I open my mailbox and find there is something from you, thank you for taking the time to share.
Beautiful! Thanks for sharing these amazing cookies!!!
looking at your fantastic tutorials is always inspirational! I love the classic and chic look of your designs!
Thank you for the tutorial, i really like the swirl with the little hearts,
going to bake and decorate right away.
See you next time
groetjes Rianne from http://www.koekiekoekie.nl
Another great tutorial Marian! Easy to do and yet produces stunning results.
Hey there! Just wanted to let you know I awarded you the sunshine award on my blog! http://cuppycakebakes.blogspot.com/2010/04/sunshine-award.html
ps thanks for sharing this tutorial! I cant wait to try!
Thank you for sharing,I just realy love your blog again thank you very much.
how do u make ur RI pure black or red… please guide me..i want to make it black also for outline…
Love the tutorial! In fact I made the pink and brown heart swirl cookies today. Need help in one area. How do you get your dots so perfect without any points at the top? And what color brown did you use? Thanks for your reply.
Glorious! I so want to make cookies that look as good as this.
Tarrah, thank you for the sunshine award!
Sana, I use the Americolor brand. No matter what brand you use, you’ll need A LOT of coloring. The three main colors which use a lot are:
red
brown
black
MJ, I use Americolor chocolate brown with a bit of black in it. If your dots have a point to them shake the cookie a bit to help them settle. If the points are still a bit to thick/high, your royal icing needs to be thinned a little.
I love this look. It looks so hard but really it is so easy. I did this on my Valentine’s Cookies & my St Patrick’s Day cookies.
For me the hardest part seems to be the outline, getting a decent line. The marbling is beautiful.
That is WONDERFUL! Thank you for such a nice and informative tutorial.
Cheers!
Petra
I have been following your blog for some time now and I love your work. You are so creative and have been blessed with an incredible talent.
Thank you so much for being willing to share your talent with others through your blog. I have learnt so much from you and have even ordered a few books you suggested & I’m loving them. Thank you.
Hannah
gorgeous. simply gorgeous. and i love the owl! adorable (:
May I know what is the consistency of the icing you used for marbling. Is it the flooding consistency or the outline consistency? And one more thing, do you put the marbling right away after you flood the cookie or do you wait for a few minutes? Thanks.
Ram, I used flood icing for the marbling.
I rarely make two consistencies anymore. My flood icing is runny enough that it marbles well, but also thick enough that it makes a decent outline. (I use the ten second rule to figure out the consistency – it’s explained in my cookie decorating tutorial).
With marbling you have to work quickly. Do your base layer, add the next layers and pull a toothpick through them right away.
Hope that helps and have fun marbling!
My Godness, your blog and information are just adorable and very useful. Wow!!! I am so glad I found you
My Godness, your blog and information are just adorable and very useful. Wow!!! I am so glad I found you
My Godness, your blog and information are just adorable and very useful. Wow!!! I am so glad I found you
Hi Marian,
thank you for all your tutorial. I’m impressed with all your beautiful cookies creation.
I’m new to cookie art,like to give it a try. It just looks fun! I have couple of questions that i’m clueless how to. Appreciate your sharing & answers 🙂
1. For your sugar cookie recipe, i couldn’t find the one which converts to weight. Where can i locate the link? or butter 2 1/2cup is how many grams?
2. Sugar used is castor or icing sugar?
3. For left-over Royal Icing, how should i store it?
Many Thanks!
Hi Jessie,
No problem:
1) I haven’t converted the recipe yet, sorry… It’s on my ‘to do’ list.
2) I use regular granulated sugar (in some countries, for example Brazil, regular granulated sugar is called castor sugar).
3) I store my royal icing in plastic containers (with the lid of course). I leave it at room temperature for a maximum of 1 week, as long has it has been made with meringue powder not eggs.
Hope that helps!
Hi Marian,
Thanx for a great tutorial once as always !! could you please tell me what was the size of your scalloped square cookie cutters for these cookies? Thanx in advance,
Monali
This tutorial is absolutely wonderful ! Thank you so much !!
Marian, How do you get your fluted edges so perfect? My sugar cookies always get puffy and spread. It’s usually not that big of a deal but with the fluted edge it looks really bad.
Hi Erin,
There are a few things you could do to help keep the shape of your cookie:
1) Chill the dough for at least an hour before you bake it. (After you cut your shapes out).
2) Lessen or take out the levening agent (baking powder, baking soda), in your dough recipe.
3) Raise the temperature of your oven 10-20 degrees.
4) You should know that after you’ve rolled and cut your dough into cookie shapes once, the scraps you’re left with always spread more when baked. (The more you handle dough the more it seems to spread).
Here’s the recipe I use if you’re interested:
https://sweetopia.net/2009/12/sugar-cookie-recipe/
Hope that helps!
Marian
I’m new to your blog and I just love it! Everything looks so beautiful…great work!!
I’m also into the food blog world, and it would be great if you can take a look at my site and leave me any comment/suggestion.
Take care and keep posting!
http://youarecookingblog.com
I have just come to your site for the first time via a post on Red Path Sugar’s Facebook page. You create the most gorgeous little treats! I will continue to follow you. Thanks for all the great ideas and tutorials!
Thank you for sharing this! I always wondered how they got the beautiful designs on the cookies. Will definitely give this a try! Love your pics!
Hey,
This looks amazing,Im trying to self teach myself all this and was just wondering if you would be able to do the same thing with a cake. If you were would you really need to pipe the base on or would you be able to just spread the icing with a knife then pipe the design?
@ belinda:
You could somewhat do this with a cake if you were using buttercream, but because buttercream is thicker you won’t have a smooth effect. I wouldn’t really recommend it – it might look a bit messy. Technically you could cover the top part of the cake with royal icing (and then marbling would work), buuuut, royal icing dries fairly hard and you might not want your cake to have a hard top crust.
Melted chocolate marbles nicely if you’d like to try that on the top of a cake.
Hope that helps!
Marian
Hello Marian,
I just found your blog and it’s really amazing, thanks for sharing all these wonderful photos and tutorials!
I have a question, if I may, up there in the picture of the marbled square cookie you finished off the edges of the border with tiny cute dots, I absolutely love it! Those are just so precise and neat dots that I would love to know how to pipe! Would you please inform me on that?
Thanks again,
Sarah
Thanks Sarah. I used the same icing with a #1 piping tip and used very little pressure to pipe them. Just squeeze your piping bag a little bit and a little droplet of icing will come out. Let go of the pressure on the bag and lift the piping tip away. Since the consistency of the flood icing is already somewhat runny, any little ‘points’ which form when you pull the piping tip away, will pool right back into the drop of icing.
That’s it!
If you have any more questions I’m happy to help. Have fun!