
Hi, I’m Bridget from Bake at 350. The first time I saw Sweetopia, I’m pretty sure I cried from all of the loveliness. Marian’s cookies and blog are just so beautiful; I’m blown away every single time I visit. I’m honored to be guest posting here!
Monogrammed shirts, monogrammed towels, monogrammed notecards….why not monogrammed cookies?
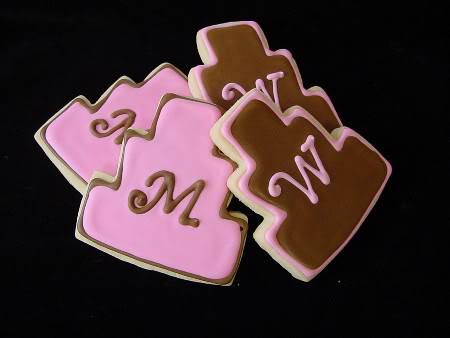
Monogrammed cookies make a special treat for bridal and baby showers. They’re also easier to make than you may think. Let me show you…

Royal Icing Monograms…
- Find a font on your computer,
- Type several letters into a Word document,
- Size the font to fit your cookie cutter (I view the document at 100% and hold my cookie cutter to the screen…this keeps from printing out lots of test pages),
- Print,
- Place the printed sheet under a sheet of wax paper on the back of a cookie sheet (I put this on a stack of books, so I don’t have to stoop when piping),


- With royal icing, pipe the monograms,
- Let dry several hours,
- Peel off the wax paper with your hands or a thin cookie spatula,
- Place onto wet flood icing.
Royal icing monograms can be stored at room temperature. {I always make more than I need, because they can snap easily. Handle with care!}
Now, if your monogram is delicate, thin or has lots of curvy details, consider making them with candy melts instead. Candy melts can be found in craft stores and bakery supply shops. They make for a less fragile monogram.

Follow the same instructions as for the royal icing monograms, just melt the candy melts per the package instructions prior to using.

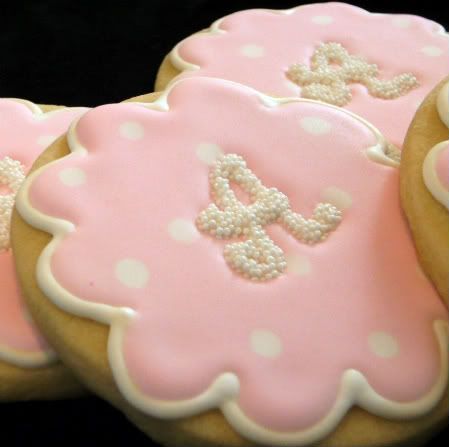
For these, non-pareils were sprinkled onto the candy melts before they set.
Thank you, Marian, for letting me be here today! Come by and see me at Bake at 350!


Bridget… I think the combination of you and Sweetopia together is giving me a heart attack. Man talk about an OVER abundance of talent and sweetness!!
You two are THE baking DUO of 2010!! (I’m so serious its not even funny!)
Love you both and think your contributions have made the world a better place!
Blessings-
Amanda
Brilliant! Outstanding post! I’ve never ever thought of doing the piping on seperate parchment and then transferring to the cookie. I will most definitely be trying that very soon. I also LOVE the idea of using a copy. And don’t even get me started on the non-pareils…I fear I’ll never stop gushing about your wonderful ideas. Thank you so much for this eye-opening post Bridget and to Marian, you are now even more, my cookie blogging idol! Sending love ~
Renee
Since I saw your original post on this earlier in March I have been hooked and doing various forms of monogramming, works great on shapes as well as letters. Your tutorials are so easy to follow, I feel that you are in my kitchen giving me lessons. Thanks Bridget and Marian, nice to be here at Sweetopia. This guest blogger is a great idea, such a good way to hook into new blogging talent.
Love it! I have a baby shower that I need to start planning and this will be perfect.
marian, thank you for this great post…i am a follower of bridget & bake @ 350…such talented ladies! wow!!!
Bridget’s one of the best!
Bridget is a great COOKIER… I love her distinctive style and original designs… she is always sharing great recipes, and her TUTOS are fantastic… I’ve learned a lot from her… I’m happy to find you here, Bridget!!
Can I just ditto Amanda? Seriously! she took the words right out of my keyboard….lol
You guys ROCK!!
Thanks so much for having me, Marian!!! I’m on Sweetopia, I’m on Sweetopia…I’m going to sing that all day! 🙂
I stalk both your blogs, so this saved me a whole mouse click today!!
I love this option, because there are so many cute fonts out there, and soooooo much easier than freehand. I love the nonpareils, they really make the monogram “pop!”. I think I’ll be making my next monograms with my favorite sweetopia-inspired medium…
*disco dust*
thanks girls!! :o)
I am new to cookie decorating and found your tuturial so helpful. I am hosting my best friend’s baby shower next Saturday and was still uncertain as to what the cookies would look like. It was starting to stress me out! Now I can breath a sigh of relief…those little pink and white numbers are perfect! Thank you for a wonderful post.
Marian what a great idea….guest cookie decorators….genius as always!
You guys are too funny and so nice! Thank you.
Kristen I can’t wait to see your disco dust monograms! LOL. Send me a pic too please. 😉
I was sooo thrilled the talented Bridget did this guest post; thank you for sharing your monogrammed cookie tips!
What a great idea! I have been making extra cookies and hoping my freehand works out OK, so this is something I’ll definitely be trying. Thanks for the guest post!
Beautiful! Any tips for piping the border and not being able to tell where u start and end? I feel like i can always tell on mine because that one spot is a bit thicker. Thanks!
Awesome tutorial! I’m definitely going to give this a try.
Danielle, I keep a toothpick nearby, and if I find the ‘blob’ a bit too big, I can take a bit of the icing off while it’s wet.
That and trying not to put too much pressure on the piping bag when I begin and end my lines.
Thank u!!!! Also, do we know what font and size the nonpareil letters were made with? They rock!
Hi Danielle…you know, I can’t remember. Whenever I make these, I always play around in Word on my computer to see the actual letter I’m making in each font. I pick the one that is a good fit for the occasion. As far as the size…that’s going to depend on what size cutter you are using. View your Word document at 100% and adjust the font until it is a good fit for your cutter. I hold my cutter right up to the screen. 😉
Hope that helped!
I can’t wait to try this. (Thinking about who I can make monogrammed cookies for..hmmm)
Could you also mirror image the royal icing that is on the wax paper so that when it is on the cookie the part you see is smooth?
Jennifer, you could do that. You could also use a runnier royal icing so when you pipe it, it settles down smoothly. My method is a bit different than Bridget’s; if you’d like to check it out it’s under the the tutorial section and is called “How to do royal icing flood work or run-outs”.
These monograms are the best! I can’t wait to try them out!
Jennifer…the “other side” of the monograms look a little dry…I guess from the wax paper. Try one first. I’m not sure if you’ll like the way it looks. You could always use a larger tip to avoid having lines in your monogram. I wanted squared off edges, so I used a smaller tip. Or, you could pipe the outline of the monogram and fill with flood icing…just let them dry overnight.
I love this website with all the beautiful pictures and wonderful ideas and tutorials. So inspiring! Do you have to use wax paper or will parchment paper work as well?
Parchment paper works well too!
Hi Marian,
I Really inspired by your pink monogrammed cookies that has white dots and candy melts on it. So when i went to baker’s store & saw Alphabet Icing Decorations from Wilton, I decided to bought it.
I want to put it on a cookie like yours.
Want to know, do i have to apply less royal icing at the place that i want it to be sticked? or just icing the cookies like usual then just put it on r.i in the middle?
when is the best time to apply it on r.i? & do i have to press it a little bit cause it’s a bit thick (about 7 mm thick) or it will sink by itself into r.i?
Lots of thanks…
Via
Via,
This is a guest post by Bridget (see last line in post), but I’ll answer from my experience. She does say that she puts it on when the icing is wet.
I wouldn’t put less in the middle and don’t think you need to press down; gravity will do the work for you especially if the icing is wet.
Hope that helps!
So sorry Marian, haven’t read it correctly …
Since i have opened lots of the tutorials, haven’t noticed that this is guest post by Bridget.
But again, thanks for the answers. Really want to know how to put the Alphabet Icing on r.i before i start putting it on.
Cheers,
Via
Hi, I have a question, does this technique works with fondant on the cookie and royal icing on the letter? Thank you
Absolutely, that’s also an option.