
I would love to share how to make simple gum paste leaves. They’re really so easy to make once you know a few handy tips and have the right equipment.

I usually create mine with gum paste rather than fondant for two reasons; they hold their shape better, and the detail is highlighted. That being said, since gum paste is more expensive than fondant, another option is to use half of each as a mixture. It is an excellent cost saving technique if you’re making a large amount of these leaves.

To make gum paste leaves, you will need:
- shortening
- decorating gloves
- cornstarch
- lustre spray
(optional)
- gum paste
- rolling pin
- pin
- leaf plunger cutter
- food gel coloring
- CelFormers
Coloring the gum paste:
Massage a small amount of food gel coloring into your gum paste at a time. It’s easier to add coloring bit by bit, rather than try and correct or lighten the color by adding more paste. I wear decorator gloves with a bit of shortening on them so that my hands stay color-free, and the gum doesn’t stick to them.
Instructions:
Dust your work surface with cornstarch. It does look a bit strange; but I like to fill a clean, new nylon stocking with cornstarch until it is about tennis-ball size, tie the end into a knot, and store it in a plastic container. It’s easy to use just the right amount of cornstarch by lightly dabbing the nylon onto the work surface.

Roll the gum paste out to about 3mm or 1/8 of an inch thick, using your small rolling pin. How thick or thin you’d like your leaves is really a matter of preference though.

Press your leaf cutter into the gum paste, just as you would a cookie cutter into cookie dough. Before you lift the cutter away, press the plunger a few times to create the petal embossing. Making sure you have enough cornstarch under the gum paste, move the cutter in a circular motion on your work surface to help create a cleaner cut. Lift the cutter from the surface.

You will notice that the edges of the leaf need to be smoothed. Gently press into the leaf cutter and run your fingers along the edges to wipe away the excess gum paste. Turn the cutter over, hovering over the flower former, press the plunger and your gum paste leaf should release and fall onto the former. If it needs a bit of coaxing, gently pry the leaf away from the cutter with your pin.

Bend the leaves into your desired shape and let them dry on the flower formers for at least an hour. If there is any excess cornstarch, gently wipe off with a pastry brush.


At this point you can put petal dust on to give the leaves a bit more color, shimmer and to highlight the veining. Another option for shimmer is to spray on lustre spray. I’ve put a very light coating on mine.

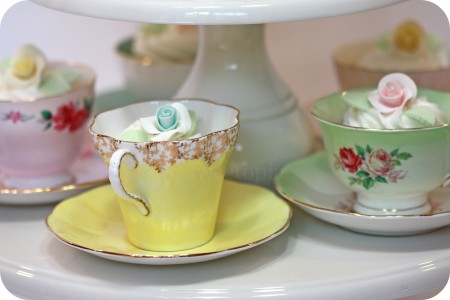
Voila! Easy gum paste leaves to dress up your flower confections.

Incidentally, these are lemon cupcakes with vanilla buttercream icing, topped with gum paste roses from Petra International and of course, gum paste leaves! A few more gum paste leaf pics can be found on older posts here, and here. You can make your own roses of course, but as I’m still working on improving mine, I opted for these pretty ones instead.
A big thanks and credit are due to Kylie Lambert of Le Cupcake for the ‘rose cupcake in a teacup’ inspiration. Her creations are beautiful works of sugar art!
Thank you to my friend Rebecca for lending me her beautiful tea cups!!
I would also like to thank-you very much for all of your attention! If I can be of any further assistance please don’t hesitate to email me.
Have fun creating!!
Marian


Thanks so much for sharing the” how to “and showing your beautiful creations !
Gorgeous as always !!
I love making the leaves, too.
I use the 50/50 mix and roll thinand shape on the flower formers.When I hav a lot to do I use paper towel tubes and bathroom tissue tubes cut in half.Dust the formers atubs with 50/50 mix of powdered sugar and cornstarch.
Happy Baking and Decorating,
Chef Angie
Diane: Thank you!!
Angie: Thanks for the tips! I’ve never thought of using paper towel or bathroom tissue tubes as formers. Great idea!
A couple of other ‘household’ formers which work are egg cartons, egg crate foam, shaped aluminum foil and manicotti noodle trays.
The prettiest thing I have seen all day, just lovely.
omg! SO so cute! Lovely work! Beautiful! I hope all is well! 🙂
maria
Bethie, thank you!
Maria, thank you too! Things are good but were busy this summer. I know I haven’t written for a while, but have some more posts brewing… soon ready to go. Hope all is well with you! =)
Thanks so much for your sweet comment on my video post!
I am glad you left a comment, because it brought me to your wonderful site!!! I am subscribing as we speak!!!
what an excellent tutorial marian, and those rose cupcakes are just stunning!!! so is your whole setup, those cups are totally to die for!!
Oh I love this creation! It really came together well! What a great use for the tea cups 🙂
wow…. what a great idee to use thies beautiful cup’s.
a very nice setup like always. I love your creations very much.
ML
Such a Great way to show off beautiful tea sets!!!
Thanks for dropping by and commenting!!
hi marian,i love everything you do and i m trying very hard to make as beautiful cookies as yours (it s a hard job!!)
anyway,thks a lot for sharing your tips and recipes,you ‘re very helpfull for an amateur like me.
these cupcakes in a cup are really cute,whith all these nice roses!!! i love them!!
i was surprised by the picture of the items we need,specially by the shortening you use;i m looking for a shortening that can replace crisco(because of the transfats)and it s really hard for me to find something else.specially because i m french and i don t know at all what kind of brands are on the market.
do you have any tip for me,please?
thks a lot for your help.
kind regards
meriam
Thanks Meriam from Moorea (love that!)!
How about just using a little bit of butter? It’s definitely fatty but not the bad kind, like you said. All natural!
I’ve never tried it, but it might be worth a shot!
Please let me know how it goes.
Happy decorating!
Marian
thks a lot marian,i m happy to get your answer,it s very kind of you.
i agree whith you for the butter,i m gonna give it a try.
happy decorating
meriam
sososo cute! I am throwing a bridal shower for my best friend and its going to be a tea party theme. This would be perfect! Where oh where did you purchase your beautiful teacups? PS- I am a new fan of yours! I LUV your blog! You definitely motivate me to try and decorate cookies! Ive never done it before cuz im scared of failing horribly… so im super excited about that. You definitely offer plenty of helpful hints! Cant wait to begin!
Hi @ sharon: Lucky me, my friend sells and buys antiques and those are all borrowed from her for the photo. Thanks for visiting and commenting and hope you have lots of fun decorating!
You’re cupcakes are beautiful! How long do the gumpaste flowers last on top of the buttercream before wilting?
Hi @ Annie: I think there are variables, such as how warm the environment is, how thick the gumpaste flowers are, how much of the surface is touching the icing, how much fat the icing has in it etc. If you’re thinking of doing a specific flower (and hopefully have some time to experiment), I would make the flower you’d like, put it on an iced cupcake, and see how long it takes.
Of course, a good rule of thumb is to put the flowers on as close to the event as you possibly can.