
In the mood for some Mardi Gras sweetness?

When Kim of The TomKat Studio asked me to make something Mardi Gras-themed for my monthly guest posting there (so excited about that b.t.w!), I immediately thought of these. So fun {and easy} to make and the perfect opportunity to use my favorite, disco dust! UPDATE: Please note that since I’ve made these I have found out new information which states that disco dust is non-toxic but only for decorative purposes. So maybe a sweet which you’re using for display or for a royal icing transfer which would be removed from a cake or cookie before serving. An alternative, although not as sparkly, but pretty nonetheless is FDA approved pearl or luster dusts.

*

I’ve made them before (one of the first posts on my blog two years ago, right here -don’t laugh too hard 😉 ) and have always wanted to try them again.

*

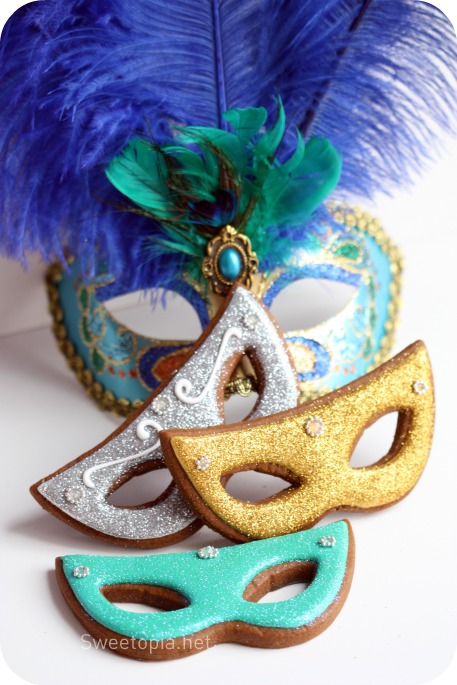
The idea is from p. 26 of Peggy Porschen’s book Beautiful Cakes (One of my favorite decorating books with gorgeous cakes, cupcakes and cookies!).


I’ve just tailored them to the Mardi Gras color theme and added a few different designs.

- If you’d like to make these, you’ll need a cookie recipe of your choice, such as gingerbread or sugar cookies. I used gingerbread.
- The cookie cutter is from Coppergifts.com, although you could just use a mask template made of paper. (File folder paper works well!)
- UPDATE: Please note that since I’ve made these I have found out new information which states that disco dust is non-toxic but only for decorative purposes. So maybe a sweet which you’re using for display or for a royal icing transfer which would be removed from a cake or cookie before serving. An alternative, although not as sparkly, but pretty nonetheless is FDA approved pearl or luster dusts
.
*
You’ll also need:
- Royal Icing Recipe and food gel coloring (Americolor Gold, Teal, Regal Purple, White & Black)
- Piping bags
- Couplers
- Piping Tips (#1, #2 and #3)
- Disco Dust
- FDA approved pearl or luster dusts
- Piping Gel
- Tiny dragées
- Tweezers
*
How to Make Decorated Mardi Gras Mask Cookies:
Once you’ve made your cookies & made and colored your royal icing, you’re ready to decorate:
Step 1: Outline cookie with royal icing using a #2 piping tip.

Step 2: Fill in or flood your cookie using the same piping tip.

Step 3: Fold a small piece of parchment in half so that there’s a crease in it. Open it up and lay your cookie on the parchment. Sprinkle disco dust onto the wet icing.

Step 4: Shake excess disco dust from cookie onto parchment. Lift parchment and pour extra disco dust into container. (Try and make less mess than I did! Lol. The crease helps funnel the disco dust, but it’s hard to take a picture at the same time!)

Step 5: Brush disco dust off the outer edge of the cookie with a soft bristle paintbrush. (Preferably when the cookie is dry so as to not poke the wet icing with your paintbrush).

Step 6: Pipe dots (size and position your preference) using a #1 piping tip and clear piping gel.

Step 7: Using tweezers, place tiny dragées around the piping gel.

That’s it!
(Another tutorial on how to use disco dust HERE and HERE).
A few other quick tips:
- Although my favorite disco dust is Rainbow, for a more vibrant look match the disco dust to the color of your icing as closely as you can.

- I used White Stokes glitter piping gel but you could use any regular piping gel
and mix a little bit of rainbow disco dust into it.

-
Note: The piping gel does not harden… it stays soft and sticky, so bagging or stacking these would be difficult. If you’d like to make them and package them in some way, maybe use cute, clear box. (The kinds they sell for wedding favors).
*
A quick tip on baking cookie with lollipop sticks:
Press or slide the lollipop stick into the back of the cookie and fortify it with a little piece of dough. Turn over and bake.

To make blue edible ‘jewels’:

Step 1: Crush the jolly ranch candy of your choice in a ziplock bag. I place the ziplock bag in between tea towels and use a meat mallet to hammer on the candy. (You can also use lifesavers, but they don’t turn out as transparent. Isomalt works too. See a post on using isomalt HERE).

Step 2: Place the powdered jolly rancher in a silicon jewel mold.

Step 3: Heat in microwave for approximately 30 seconds (length of time depends on your microwave). Long enough to liquefy it, but not burn it!

Step 4: Let cool to room temperature. You could pop the silicon mold in the fridge or freezer to cool the candy down; just be aware that if you leave them in there too long, they get stickier faster because of the moisture in the fridge or freezer.

Step 5: Pop them out of the mold and apply to your cookie with piping jelly. (I like the jelly because it’s clear).
*
To add some sheen to your royal icing:
Lightly spray the dry royal icing with PME Lustre Spray with the colour of your choice.

How to add swirls:
Wet on wet marbling technique: Pipe dots onto your wet icing and drag a toothpick through the dots. For a video click HERE, for a how-to post click HERE.

There’s an endless amount of ways you could decorate these cookies. More piped details, more ‘jewels’, different color jewels, fondant or gumpaste broaches… you could even add some real feathers or flowers as adornments.
I know I’d love to keep playing around with these and am looking forward to seeing what you come up with if you’d like to share on my facebook page HERE.
Have fun decorating yours and happy Mardi Gras!
xo,
Marian


These cookies are beautiful! Lots of fun tips and cool cookie decorating “stuff”. Thanks, nice job!
so gorgeous!!
My word! These are fancy.
Marian,
These are beautiful! Love your work!
What a fantastic tutorial! Just gorgeous masks. I made a crude version of these awhile back but your tips make me want to go back and redo them (not to mention erase the post!) Thanks for the fabulous info.
WOOOOOOWWWW!!!!!
Fantasctic!!!
They came out beautiful!!! There so much to learn from this post. Thanks 🙂
quite lovely & always GREAT tutorials!
enjoy the w/e!
Gorgeous a s always…and a great tutorial! Thank-you!!
these look great, and I really love the idea of adding the stick to the side!
You’re a genius.
What fun Marian! Love an interactive cookie you can wear, then eat! You did a lovely job. They look fantastic!
Marian,
OMG… you are something.. these are amazing. Can I come for a day with you…hahahaha
I am in Buffalo, Not to far away.. I am actually thinkging of the Toronto based classes that you attended. Maybe if they have a weekend crash course or something, I will make the trip.
Aimee
Thank you for your kind comments!!
Never get tired of looking at these beautiful cookies and your tutorial is so informative.
You are so talented,I loved the marbeled one.
Your tutorials are very clear and easy to follow.
GRACIASSSSSSSSS!
wow… you did again a fantastic job! thank you for all the interesting idees and tutorials. I love your blog!
ML
Marian:
I lOVE these. I am SOOOOOO disco dust stingy! But, when I see these I think….okay, I can add more!
Is it immediately wet when you add the dust or do you let it dry a little? I always think if it is too wet it will sink in the royal and I will have wasted!
Thanks for the comments!
@VT Yes I add the disco dust right after I pipe the icing…. It sits on top! (I know what you mean about using the disco dust. I got over it (obviously hahahaha!)
OMG, these cookies are so beautiful! Your tutorials are just the best, thank you so much for all your efforts!
Love them, they are absolutely the coolest cookies ever!!
Wow, these cookies are absolutely gorgeous!
Great job on cookies
Wow! What a great post. So detailed. Love the masks. Did you use a cookie cutter for the shape of the masks?
What a beautiful job again.
Fantastic photos,
detailed explanation,
once again a fantastic job.
Bravo Marian.
Absolutely gorgeous!
@ Dominika, @ leana, @ Maria-Greece: Thank you!
@ Melissa: I used a cutter from CopperGifts. (The link is just before the tutorial).
Wow! It’s a great post. This tutorial is amazing. I love all your job.
Beautiful! You are so talented! I’m just starting to decorate cookies. I hope mine will someday turn out to look half as great as yours look! Thanks for the Tutorial!
Oh Marian, these are just breathtaking! You make it sound so very simple, but your results are something I surely couldn’t achieve! Thank you, thank you for sharing with us!
AMAZING!
@ nyanyels, @ Holly: Thanks so much!
Holly and Nicole; you *can* do it!!
MARIAN YOU ROCK!!!
OMG those are AMAZING, and that tutorial is incredible!!
edible lustre spray? how cool!
the jewels you made from jolly ranchers? GENIUS
every detail……just beautiful!!
They are so beautiful!!
Marian, I always learn something every time I read your blog. Those molds are great! They are a MUST!
creative and beautiful
Oh my, these are just stunning! Truly amazing! Did you have a cookie cutter for the masks or did you make yourself a template? I must get me one of those jewel moulds!
These look absolutely amazing! You did a fantastic job with all the decoration options!
Thanks for the comments! =)
Emma; I used a cutter but yes, you could make a template! There’s a link to the cutter I used; just before the tutorial.
they are wonderful, i like them very very much.
great work. i want to try the icing receipe while decorating some cookies.
Wow ! Love them so playful and sophisticated at the same time !
These are great! My niece just requested a Mardi Gras themed Quincinera, so I can’t wait to try some of your techniques!
Thank youuuuu, this is awesome!
Thank YOU for your comments!!
Gorgeous Work of Art! Marian you are amazing and so inspiring love
These are STUN-NING. Truly. I am utterly inspired! They are just so beautiful! And perfectly, flawlessly done! Great job!
Those are beautiful! I wish I was as creative and inventive as you are!
So festive and perfect for Mardi Gras!!!
Love the shimmer–just magical!
My sister is having a Mardi Gras party I’m going to make these now!
I am lost of words to describe how stunning these masks cookies are. This truly work of art. Thanks for a an eye feast for me.