

Managed to squeeze in some Easter cookie decorating and I have a wee bit of an update.

I’ve had so many emails asking about the KopyKake drawing projector, I think it’s about time I put together a tutorial!
So, for all those who asked, just thought I’d let you know that I’m beginning to work on one. (Update: The tutorial is ready; you can find it HERE).
I’d like it to be detailed and comprehensive with lots of visuals, showing a step by step how to use the “ever-so-pretty” contraption. *
For now, here’s a little photo slide show of one of these Easter cookies I made using the KopyKake projector:
After letting the outline dry, I flooded the cookie with the same consistency royal icing.

And c’est tout! That’s all!

I decided to try two different ways of doing these cookies; one with a base of royal icing and one without.


Which do you like better?


Of course I had to do a few cookies with disco dust![]() ! Click here for a little tutorial on how to apply disco dust to your decorated cookie.
! Click here for a little tutorial on how to apply disco dust to your decorated cookie.


*
If you’d like to try some of these cookies or others, you can find the recipes I used here:
*
For a Tutorial on Decorating Cookies click here.
*
Enjoy decorating and Hoppy Easter!
xo,
Marian


Your cookies are adorable! I personally like the ones with the royal icing background best.
My friend Courtenay attempted icing cookies using royal icing for the first time on some easter biscuits. The results of her first try can be seen on our blog: http://bakingmakesthingsbetter.blogspot.com/
Love your blog, keep it up!
adorable!
LOVE the cookies. how many diff. colors do u make at once? oh boy! Also, your piping is much thinner than mine. I have trouble going less than a 3tip-guess my icing needs to be a bit thinner-it breaks in a 2 tip. what size tip did u use for these outlines? As always, each one is stunning!!!!!!!!!!!!!!!!!
One more question-white backgrounds…piped with projector or by hand???
Thanks for the comments Tanya and Melissa (cute blog b.t.way!)
Danielle; Thank you as usual! 🙂
Those outlines are with a number 2 tip. You’re right – if your icing is breaking it needs to be thinned out a bit. The white backgrounds are freehand.
Very cute! I’m jealous of your projector and I’m thinking about getting one too but I don’t think the hubby will like that. I like the cookies with the background but they’re all cute!
I love all of them! But the ones with the icing background is my fav! And now you are selling me on getting the projector! UGH! I love you and hate you at the same time! lol
hugs
Kim @ http://frostmeblog.blogspot.com
Love them both! Just adorable!!
Wonderful….if we all had a kopykake machine! Question…do you always flood your cookies with the same consistency of royal icing that wou would use to pipe outlines? It always looks so thick and perfect! Happy Easter! Cute cookies!
p.s. I like the ones with the background..it makes them pop a bit more than the others…but all are great!
Melissa; Yes, I don’t bother making a thicker consistency border anymore. When I flood the cookie using the same icing the bumps need a little help to settle, so I shake the cookie gently.
Happy Easter to you too!
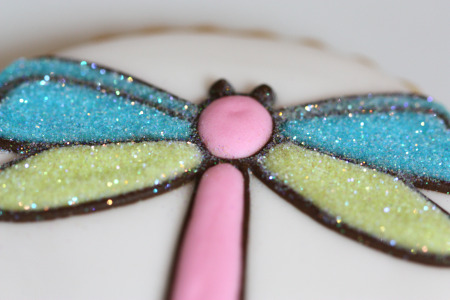
Love the vivid colours in these cookies and the dragonflies are gorgeous! Happy Easter 🙂
The chicks ar my absolute fave!
Can’t decide which I like better…all of them are beauties! You have such a steady hand. I REALLY want one of those projectors!
You’re so sweet! It’s your Easter holidays and you’re still thinking of us. BTW, I ordered my Peggy Porschen Books with your advice but I’m looking forward to ordering your book/s or attending YOUR classes one day. Do keep us posted about these developments. Louise from http://www.cakejournal.com has just released her e-book titled Easter Treats.
It’s not just the KopyKake machine but the way you actually pipe that is fantastic. I never actually thought about holding the icing so far away from the cookie for better control of the lines. Amazing tip!
Marion I truly enjoy your site. After doing cookies for 7 years, I still come away with a bit of knowledge from you. I am so looking forward to your “detailed” lesson on the KopyKake as I am on the fence about purchasing one. I notice their are several models out there, which one do you use?
Have a Blessed Easter!
Susan
Thanks for the kind and complimentary comments!
Susan I’m using the 300XK model right now, but plan on trying the 1000 as well. I’ll go over more detail in the tutorial to come!
Marian, these cookies couldn’t be cuter! I am in love with them! As to which ones I like better? I like them both the same so I would go with the ones without the royal icing base. They would be faster and easier to make since you don’t have to flood the whole cookie. Also, less sugar which is always a plus! Great tutorial. I HAVE to get that kopykake projector (I’m not going to say it again in this house as my husband ALWAYS thinks I’m saying coffee cake and says go ahead and make one!) hahaha
I love both of your style’s,very colorful…
to eat I would like the one with out the royel icing background,less sugar.
Happy Easter!
ML
Yeah it’s so cute and colorful. My daughter would love this for next easter. Or maybe I can make this laer for her to munch on. 🙂
Wow these are possibly the cutest cookies I’ve ever seen! Totally adorable. I am in love with the little chick 🙂
Super cute cookies Marian! Can’t wait for your Kopykake projector tutorial. Your tutorials are the best! I always learn a lot and the colorful pretty pictures always helps too!
I love all them!! it’s a great idea make them without background (more light) but with it I like very much too. One question for your tutorial.. I wrote you from Barcelona, in Spain. Could you explain if it will work with 220v? Can I buy it and use in Europe?
Thank you very much for all!!!
These are adorable!!
Gosh, these are as adorable as ever!!! I *so* want one of those projectors! Even so, I don’t think my cookies would be as darling as yours!!!
Absolutely adorable! I am like a kid in a candy store when I visit your blog!!
Where do you find the time??! (I know how busy you really are!) I like the ones with the white background, but for sake of sugar (and time, precious time) I would probably do without. What black colouring do you use to get it looking so fantastic and where do you get it? Thanks lady!
Just stunning as usual Marion!! You are SO gifted and talented and a trend setter!!
Blessings-
Amanda
cute as always!
I love the look of the cookies with the background but prefer the taste of less sugary ones!
cant decide really…
love your works. love love love em
awesome…love your cookies…i could never make such beautiful cookies…
Your piping skills are so amazing! I wish I could my lines as great as you. I wonder if I have my frosting too thick sometimes…
Even with a projector I doubt my cookies could ever be as good as yours! Your colors are always perfect too.
Susan, thanks for the giggle! re: ‘coffee cake’
Yolanda, yes, there is a KopyKake Projector to use in Europe at 220v, but you’d have to buy the specific adaptor. You’d have to also buy it specifically from KopyKake.com and let them know you need it for 220v. The other places which sell it won’t have the ability to change it to 220v.
Kerri-Ann I use the Americolor black (it tends to bleed less)… You can click the Americolor banner on the top right of Sweetopia to find their products. I only have sponsors which I 100% love!
BNDQ8 and Emily, once you have the little tips and tricks it’s only a matter of a bit of practice – really! And Emily, if the icing isn’t flowing well it might be too thick. For colors, try the Americolor brand.
Your cookies are so lovely! I love the black outlining. I need to work on my piping skills a bit more!
oh my WOW! I would love to get my hands on one of those projectors! (I have visions right now though of myhusband rigging up a fliashlight type apparatus…hmm may work out lol)
I want to play cookies now but I still have a ton of cookies from the other day….I better start dishin them out quickly!!!
wow! these cookies are divine! LOVE them!!
Hi Marian, I’m always a fan!
One question, after you pipe the background and waiting for it to dry, do you put them in the refrigerator?
Is that a bad thing, will it make the RI soft and gross?
Thanks in advance!! 🙂 love the blog! xx
Hi Pat,
Definitely not a good thing to put them in the fridge; you’re right, the RI will not dry properly and the colors would bleed due to the moisture in the fridge.
Just leave them at open at room temperature. The RI acts as a sealant for the cookie and helps keep it fresh for the time that it sits out. (That being said it can’t stay out indefinitely).
Happy decorating!
I actually like the ones without the royal icing base the best. Your designs are adorable!
HI! First of all, I love your site! You truly are an artist!
Second, my projector is driving me bonkers! I purchased a Kopykake projector (the bigger one) from a lady on Craig’s list. I’ve tried using it many times, but I’m about ready to chuck it out the window! The trouble is, my arm shadow always gets in the way and I can’t trace over the image like I’d like, especially with icing where you have to make one continuous line or it doesn’t look right. I’ve tried moving the projector, myself, turning every light in the house off, rotating the image, etc., to no avail.
Do you have any tips for me? I really want to use this on my cookies…
Thank you!
Hi Marian! I am realizing that I love your ability to match a color almost exactly as the pattern/picture you are using. Is there a technique or tip(s) that you have for doing that? Everytime I make RI my color is never quite as I would like it to be – i.e.not vibrant enough, wrong shade. Any suggestions would be most welcome and as always love, love, love, your site!
Hello Marian, I’m Ara from Ara Galetes, as I told you I bought the kopikake and I’m starting with the beautifully decorated cookies how you do it. I know it is early, but I see yours, with that outlined so perfect and I’m dying of envy. To me, if I do it with the nozzle 2 me is too thick, and if I do it with the glaze does not leave a sufficiently smooth and sometimes is wound. I do not know if I explained well. I wonder who exactly is the icing consistency when you go to draw up as accounts?
Thank you very much for everything and sorry for so many questions.
greetings
Hello Ara,
Have you tried using the recipe which I use? That may help with the glaze question you had. It’s in this post here:
https://sweetopia.net/2009/06/cookie-decorating-tutorial-general-tips-butterfly-cookies/
You’ll need to shake the cookie after you flood it with the icing to help the icing smooth over.
I do like the #2 tip with the icing I use, but #1 also works well with it.
I hope I’ve understood your questions correctly but please ask again if you need to!
Marian,
Your work is really beautiful. One question – I notice that you do all your dark color details before flooding the cookie. For example, on the chick you did the outline of the body as well as the eye and wing. My question is: how do you flood without getting icing on the fine details? I have tried to do eyes and other small details before flooding but they always wind up looking bad because I can’t get the icing to flood in a perfectly or because some gets onto the detail. I hope this question makes sense. I’m not sure how else to describe the issue.
Thanks.
Ellen, I think I understand what you mean. 🙂
If I pipe the eyes or other small details (which are usually inside the outline), I try to make those lines/dots a bit bigger or thicker because I know some of it will get ‘buried’ by the icing.
I also try not to flood or fill in as much icing in those cookies because I know too much icing will cover the details.
Even if I try these things it doesn’t always end up looking the neatest. For example, look at the ears of the bunny in the last picture here. (The one where the bunny is saying “I love Easter time”). It is more difficult to get a nice full look when there’s a small area to fill in – i.e. the thin part between the outline and his ear detail.
If you want to get a nicer look, you can a) do the outline, b) fill in the cookie, c) once the ‘filling’ is dry, THEN add the details such as the eyes etc.
I don’t always do the latter suggestion because it’s an extra ‘drying time’ step. -Laziness on my part 😉
Hope that helps. Leave me another comment if that wasn’t what you were getting at or if you have any more questions.
I was wondering where you get the designs/artwork? Are they from a book or site? Thanks, Love the cookies and blog!!
Kristi, I just saw your question; sorry! I just play around with the colours by using a small bit of icing first and seeing which gels work the best. If I’m not sure how to make a colour which doesn’t already exist in a gel or paste, I’ll google on the internet. For example, “How to make raspberry color” and see what comes up.
Jennifer, I get my designs/artwork from everywhere, especially stickers. other artwork, scrapbook paper, material etc.
hello Marion
beautiful work very inspiring thank you
I was wonering what colours and make of colouring you are using for these easter cookies
I have colours by sugarflair,(UK) and have a couple of americolour but I love these vibrant colours the pink, orange, turquoise and lime green
also where to get meringue powder for the royal icing I live in Paris France
thanks
ginixx
Hello Gini,
Thank you; I used Americolor for all of these.
The meringue powder is from Wilton; here’s a link if you like on Amazon:
http://www.amazon.com/Wilton-702-6015-Meringue-Powder-Can/dp/B000ZNOVCA/ref=sr_1_1?ie=UTF8&s=home-garden&qid=1294079573&sr=8-1
Have fun!
Hi thanks for your quick reply and the link!
I have been looking at the Americolor color chart and there are alot of shades in the same color, can you tell me which colour names you used on this project, for the pink, green , blue and yellow, just so if I order I can get the right shades!
thanks again
xx
These are pretty and so perfect. I am getting a head start on my EAster cookies and these are a definite inspiration. I love the look of the disco dust but its not really edible is it? I know its non-toxic but I read it was actually plastic. I was about to order a few containers but I held off after reading up on it…what is your take on it?
Hi Amy; disco dust is non-toxic and I’ve heard conflicting information about edibleness, which is why I’m in the process of finding out concrete info., not rumours. It sounds like it’s going to be good news – that it’s edible, but I’m waiting for FDA info. and will write a post as soon as I have the documentation.