
This is my first tutorial on tips and tricks for decorating cookies with royal icing. I have to say first off, that I’ve learned many great tips from various sources on the internet, from books and from cookie decorating classes. If you’re interested in other sources here are the main ones I’ve learned from:
1. Internet:
http://cakecentral.com – Find forums to chat with others about cake decorating etc., photo galleries for inspiration, tutorials and more on this gold mine of a cake decorating (& more!) site.
http://www.cakejournal.com/ – A lovely site with beautiful work by the author, Louise. She’s so great you might want to just leave here and check out her tutorial on decorating cookies! Why am I even writing this?! =)
http://chiccookiekits.blogspot.com/ – Meaghan’s got a great site dedicated to all kinds of cookie decorating. In addition to publishing her own book, Cookie Sensations, she writes for www.craftgossip.com edible crafts section.
http://www.youtube.com/watch?v=tZBXVveAEPE – Cat Cora from Iron Chef, shows how to decorate cookies on youtube.com. Hers is good for the beginner. There are lots of other video tutorials on youtube as well!
There are so many other great sites out there; have fun surfing!
*
2. Books:
Peggy Porschen’s books have great recipes, easy to follow instructions, and beautiful cakes, cupcakes and cookies. She has a new book coming out in July, Cake Chic
. I can’t wait for it!
Cookie Craft by Valerie Peterson and Janice Fryer is another excellent resource. It covers all the practicals of cookie decorating… from making or freezing the dough to a myriad of fab cookie ideas.
Toba Garrett’s Creative Cookies is one of the first decorating books I’ve bought. She covers many different techniques for decorating cookies, from piping royal icing, to covering them with fondant etc. For the beginner and advanced!
*
Classes:
Bonnie Gordon’s School of Cake Design (www.bonniegordoncakes.com) – Super if you live in the Toronto area! I enjoyed the cookie decorating class offered there and learned some helpful tips. There are many other great-looking decorating classes I’d like to try in the Toronto area, but haven’t taken the classes yet, so I can’t comment on them at this point in time.
*
Okay, here we go!
Decorating cookies is often called ‘flooding’ because you can essentially create a dam, wall or outline of icing on the edge of your cookie, and then ‘flood’ or ‘fill in’ that ‘dam’ with icing. There are those who like to decorate without using a dam by just applying the icing, but I find that I’m able to add more icing onto the cookie when the dam holds it in, therefore making the cookie surface look more thick and rich.

One of the most important components of decorating cookies is the royal icing itself. I have two favorite recipes; Antonia74’s (from cakecentral.com), and Peggy Porschen’s recipe from any of her books. Here is Antonia74’s icing recipe for decorating cookies:
Royal Icing Recipe
Ingredients:
6 oz (3/4 cup) of warm water
5 Tablespoons Meringue Powder
1 teaspoon cream of tartar
1 kilogram (2.25 lbs.) powdered icing sugar
*** Note; if your meringue powder has no vanilla flavour (vanillin powder) in it, add a teaspoon of clear vanilla to this recipe.
Directions:
In mixer bowl, pour in the warm water and the meringue powder. Mix it with a whisk by hand until it is frothy and thickened…about 30 seconds.
Add the cream of tartar and mix for 30 seconds more.
Pour in all the icing sugar at once and place the bowl on the mixer.
Using the paddle attachment on the LOWEST speed, mix slowly for a full 10 minutes. Icing will get thick and creamy.
Cover the bowl with a dampened tea-towel to prevent crusting and drying.
Tint with food colourings or thin the icing with small amounts of warm water to reach the desired consistency.
*
Besides your cookies and the ingredients for the royal icing recipe, you’ll need your tools:
Cookie Decorating Tools:
1) piping bags
3) piping tips(at least #’s 1-5)
4) couplers
5) coupler covers – these aren’t necessary; you can just rest your tips in a damp cloth
4) glasses – to stand your icing bags in
5) clean cloths – a few damp and dry ones nearby
6) toothpicks

Icing Tips and Tricks:
One of the most important things I’ve learned about cookie decorating is that if your icing isn’t at the right consistency or thickness, the experience can be very frustrating.
So, once you have made the icing, it ususally needs to be thinned a bit to create the best consistency for decorating. This means that it needs to be fluid enough so that it will flow just enough that it settles into your cookie dam, but not too much so that it runs over.
You may realize that that the icing was thinner before you whipped it for 10 minutes according to the recipe, but it does make a difference in the texture that you mix it that long. Do mix it for 10 minutes and then thin it out if you need to.
Add just drops of water at a time to make the icing runnier. If you add too much water at a time it’s more difficult to thicken it with icing sugar than it is to add water to it.
The trick I use to make sure my icing is at the right consistency, is called the “10 second rule“. Drag a butter knife through the surface of your royal icing and count to 10. If the icing surface becomes smooth in anywhere between 5-10 seconds, then your icing is ready to use. If it takes longer than approximately 10 seconds, the icing is too thick. Slowly add more water. If your icing surface smoothes over in less than 5-10 seconds, it is too runny. Mix your icing longer or slowly add more sifted icing sugar to thicken it.
I learned a slightly different ’10 second rule’, through Sarah Bell at Bonnie Gordon School of Cake Decorating… she likes to dip a spoon into the icing, lift it and let ribbons of icing drop back into the bowl, and count how many seconds it takes to make that surface flat again. (5-10 seconds).

Some people use a thicker consistency icing to outline their cookie shape and then a runnier one to fill it in. I have come to prefer using the same icing to outline and flood because it saves me time. (I don’t have to prepare two icings for each color, prepare two piping bags for each color etc.). That being said, the icing then can’t be too runny, because the outlines will not form properly.
Some decorators like to flood their cookies with a very runny icing, so if you are one of them, prepare two icing consistencies, one thicker, one runnier. The thicker icing should not be so thick that it is dry and curls when you try to pipe it. It should just hold it’s shape when you pipe it onto the cookie.

Coloring Icing:
Once you’ve managed to reach the desired icing consistency, add food paste coloring of your choice. I use a toothpick to slowly add color bit by bit. Because deep, dark colors such as red or black usually require a lot more food paste coloring, I’ll use the end of a butter knife to scoop out those colors if they’re in a tiny container. I should also add that I have come to prefer the Americolor brand for black especially. Americolor uses squeeze bottles which makes adding the color much easier, and it seems to bleed less into other colors.
Another tip when it comes to adding color to your icing; the colors usually deepen with time, so I try to color my icings 24 hours in advance to see if I’m happy with them.
Also, stirring your icing to add color will incorporate air into it, so if you leave the icing sitting for a while the air bubbles rise to the surface, where you can pop them by gently stirring just a little before you add the icing to the piping bags.
One more tip to help avoid air bubbles in your piping bag; massage the royal icing a bit before you twist the top end of the piping bag closed. Press the icing in the bag upwards, starting from the tip and working your way up, pushing out the air bubbles as you go. Then push it back down towards the piping tip.
*
Filling Piping Bags:
I have disposable and non-disposable piping bags for decorating. Either are fine, however, I tend to lean towards disposable because I can quickly see what color each bag has in it. Important when timing is key! That being said, you could color-code each with a matching elastic if you don’t like using disposable bags. I’ve also tried using squeeze bottles with my students at school, and they’re also great for being able to see the colors easily, they aren’t very messy, and the icing can be kept in them as they’re airtight with the wee little lids. Trying not to lose them with teenage students is a problem though! Sorry guys it’s true! 😉 For me, the bottles are really only good for filling in, or flooding, so I tend not to bother with them for the most part.
Cut off the ends of your disposable piping bags, insert the coupler, tip and close it off. I generally use a number 2 or 3 piping tip to outline my cookies and a number 2 – 5 to flood them. The larger the cookie, the larger the piping tip. There are some great tips for small details, such as 00 or even 000, however they clog very easily! I like to use tip #1-#1.5 for smaller details.
Get as many glasses as I have colors out, add a clean, damp cloth to the bottom of each, and set one empty piping bag into each as well, with the opening of the piping bag folded over the rim of the glass. Fill the piping bag with your royal icing. I find it easier to fill the bags with icing when I have two hands free.
Twist the openings of the piping bags closed, and tightly secure them with elastic bands. Work over your icing bowl so that the icing dripping out of the tips doesn’t go all over your work surface. Rest your finished decorating bags back in the glasses until you’re ready to use them.
*
Outlining Cookies/Piping Techniques:
Practice piping on your work surface so that your hand gets some practice before you begin the cookies. I usually find I need a few minutes to play around before my piping improves. I decorate my least favourite cookies, or my extra cookies first; that way if I make a mistake it won’t matter as much!
Outline the cookies first, and wait at least 15 minutes before you flood the inside of the ‘dam’. If the outline is a dark color such as brown or black, I wait 24 hours before flooding the cookie. It lessens the chance that the colors will seep into each other. If you live in a humid climate, air conditioning or a dehumidifier will help prevent color seepage as well.
I should also mention, that if you don’t like the look of the outline on the cookie, outline your cookie and fill it in right away. The icing needs to be at medium consistency for this… not too runny or it will just flow everywhere, and not too thick or it won’t settle smoothly.
To outline the cookies, hold the bag at a 45 degree angle and position the tip at a corner of the cookie. Put enough pressure on the bag so that the icing comes out and start moving towards the direction you’d like your icing to flow at the same time. About a centimeter after you’ve begun your outline, start lifting the piping bag away from the cookie, so that the icing just falls onto the cookie. Start coming back closer to the cookie when approaching another corner. If the cookie is more intricate, or has more corners, you may not be able to just let the icing fall as there won’t really be room to. Also start to apply less pressure as you approach the corners. While decorating, every once in a while I twist and tighten the top part of the bag to create pressure so that the icing flows well.

Flooding/Filling In Cookies:
When your cookies are ready to flood use a #3 – #5 sized piping tip. The larger the cookie the larger the tip. Start at one area and quickly zig zag back and forth until you’ve covered your cookie. Don’t worry if you haven’t filled in every little spot; speed is more important at this point. If there are a few spots that haven’t quite filled in once you’ve basically covered the whole cookie, use your piping bag, a toothpick or a paintbrush (used only for food), to push the icing around and fill in the gaps.

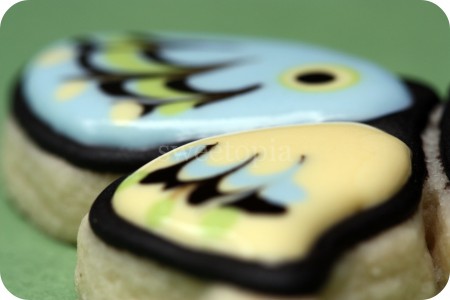
If you would like to add more icing colors to your cookie so that they ”meld’ into the base color, you need to add it right away. The base layer starts to dry quickly so you need to add your next colors as fast as possible. For example, I added these two black lines and one colorful line and then drag a toothpick through them.


The ‘eye’ of the butterfly is then made by layering a few colored dots on top of each other, with the white or light color second last and black last. Dots are easy to make; position your piping bag straight above the area you’d like to pipe and gently apply enough pressure so that just a dot comes out of the tip. Stop the pressure on the bag and lift it away. Take your next color and keep layering, making sure that your dots get smaller each time.


Fill in each wing or every two wings at a time.

Packaging and Storing Cookies:
Let the cookies dry for 24 hours before you package them.
If you’d like to store them in tupperware instead of packaging them, stack them with the largest cookies on the bottom and the smallest, most delicate ones near the top, and insert parchment paper between each layer. Store in a cool, dry area. I try to make mine no more than one week in advance, and advise people to eat them as soon as possible! They should be eaten within one month for sure. Some people claim they are fine even up to 3 months, however, I’m a firm believer in “the sooner, the better!”

I hope this tutorial has helped you! I welcome any questions or feedback… Have I forgotten to mention something? Do you need clarification on anything? Please ask or let me know!
If you like learning with video, you can also find me on YouTube, by clicking here.
Have fun creating!!
xo,
Marian

 For some other butterfly cookie examples see this older post here.


This was a wonderful tutorial! Thanks so much for sharing!
Excellent tutorial! Writing a good tutorial is not easy. You did a great job. And kudos to you for sharing your knowledge with the world. Beautiful cookies, too! Gotta try this some day.
kim
Thanks so much for this detailed tutorial!
Marian, thanks so much for such an excellent tutorial! You really thought of all the tiny little details that make royal icing newbies nervous. Thanks so much for this!
Susie
Wow Marian!!! Your tutorial is just FANTASTIC!!! So detailed! Thank you very much for sharing with us!!!
Love
Donatella
Marian! Thanks sooooo much for this tutorial! Way cool:)
Marian,thank you for taking the time to do this tutorial. It’ rocks but you rock harder! 🙂
THANK YOU so much for this wonderful tutorial and for sharing all your tips and tricks! If I had all the tools needed at home i would try right away but I will have to buy a few things first. I just have to give this a try and I would be thrilled if my cookies came out just half as beautiful as yours!! 🙂
I consider myself a bit of a sugar cookie addict, baking and eating, but I loved reading your tips. I have never seen the 10 second rule except when applied to cookies that fall to the floor! Really a great site, and you are very talented, thanks for sharing!
Marian, thank you so much! This is exactly what I’ve been needing – and it’s so generous of you to share your knowledge with us. Now I can’t wait to get started…
Marian ~ Thank you so much for doing this for us! your butterfly’s are beautiful!! I so look forward to your new post – you never disappoint!!
Yet again, absolutely perfect! You truly are the best!
Thank you SOOO much Marian!! This tutorial is amazing!! All of us can use such GREAT tutorials!
PLEASE, PLEASE keep them coming!!!
Thank you again SOOOO much!,
Lauri
How long do you let the outlines dry or harden before you flood them?
Your butterflies are lovely, I look forward to trying something like this.
love, love , love this…thank you marian for all your hard work getting this up. It will be worth it for you in the future. We need you!!! Will upload pics if I can figure out how as soon as I am done with my “onsie” baby shower cookies. You are the best.
Marian,
You are BRILLIANT! Thanks for sharing your time and talent with us all. I wouldn’t want to make cookies with anyone else! ^_^
Thank you so much everyone! :love:
Talia, I let my outlines dry for a minimum of 15 minutes, unless they’re darker colours like black or red. I let those sit for about 24 hours because I want them to be 100% completely dry to avoid bleeding.
Also, if you don’t like the outline look, you don’t have to do them. You can just outline and flood in right away. Just be careful with your edges so that you don’t overfill. Good luck and have fun!
Your cookies look so beautiful…almost like stained glass. I have vowed to do more cookie decorating (as opposed to just the baking and eating) when my kids are a little older. I find it to be therapeutic, (only not when someone is calling me from the other room! 🙂 )
I found you on TasteSpotting and am writing to say that if you have any photos that aren’t accepted there, I’d love to publish them. Visit my new site (below), it’s a lot of fun! I hope you will consider it.
Best,
Casey
http://www.tastestopping.wordpress.com
I have been waiting for you to do this tutorial i just love your butterfly cookies they are so pretty thanx!
Your website is one I just can’t seem to take my eyes off of! Love it all! Pure talent you have!
Can you email me at the above email address as I can’t seem to find yours in your profile you said I am the YEAH lucky winner of the Planet Cake book. So awesome!!
Yes!!! I have been waiting for a tutorial! Thank you so much for making one! I’m really quite excited about this 🙂 I can’t wait to bake some cookies, though I already know mine won’t be as beautiful as yours. Those butterflies are truly stunning… you make the most perfect cookies I’ve ever seen.
Dear Marian
I enjoyed reading your very comprehensive tutorial and will definitely try your method diligently. One question: Will the black icing bleed into the colored ones in the wings if I use light corn syrup base icing? Am still experimenting with colorflow, etc
Thanks
Angela
Thanks for your comments everyone! :blush:
Angela, funny enough, I’ve just recently starting playing around with corn syrup and royal icing… I haven’t experimented enough to be able to answer your question – sorry! I’d love to hear about your results if you try it.
Thanks!
Marian
OH WOW!
LIKE, ONLY THE BEST TUTORIAL EVER!
Marian, really you are amazing. Thanks so much for this tutorial.
It’s covered everything from a-z about decorating with royal icing.
I can’t thank you enough for this post!
I have a question though!
Where I live, it’s really humid.
Usually if we leave cookies out for too long, it gets kind of soft in texture.
I wonder, if we keeping it in a container will work as well?
Or… how can I get around this problem?
Thanks.
🙂
I wonder, if keeping it in an air-tight container will work as well*
Ping, you are the sweetest… Hardly the best tutorial out there!
Humidity is one of the trickiest problems with decorated royal icing cookies. I think your air-tight container suggestion is great! I’d suggest that the environment you work in is climate-controlled if possible (air condidioning)… Decorate and package them in the least amount of humidity possible and then keep them in the container until the very last moment, and of course, put them away before they get too soft.
Obviously that’s not much help in terms of new info. :S Would love to more if anyone’s got any other ideas.
Humidity is only a problem for me about 2 months of the year… I avoid black and white in combination for those days!
Have fun decorating, and would love to hear how it went for you!
xo,
Marian
Love these! Sure hope you will be posting more cookie tutorials! Great Job! So creative!
Janet
Hi Marian,
Well I have searched for weeks for a tutorial like this one as I am new…. far the best!!!
I have a question.
I want to make these for our school fete in 5 weeks. Can you make them ahead of time. Is it sugar cookies, could you freeze the cooked cookies and then ice them. Any hints to help me organise my time would be great as I am coordinating this years cake stall and I am making alot of stuff but not so familar with decorating cookies.
Thanks in advance Tracey (a big fan!)
Thanks for the comments Janet and Tracey!
Tracey, you can make the cookies now and freeze them. Just store them in tupperware between sheets of parchment so they don’t stick to eachother. Take them out of the freezer 24 hours in advance and thaw them in the refridgerator. Then have fun decorating!
I don’t advise decorating and then freezing them… Some people like to do that, but I find that the moisture in the freezer and fridge affect the royal icing and bleeding etc. tends to happen.
Hope that helps and have fun decorating!
Marian =)
Def need some milk with those cookies!
This was a great tutorial. Thanks! I wish I had had this before I tried my first attempt at the butterfly cookies. You really covered so many helpful little tips. I am making baby shower buggies and bibs soon so will use your helpful hints. One question. Maybe I need to read it again but when you use your glasses to hold up your bags; you put a damp cloth in the bottom of the glass then said you put a clean/empty bag in folding the edge of the bag over the cup, is that just your bag your are filling with frosting or is that an empty one for some other purpose?
Thanks! Summer.
Thanks for the comments Danica and Summer! 😉
Summer, I’ll go back and fix that paragraph to make it clearer, but yes, I fold the edge of the bag over the cup and then fill that bag with icing.
Good luck with the cookie decorating; I’d love to hear how the experience went!
EXCELLENT photography!! I almost never say anything about something I found just because (I was really looking for some real butterflies examples), but your tutorial was just exquisite! Not only because the cookies looks adorable, but because all your pics are really nice done and designed.
Congrats, stranger! thousands of claps for ya!
p.s.: you will excuse my english
Thanks for the great tutorial. I decorate cookie too, though long research in book and internet. You gave alot of useful tips. I should have find your website sooner! :). Btw, for ‘2nd’ layer effect, how long do you let the 1st layer dry up before added 2nd layer icing?
Thanks Corina and Shinni!
Shinni, I usually let my layer dry for 24 hours to make sure that the icing is completely dry, and no bleeding of colors will occur. Especially if it’s a deeper, darker color such as black, red, brown etc.
If you’re pressed for time though, you could wait 4-5 hours and then add your next layer. It’s a bit riskier, especially again if you’re using darker colors, but can still work out. I don’t advise it if you live in a humid climate though.
Hope that helps!
Wow! Thank you for posting this brilliant tutorial. I’ve been admiring pictures of your work and that of others (Hello Naomi, Nevipie…) on flickr and wanted to try something modest. This has given me the kick I needed to have a go. It might be a while before I’m attempting any Swallowtails though!! Big fan. x
Hi! Thank you for this very detailed tutorial!
I just have a question.. when leaving your royal icing 24h to be sure that the color is still what you want, do you keep the icing in the fridge or at room temperature?
Thanks again! 🙂
Question? I am a little confused when you talk about colors bleeding. So how is it that in this example..you are adding other colors to wet icing and they will not bleed? In making the eyes and also the colors that are dragged with the toothpick.
Hi Mari,
When you add one wet icing to another, they merge together, or the top one sinks into the bottom one. Just to make sure I’m explaining myself well, that’s not called bleeding.
When colors bleed they look like the brown seeping into the yellow on this butterfly here.
You can find my top 7 tops for helping prevent bleeding here.
Hope that helps! If you have more questions leave me a comment and I’ll try my best to answer. 🙂
Thank you so much for responding so quick. I totally undrstand what you mean by bleeding. And in order to avoid that you have to let one color complety dry before adding the other…correct? However, on the example of the eyes for the butterfly….two colors are being added before any are dry at all. Why is it that the colors do not bleed in this case? Sorry, not trying to make this complicated. I just want to fully understand it. Thank you.
Mari, no worries, I think the most important thing for you to know is that you do not need to let the icing completely dry before you add the next layer (in order to prevent bleeding).
You can definitely add two or more colors together without bleeding happening.
The biggest problem is humidity/moisture in the air. For example, right after doing my butterfly ‘eyes’ they will look fine. But if they are in a humid room, as they dry that bleeding will happen. You don’t usually see it happen right away; perhaps a few hours later.
Hope that helps! Please don’t hesitate to ask if you have any more questions or need clarification!
Thanks so much for the tutorial! This is my first time using royal icing and using this swirly technique. So cute! I incorporated your idea for a baby shower I just did:
http://bootyandbrains.blogspot.com/2009/10/for-love-of-cupcakes.html
Jen, cute cookies! I just checked out your site. I’m so glad the tutorial helped. 🙂
Marian, what about when doing cookies with edible images. I am working on a 400 qty order and I found out the hard way when 80 cookies were ruined. I guess I ended up bagging them too soon and the images started to bleed and also got stuck to the bags. I read after the fact that we have to wait about 24 hours on these also. Any advise as how to shorten the time of wait. Maybe the consistency of the icing? I didn’t do a flow, I just spread enough to be able to stick the image on there.
Hi there,
I just wanted to say THANK YOU for this amazing tutorial and recipe and tips. I’ve recently become interested in cookie decorating again after a long time and this web site is an incredible resource.
I also have a question. Do you know of any way to make cookies dry shiny instead of dull? I am using Antonia74’s recipe for my royal icing and I LOVE IT for its consistency and stability but I would love for my cookies to look as glossy when they dry as when they are wet.
All the best and thank you again!
Holly
Thanks Holly!
That’s another one on my list of ‘to do’ experiments, but I have heard that some people add clear corn syrup or liquid glucose to help make the icing somewhat shiny. I’m not sure it will ever be as shiny as it is when wet, but apparently those can help.
I’ve also heard that some people use a hair dryer over their cookies for a few minutes to help add shine, I’m a bit dubious about that one though… My guess is that the warm air actually melts the surface of the royal icing a bit, thereby making it liquidy and wet again. I could be wrong though and would love to hear if anyone knows differently!
Another option, although not exactly the effect you’re looking for is this lustre spray It creates this pearlized, shiny look. My cookies here and here have some on them.
Hope that helps!